
Owner Manual


9
3
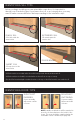
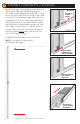
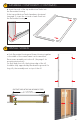
SECURE SCREEN (CONTINUED)
c. Drive Sill Screws
approximately 4” from either
end, and 4” to the left and
right of center.
#6 x 3/4”
Sill Screws
Qty: 4
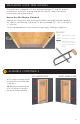
4
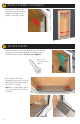
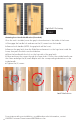
VERIFY LATCH ALIGNMENT
a. Pull the Slider Bar closed to verify the Latch and Latch
Hook align properly.
Using a hand screwdriver, the Latch Hook can be adjusted
up or down to make the latching lock more secure.
TIP: The Latch Hook comes pre-installed and will face
either up or down depending on the chosen Screen
Housing orientation (see page 5). If you prefer to operate
the screen by always pushing either down or up and, that
is not the current operation, remove the two screws that
hold the Latch Hook, turn the Latch Hook in the opposite
direction and then reinstall the screws and adjust the
latch hook as needed.
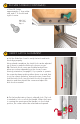
b. On the handle interior, there is a Handle Lock. The Lock
is swiveled to lock or unlock the Handle. When the Screen
is covering the opening and the Handle is in the locked
position, the screen cannot be unlatched and opened.
UNLOCK
LOCK