
User manual

www.lascarelectronics.com
This Help Guide refers to the EasyLog USB Data Loggers
Issue 1_06-2016
Page 3 of 24
EASYLOG SOFTWARE GUIDE
If the data logger does not feature a battery, then consult the data logger’s technical datasheet for the
correct and safe method to power that data logger.
If a low battery warning appears on-screen while using EasyLog USB, then replace or re-charge the battery
(depending on the battery type fitted) before starting a new data logging exercise.
Plug the data logger into a free USB port
Insert the data logger into a free USB port on your PC. The computer will automatically detect the presence
of the data logger and start the hardware installation process.
3. Software Quick Start Guide
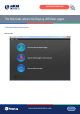
Starting the EasyLog USB Software
Double-click the EasyLog USB icon on the desktop to launch the control software. You will be presented
with three round buttons on the main screen. Click on the green button to set up and start the data logger
and complete the following procedure.
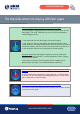
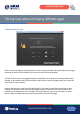
Note: A data logger may already contain readings that have not been downloaded, in which case
you will receive a warning message. If this is sample data in a new data logger then click on OK to
continue, else click on Cancel and then click on the red button to download the readings to the PC.
Then click on the green button again to set up and start the data logger.
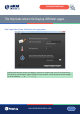
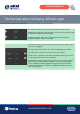
Data Logger Name, Scale, Calibration and Logging Rate
- enter the Logger Name
- select the required Scale and configure any other options
- select the Logging Rate
- click on Next