
Clock User Manual

LTRx-512 User’s Guide
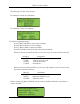
Enter your password (#0#), then press [#][9][#]. You will see a display similar to the
following:
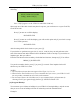
SELECT SYNCH CLOCKS
CLK[1] &/OR CLK[2]
Note: CLK[2] appears on the LTR8-512 and LTR8-512M only
Since only one of the clock circuits may have lost power, you can choose to re-sync CLOCK1,
CLOCK2 or both.
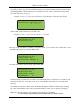
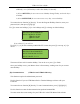
Press [1] to turn on or off this display:
ADVANCE CLK1
Press [2] to turn on or off this display (you will see this option only if your clock is setup
for 2 Clock Systems.):
ADVANCE CLK2
After choosing which clock circuits to sync, press [#].
If your clocks are synchronous types (01, 03, 06, 18, 19 & 22), they can only advance to the
start of the nearest hour and will then wait for the Master Clock to catch up. If your clocks are
impulse types, then you will see
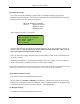
Enter the time shown on the secondary clocks that have lost time, then press [#]. You will see
PRESS [#] TO EXECUTE
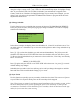
To sync the secondary clocks, press [#], or press [*] to cancel. Your impulse clocks will
advance to your LTRx-512’s time
NOTES:
1. The Clock Sync function does not support Clock Types 14, 15 or 24
2. When a Power-On Clock Recovery or user-initiated clock sync occurs, your LTRx-512 will
not accept other commands to start clock synchronization
3. You can cancel Power-On Clock Recovery or user-initiated clock synchronization by
choosing Clock Types again through function [2]=SELECT CLOCK CTL.
[A]=Program Holidays
You can enter up to 16 dates as holidays in your LTRx-512. During holidays, only the events
that you set to occur on holidays will turn on when they reach the scheduled time.
Examples:
15