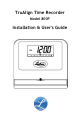
TruAlign Time Recorder Model 800P Installation & User's Guide
This device complies with Part 15 of the FCC Rules. Operation is subject to the following two conditions: (1) this device may not cause harmful interference, and (2) this device must accept any interference received, including interference that may cause undesired operation. WARNING: Changes or modifications to this product not expressly approved by the party responsible for compliance could void the user’s authority to operate this equipment.
Table of Contents Introduction .............................................................. 5 Features................................................................... 5 Caution .................................................................... 6 About this Manual ....................................................... 6 Optional Accessories .................................................... 6 Packing Contents ........................................................
800P TruAlign Time Recorder User Guide Introduction Thank you for purchasing our time recorder. For safe and proper operation, please carefully read this manual before using the time recorder and save it for reference. Lathem’s 800P TruAlign Time Recorder is a maintenance-free employee time recorder that uses no ink, ribbon or toner and operates without any loud impact noise to disturb the working environment.
800P TruAlign Time Recorder User Guide Caution Avoid placing the time recorder in environments that are: humid dusty exposed to direct sunlight subject to frequent or continuous vibrations affected by chemicals or ozone outside the temperature range between +25°F and 113°F Place the time recorder close to a wall outlet so that it is easy to disconnect. Do not put a heavy object on the time recorder, or forcefully press the time recorder onto the back-plate.
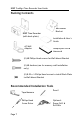
800P TruAlign Time Recorder User Guide Packing Contents 800P Time Recorder (with back-plate) AC Wall Adapter Wall-Mount Bracket Installation & User’s Guide Sample pack of E8 timecards (2) #8 Philips Head screws for Wall-Mount Bracket (2) #8 Anchors (use for masonry wall installation only) (2) 8-32 x ¼ Philips Head screws to install Back-Plate to Wall-Mount Bracket Recommended Installation Tools Tape Measure Philips Head Screw Driver Page 7 Pencil OptionalPower Drill & Drill Bits
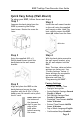
800P TruAlign Time Recorder User Guide Quick Easy Setup (Wall Mount) To setup your 800P, follow these next steps: Step 1 Separate the back-plate from the 800P by removing the Philips head screw. Retain the screw for later. Step 2 Install the wall-mount bracket to the wall using the supplied wall-mount screws. Note: For best visibility mount the 800P about 48 inches from the floor.
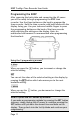
00P TruAlign Time Recorder User Guide Quick Easy Setup (Table Top Mount) To setup your 800P, follow these next steps: Step 1 Separate the back-plate from the 800P by removing the Philips head screw. Retain the Philips head screw for later. Step 2 Plug the AC adapter into the 800P and then plug the wall adapter into the AC outlet. Step 3 Secure the back-plate to the 800P with the Philips head screw being careful not to pinch the AC cord.
800P TruAlign Time Recorder User Guide Setup To set up your 800Ptime recorder, follow these next steps: Remove the Back-Plate Separate the back-plate from the time recorder by removing the Philips head screw. Retain the Philips head screw for later. Connect the AC Power Plug the AC adapter into the time recorder and then plug the wall adapter into the AC outlet. NOTE: The time recorder has an internal battery that will retain the programming if the time recorder is unplugged from AC power.
800P TruAlign Time Recorder User Guide Programming the 800P After removing the back-plate and connecting the AC power you will be ready to begin programming the 800P time recorder. Use the three buttons on the back to program the time recorder. Hold the time recorder with both hands with the display facing you. Use your index and middle fingers to press the programming buttons on the back of the time recorder while watching the settings on the display.
800P TruAlign Time Recorder User Guide Setting the Time To enter the ‘Time Set Up Mode’, press the buttons at the same time. + and SET The blue light will turn off and the display will show the hours and minutes, release the + and SET buttons. Press the + button to move the time forward or press the button to move the time backwards. To move quickly through the time, press and hold down the + or - button. Holding down either button will increase how quickly you scroll through the time.
800P TruAlign Time Recorder User Guide Setting the Date and Other Functions To enter the ‘Setup Mode’, press the the same time. - and SET buttons at Release the buttons, the blue light will turn off, the ‘Set Month’ function (1) will display. Press the + or - buttons to change the value of the settings. The + button moves you forward and the - button moves you backwards through the available selections. When you have the desired setting on the display, press the SET button.
800P TruAlign Time Recorder User Guide Set up Functions The set up functions of the time recorder are in sequential order from 1 through 15. When in the ‘Setup Mode’ you must pass through each function even if you only need to change a single setting. Simply press the SET button to accept the settings that you do not wish to change. Note: If you do not pass through each setting your time recorder may not be configured as you desired.
800P TruAlign Time Recorder User Guide Function 1 – Set Month When prompted to set the month, use the + button to scroll forward or the - button to scroll backwards. With the desired month showing on the display, press the SET button. The ‘Set Date’ function (2) will display next. Example: Set the month from 01 to 10 Function # Month Step 1 1:01 Press the or shows ‘10’. - button until the display Step 2 1:10 Press the SET button when the month is correct.
800P TruAlign Time Recorder User Guide Function 2 – Set Date When prompted to set the date, use the + button to scroll forward or the - button to scroll backwards. With the desired date showing on the display, press the SET button. The ‘Set Year’ function (3) will display next. Note: If setting the date in February make sure you set the date correctly, for example leap year has 29 days, otherwise the daylight savings may not activate correctly.
800P TruAlign Time Recorder User Guide Function 3 – Set Year When prompted to set the year, use the + button to scroll forward or the - button to scroll backwards. With the desired year showing on the display, press the SET button. The ‘Set DST’ function (4) will display next. Example: Set the year from 01 to 09 Function # Year Step 1 3:01 3:09 Press the or shows ‘09’. - button until the display Step 2 Press the SET button when the year is correct.
800P TruAlign Time Recorder User Guide Function 4 – Change Factory Default Daylight Savings This function allows you to change or modify the factory default daylight savings settings. The daylight savings setting are set at the factory for the Second Sunday in March and the First Sunday in November. Most customers should use the factory settings for daylight savings. The daylight savings setting are set at the factory for the Second Sunday in March and the First Sunday in November.
800P TruAlign Time Recorder User Guide Function 9 – Set 12/24 Hr Display When prompted to select the format for how hours show on the display, use the + button to scroll forward or the - button to scroll backwards. With the desired format showing on the display, press the SET button. The ‘Set 12/24 Hr Print’ function (10) will display next.
800P TruAlign Time Recorder User Guide Function 10 – Set 12/24 Hr Print When prompted to select the format for how hours will print on the timecard, use the + button to scroll forward or the button to scroll backwards. With the desired format showing on the display, press the SET button. The ‘Set Print Minute Format’ function (11) will display next.
800P TruAlign Time Recorder User Guide Function 11 – Set Print Minute Format When prompted to select the format for how minutes will print on the timecard, use the + button to scroll forward or the button to scroll backwards. With the desired format showing on the display, press the SET button. The ‘Set Day Print Language’ function (12) will display next.
800P TruAlign Time Recorder User Guide Function 12 – Set Day Print Language When prompted to select the language the day of the week will print on the timecard, use the + button to scroll forward or the - button to scroll backwards. With the desired language showing on the display, press the SET button. The ‘Set Print Intensity’ function (13) will display next.
800P TruAlign Time Recorder User Guide Function 13 – Set Print Intensity When prompted to select the intensity of the imprint on the timecard, press the SET button to accept the factory setting. The ‘Confirmation Beep Disable/Enable’ function (14) will display next. Note: Normally you would press the SET button to by pass the Set Print Intensity function.
800P TruAlign Time Recorder User Guide Function 14 – Confirmation Beep Disable/Enable When prompted to select whether the confirmation beep will sound or will be disabled, use the + button to scroll forward or the - button to scroll backwards. With the desired setting showing on the display, press the SET button. The ‘TruAlign Calibration’ function (15) will display next.
800P TruAlign Time Recorder User Guide Function 15 – TruAlign Calibration / Print Head Test When prompted to activate the TruAlign Calibration / Print Head Test, press the SET button to accept the factory setting. After pressing the SET button the time recorder will go to the normal time/date display and will be operational. Note: Normally you would press the SET button to by pass the TruAlign calibration function.
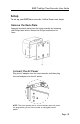
800P TruAlign Time Recorder User Guide Wall Mount Select a site to install the 800P time recorder that will be convenient to employees clocking In and Out. The 800P time recorder can be mounted directly to a wall. When deciding where the time recorder will be installed, keep in mind that 115VAC power outlet should be within 6 feet of the mounting location.
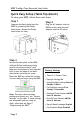
800P TruAlign Time Recorder User Guide Wall Step 3 Using the supplied 6/32 x 3/8 Philips head screws install the back-plate to the wall-mount bracket. Wall Step 4 With the back-plate secured to the wall-mount bracket, plug the AC wall adapter into the time recorder. Align and place the time recorder on the back-plate and secure the two together with the 832 x ¼ Philips head screw, being careful not to pinch the AC cord. Plug the wall adapter into the AC outlet.
800P TruAlign Time Recorder User Guide Using the Time Recorder Front View AM/PM Indicator Display Daylight Savings Indicator Timecard shelf Day of Week Indicator TruAlign LED Guide The employee places the long edge of the timecard on the timecard shelf of the 800P and aligns the timecard to the cell to be printed. When the timecard is aligned correctly an automatic imprint with the day and time will be recorded on the timecard.
800P TruAlign Time Recorder User Guide Appendix A - Changing the Print Intensity How to change the print intensity on the timecard If the imprint on the timecard is getting faint you may wish to increase the print intensity setting from the factory setting of 5. See the instructions below. Enter the ‘Setup Mode’. See Page 13. Press the SET button until you get to Function 13 Use the + button to scroll through and set the desired print intensity level.
800P TruAlign Time Recorder User Guide Appendix B - Calibrating the TruAlign Function The time recorder was calibrated at the factory but with the passage of time or shifts in temperature you may find it necessary to recalibrate the time recorder. When should I calibrate the TruAlign function for the timecard? Recalibration may be needed if you insert a timecard in the time recorder and the blue LED changes to green when the timecard is not aligned correctly.
800P TruAlign Time Recorder User Guide Function # 15: TruAlign Calibration Press the or - button until the display shows ‘1’. Selecting ‘1’ activates the TruAlign calibration mode. Press the SET button. 1 The display will show ‘CAL 1’, insert and visually align a timecard, see Figure 1. CAL1 With the timecard fully inserted and properly aligned, press and hold the button to register the alignment. Note the value showing on the display.
800P TruAlign Time Recorder User Guide CAL2 With the display showing ‘CAL 2’, insert and intentionally misalign the timecard, see Figure 2. With the timecard fully inserted and misaligned, press and hold the - button to register the alignment. Note the value showing on the display. Shift the card slightly left and right, the value will increase or decrease. End When the display is at the highest value, release the - button, the display will show ‘END’. Remove the timecard.
800P TruAlign Time Recorder User Guide Appendix C - Testing the Print Head When should I run the test on the print head? If you notice that the imprint on the timecard appears to be missing segments, you can test the print head to make sure it is working correctly. To test the print head, see the instructions below. Enter the ‘Setup Mode’. See Page 13.
800P TruAlign Time Recorder User Guide Appendix D - Changing the dates for Daylight Savings By default, daylight saving time is factory set for the second Sunday in March and the first Sunday in November. To change the factory set daylight savings dates, see the instructions below. Enter the ‘Setup Mode’. See Page 13. Press the SET button until you get to Function 4. + or - button until the display shows ‘Y’. Then press the SET button to go to Function 5.
800P TruAlign Time Recorder User Guide Appendix E - Disable Daylight Savings Correction By default, daylight saving time is factory set for the second Sunday in March and the first Sunday in November. If you are located in an area that does not recognize daylight saving time, you can disable the automatic correction. To disable the daylight savings correction, see the instructions below. Enter the ‘Setup Mode’. See Page 13. Press the SET button until you get to Function 4.
800P TruAlign Time Recorder User Guide FREQUENTLY ASKED QUESTIONS Why will the 800P not power up? Why will nothing print on the timecard when it is inserted in the 800P? Why is the 800P printing on the timecard when it is not aligned in the timecard cell? When I press the SET button to accept a setting the display shows “Err #”. (# = the function number you are currently configuring.
800P TruAlign Time Recorder User Guide SPECIFICATIONS Dimensions ...............5 1/3 " H x 6" W x 3" D 13.5cm H x 15.2cm W x 7.6cm D Weight ....................5.0 lbs (2.3 kg) Display ....................LCD Housing ...................Electro-Galvanized Steel with PowderPaint Coating Line Power ...............120vAC, 80mA typical 220vAC, 80mA typical 50 / 60 Hz Memory ...................BR2325 Coin-Cell Lithium Battery (change the battery every 7 yearsrecommendation) Environment .............
800P TruAlign Time Recorder User Guide MINUTE CONVERSION CHART Minutes to 1/100s of Hour Minutes Decimal Hrs Minutes Decimal Hrs Minutes Decimal Hrs 1 .01 21 .35 41 .68 2 .03 22 .36 42 .70 3 .05 23 .38 43 .71 4 .06 24 .40 44 .73 5 .08 25 .41 45 .75 6 .10 26 .43 46 .76 7 .11 27 .45 47 .78 8 .13 28 .46 48 .80 9 .15 29 .48 49 .81 10 .16 30 .50 50 .83 11 .18 31 .51 51 .85 12 .20 32 .53 52 .86 13 .21 33 .55 53 .88 14 .23 34 .
800P TruAlign Time Recorder User Guide WARRANTY Limited One-Year Limited Warranty Lathem warrants the hardware products described in this guide against defects in material and workmanship for a period of one year from date of original purchase from Lathem or from an authorized Lathem reseller. The conditions of this warranty and the extent of the responsibility of Lathem Time Corporation (“Lathem”) under this warranty are listed below. 1.
800P TruAlign Time Recorder User Guide A Accessories, 6 C Caution, 6 Changing the dates for Daylight Savings, 34 Changing the Print Intensity, 29 Confirmation Beep Disable/Enable, 24 D Daylight Savings Settings, 18 Disable Daylight Savings Correction, 35 F Factory Settings, 13 Features, 5 Frequently Asked Questions, 36 I Installation Tools, 7 Introduction, 5 M Minute Conversion Chart, 38 Mounting to a Wall, 26 P Packing Contents, 7 Print Head Test, 25 Print Intensity, 23 Program the Time Recorder, 1