
Asembly & Installation Instructions
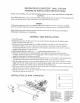

11.CEILING ANCHOR
12.DRILLEC HOLES
13.KEY HOLE
S
L
OTS
14.FIXTURE BODY
15.ANCHOR SCREW
16.CAP NUTS
17.ACRYLIC LENS
18.END CAP
19.SCREW
1.0UTLET BOX
2.BLACK SUPPLY WIRE
3.BLACK FIXTURE
WIRE
4.WHITE
SUPPLY WIRE
S.WHITE FIXTURE WIRE
6.WIRE CONNECTOR
7.FIXTURE
GROUND WIRE
8.SCREW
9.MOUNTING PLATE
IN
S
TA
L
LATION IS NOW COMPLETED.
l
.Turn
off the
power.
2.Remove
the
one
screw
(19)
from
one
of
the
end
caps
(18).
Remove
the end
caps
(18)
and
the
acrylic
lens
(17)
from
the
fixture body
(14)
.
3.Position
your fixture
o
v
er
the
outlet box (]
).
Mark
the
l
ocation
of
the
four
key
h
ole
s
lots(l
3)located
on
the
fixture
body(l 4)
.Be
sure to
mark
only
t
he
narrow
parts
of
the
key
hole slots(l3).
Remove
the
fixture
body(l4)
from
the
wall
.Dri
ll
the
four
holes using
the
appropriately sized
drill
bit. Insert
the
provided ceiling anchors
(11)
into
the
holes.
4.Install
mounting
plate(9)
to
outlet
box
(
1
) in
ceiling
using
mounting
screws
C
l
O
)
.
5.Secure
the
two
screws(8)
to
the
mounting
plate(9).
You
should
leave
the proper
length
of
t
he
two
screws(8)
beyond
the surface of the
mounting
plate(9)
to
ensure enough t
h
read
is
available
to
properly
mount
the
fixture
body(l
4) with the
cap
nuts(l
6).
6.
Position
fixture
body(14)
over mounting
plate(9) and
align
holes
in
fixture
body(l4)
with
mounting
screws.
With
thread
protruding
through
fixture
body(l 4)
surface,
thread
and
secure
both
cap
nuts(l6)
.
7.Make
the
wiring
connections:
connect
the
fixture
ground
wire
(7)
to
the
out
l
et
box(l)
;connect
the
white
supply
wire
(4) to
the
white
fixture wire(5)
;
connect
the
black
supply
wirc(2)
to
t
h
e
black
fixture wire(3)
using wire
connectors
(6).
Carefully
tuck
ail
wires
back
into
the
outlet
box
(
1)
.
8.Feed
the four
anchor
s
c
r
ews(15)
through
the narrow
part
of slots
(13).
Tighten
the
anchor screws(l5)
into
the
wall
until
the fixture body(l4)
is
flush
with
wall.
9.Place
the
acrylic
lens
(l
7)
over
the fixture
body(l
4).
Replace end
caps
(18)
onto
the
fixture
body(l4),
and
secure
it
using
th
e
one
screw(
19).
ASSEMBLY AND
INSTAL
LA
TION
Remove
the
fixture and
the
mounting
package
from
the
box and
make
sure
that
no
parts
are
missing
by
referencing
the
illustrations
on
the
installation
.
GENERAL
All
electrical
connections
must
be
in
accordance
with
local
and
nationa
l
e
l
ectrical
code
(N.E.C)
standards.
if
you
are
unfamiliar
with
proper
electrical wiring
connections
obtain
the
services
of
a
qualified
electrician.
i
Please
read carefully
and save
this instruction
sheet, as you
may
need
them at
a
later
date
.
CAUTION
Turn
off
the main power at the
circuit
break before installing the fixture
.
in
order
to
prevent possible shock.
Please
read
carefully
and
save
these
instructions
.as
you may need
them at
a
l
ater date
.
DECORATIVE FLUORESCENT WALL FIXTURE
A
SSEMBLY& INSTALLATION
I
NSTRUCTI
O
N
S