
Installation Instructions

NOTE:ALWAY TURN POWER OFF BEFORE INSTALLING LIGHTING FIXTURES!
WARNNING-- Follow the instructions carefully to assure full compliance with N.E.C. requirements. If there are any questions, contact a
qualified electrical contractor.
CAUTION -- All glass is fragile, use care when handling glass component(s) and or lamp(s).
Wiring:
1, Split the conductors of the fixture wire about 4 inches. Be careful
not to expose any of the wire inside of the insulation.
2, Connect the fixture ground wire to the outlet box ground wire
using wirenut. Connect outlet box ground wire to mounting
plate with GREEN hex-head ground screw to tapped hole in
mounting plate marked “GND”.
3, Connect the half of the fixture wire that is white, marked, or has
a ribbed surface to the outlet box supply wire(WHITE). Connect
the other half of the fixture wire that is black, unmarked, or has a
smooth surface to the outlet box supply wire(BLACK or RED).
Use wirenuts to connect all fixture wires.
4. Spread the electrical splices so that the black wires are on one
side of the outlet box and the white wires are on the other side.
5, Slide canopy up into place against ceiling. Slide collar ring up
and thread onto collar loop to secure canopy in place.
Grounding Instruciton:
a). On fixtures where mounting plate is provide with a hole and two
raised dimples. Wrap ground wire from outlet box around green
ground screw and thread into holes.
b). On fixtures where a cupped washer is provided, attach ground
wire from outlet box under cupped washer and green ground
screw, and thread into mounting plate. If fixture is provided with
ground wire, connect fixture ground wire to outlet box ground
wire with connector after following the above steps.
NOTE: Make sure chain supports the weight of the lighting
fixture and no weight is no either supply or ground wires.
Outlet Box
Ground
Green
Ground Screw
Dimples
Fixture Ground
Wire Connector
(Not Provided)
Outlet Box Ground
Green Ground
Screw
Fixture
Ground
Cupped
Washer
a) b)
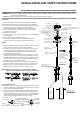
Installation:
1, Disconnect power at main electrical panel before installation.
2, Assemble mounting screws into thread holes in mounting bar.
3, Position the fixture to the desired height by adjusting the supply
wire then move the "8" buckle close to plastic bushing.
Secure locking the plastic set screw into the plastic bushing.
4, Attach mounting bar to outlet box using mounting screws
provided with outlet box.
5, Make wire connections.
6, Push the canopy to wall, carefully passing the nipple through the
mounting holes.
7. Secure the canopy to wall with swivel joint.
8. Place glass or shade in position and securely tighten the
mounting screws to hold glass or shade with the fixture.
Outlet Box
Supply Ground Wires
Mounting Bar
Mounting Screws
Steel Canopy
Description cap
Lead Stem
Supply Wire
7’ long
Ground Screws
Nipple
Wire Nut
Hexnuts
Supply Wire
Fixture Ground Wire
“8” Buckle- Lace the supply wire through
"8" buckle to safe guard the fixture
from falling.
for strain relief.
Plastic Buckle with set screw
INSTALLATION AND SAFETY INSTRUCTIONS
Optional
Fabric
Shade
Optional
Glass
(Tub&
Trangle)
Mounting Screw with
Decor--2pcs
For mounting fabric shade
Mounting Screw
with Decor--3pcs
For mounting glass
Additional
tube
order:
STEM1506
STTM1512
This nipple
place in parts
bag.
Fixture can be
converted to stem
hung with purchase
of 12" stems
(STM1512) and
6" stems (STM1506)