Assembly Instructions BENCH CAUTION: You must read this before you proceed. CAUTION : This Bench is NOT a TOY. Keep your child / children at bay in the process of assembly. For turning the bench and to prevent damage to the bench, 02 persons may be needed to execute this action.
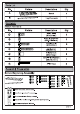
Paris Isl No. Picture Description Qty A == Bench 1 B Leg Connector 1 Haw Bench Hardware No. Picture Description Qty D mm ots 3 ? ser | ® chess | @ Emm Soda 3 ® Mammogram | 5 ® hea | @ — Allen Keys 2 Asset Preparation Before Beginning Assembly: Gum Grammy (oom Prom Somme O15 1 Gum @O {8 X Read instructions, cover fo cover, E20 5 =. Xl Have 2 adults on hand for assembly. X Do not assemble on fingering or carpet. X Assemble on a clean non-marring surface (packing foam). IIs X Save all packaging until finished.
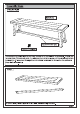
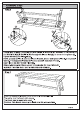
Le OVERVIEW 2 FRONT FACING Bench (A) Leg Connector (B) steps before assembly This Bench has multiple parts and may require up to 30 minutes to assemble. To give you an overview of the bench parts, the above picture is fo help you put the various parts into perspective. Please read through the instructions here below to familiarize the parts and Step 1 — Unpack and place all parts on a clean, non-marring surface.
Assembly Siege Step 2 Place the Bench (A) with the fabric face skywards onto a clean, soft surface to avoid any scratches or damages to the product. Lift legs upright in degrees until the braces are locked, as shown in the diagram. Attach the Leg Connector (B) to the Bench (A), You may need to apply a little pressure to the Bench Legs pushing outwards to position the Leg Connector(B). Using the Short Bolts(i> ) with Big Flat tighten the bolts by using the Allen Key(z: as shown in the diagram.
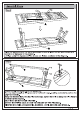
Assembly Slaps Step 4 nt Loosely affix by using Long Bolts (@ ) with Small Flat Washers (8), as shown in the picture (1) and Middle Bolts?) & Small Flat Washers(&) with Sleeve as shown in the picture (2). Tighten with using the Allen)key (7). NOW, go back to all bolts previously loosely fasten, drive in and tighten all bolts in sequential manner. This sequential manner will reduce possible distortion of frame. CAUTION II DO NOT OVER TIGHTEN. OVER TIGHTENING COULD LEAD TO DAMAGE OF THE PRODUCT.
Care & Maintenance not put hot items directly on furniture surface. not clean furniture with harsh cleansers or polish. To obtain the longest lifespan of your outdoor products, minimizing vie I exposure to direst sunlight is book bayou not write on furniture without a padded barrier to protect the surface. <> | To obtain the longest lifespan of your outdoor products, avoid extended v ww and lengthy exposure to rain, snow, and direct sunshine.