
Installation Guide


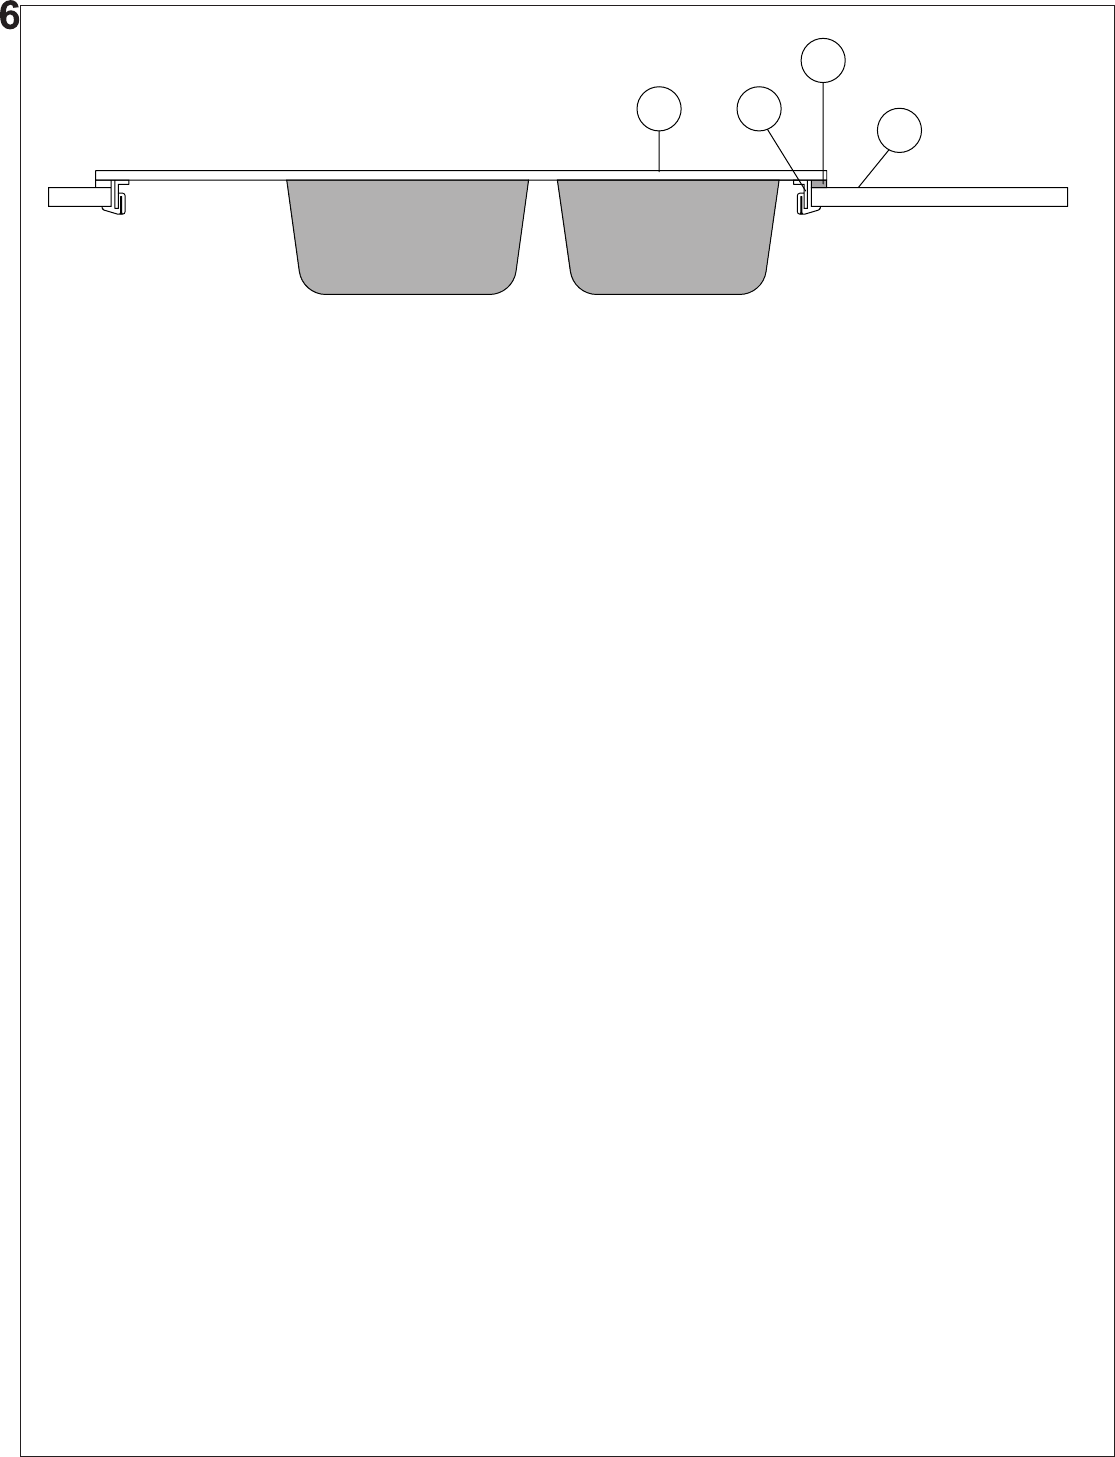
- 1 IT - GUARNIZIONE EN - SEAL FR - GARNITURE DE - DICHTUNG ES - JUNTA DE ESTANQUIEDAD RU - ПРОКЛАДКА PRC - 密封条
- 2 IT - LAVELLO EN - SINK FR - EVIER DE - SPÜLE ES - FREGADERO RU - МОЙКА PRC - 水槽
- 3 IT - PIANO TOP EN - COUNTER TOP FR - PLAN DE TRAVAIL DE - ABDECKPLATTE ES - ENCIMERA RU - ПOВЕPХНОСТЬ PRC - 台面
- 4 IT - STAFFETTA DI FISSAGGIO IDONEA PER TOP CON SPESSORE DA 30 A 40 MM. EN - MOUNTING BRACKET SUITABLE FOR WOR-
KTOP OF THICKNESS FROM 30 TO 40 MM. FR - ETRIER DE - BEFESTIGUNGSBÜGEL ES - GRAPA DE FIJACION RU - СПЕЦИАЛЬНАЯ
КРЕПЁЖНАЯ СКОБА ДЛЯ ПОВЕРХНОСТИ ТОЛЩИНОЙ ОТ 30 ДО 40 MM. PRC - 固定支架
IT - Posizionare con cura la guarnizione (1), a corredo del lavello, nel perimetro esterno dell’apertura praticata sul piano top (595x480 mm. - 770x480
mm. - 840x480 mm. - 970x480 mm. - 1140x480 mm. - 410x480 mm.- 390x480 mm. - 540x480 mm. - 740x480 mm. - 580x480 mm. - 760x480 mm. per
i lavelli rettangolari, Ø410 mm. - Ø490 mm. per i lavelli tondi e 810x810 mm. per il lavello ad angolo, a seconda del modello - per i lavelli angolari di
forma irregolare avvalersi dell’apposita dima), facendola aderire con una leggera pressione della mano lungo tutto lo sviluppo. Fissare con un giravite
a mano le staffette di ssaggio (4) nelle apposite sedi preforate del lavello. Inlare il lavello all’interno dell’apertura centrandolo adeguatamente posizio-
nandolo sopra la guarnizione (1),serrare sul piano top la parte mobile della staffetta di ssaggio, agendo sull’apposita vite, quindi rilare accuratamente
la guarnizione che deborda dal lavello.
EN - The special seal (1) should be placed carefully onto the upper surface of the counter, on the edge of the cutout. Press down on it lightly so that
it sticks to the surface (consult Figure 7 for the appropriate cutoutsizes: 595x480 mm. - 770x480 mm. - 840x480 mm. - 970x480 mm. - 1140x480 mm. -
410x480 mm. - 390x480 mm. - 540x480 mm. - 740x480 mm. for rectangular sinks, Ø410 mm. - Ø490 mm. for round sinks and 810x810 mm. for corner
sink, depending on the model – for irregular corner sinks, use the suitable sheet with the drawing). Carefully lower the sink into the cutout and onto the
seal. Fasten the mounting brackets (4) to the sink as shown, using the screws provided. Then tighten the mounting bracket with a screwdriver, making
sure that the sink is pulled down towards the counter top and compresses the seal (1).
FR - Appliquer la garniture (1), que vous trouverez dans l’emballage, dans le périmètre extérieur de l’ouverture pratiquée sur le plan de travail (770x480
mm. - 840x480 mm. - 970x480 mm. - 1140x480 mm. - 480x412 mm. pour les éviers rectangulaires, Ø415 mm. pour l’èvier rond et 810x810 mm. pour
l’èvier d’angle, selon le modèle - pour les éviers d’angle de forme irrégulière, utiliser le feuille fait exprès avec le périmètre), en la faisant adhérer avec
une légère pression de la main sur toute la surface. Fixer avec un tournevis à la main les griffes de xation (4) aux endroits prévus. Poser l’évier à
l’interieur de l’ouverture en le centrant et en le positionnant sur la garniture (1), serrer sue le plan de travail la partie mobile des griffes en agissant sur
la vis, ensuite enlever les excès qui depassent de l’évier.
DE - Legen Sie die Dichtung (1), die der Spüle beiliegt, vorsichtig auf den Außenrand der Öffnung der Abdeckplatte (je nach Modell gelten folgende
Maße: a) für rechteckige Spülen: 770 x 480 mm
- 840 x 480 mm - 970 x 480 mm - 1140 x 480 mm; b) für andere Modelle: Ø410 für die Rundspüle - 810 x 810 für das Eckmodell und für die eckigen
Spülen unregelmäißger Form benützen Sie bitte dazu bestimmte Schablone. Drücken Sie die Dichtung der ganzen Länge nach leicht fest, so dass
sie gut anliegt. Schrauben Sie miteinem Handschraubenzieher die Befestigungsbügel (4) in den vorgebohrten Löchern der Spüle fest. Geben Sie die
Spüle in die Öffnung und achten Sie dabei darauf, dass sie genau in der Mitte und auf der Dichtung (1) liegt. Schrauben Sie den beweglichen Teil des
Verbindungsbügels auf der Abdeckplatte fest, indem Sie die dafür vorgesehene Schraube festziehen. Danach schneiden Sie die Dichtung, die unter der
Spüle hervor sieht, sorgfältig zurecht
ES - Colocar con cuidado la junta de estanqueidad (1), en el perímetro externo de la abertura practicada en la encimera (770x480 mm – 840x480 mm
– 970x480 mm – 1140x480 mm – 480x412 mm para los fregaderos rectángulares, Ø415 mm para el fregadero redondo y 810x810 mm para el fregadero
de esquina, según el modelo; para los fregaderos de esquina de forma irregular servirse del diseño), haciendola adherir con una ligera presión de la
mano a lo largo del desarrollo. Fijar con un atornillador de mano las grapas de jación (4) en las partes pre-agujeradas del fregadero. Introducir el fre-
gadero en el centro del hueco centrandolo adecuadamente y posicionandolo sobre la junta de estanqueidad (1), cerrando en la encimera la parte móvil
de las grapas de jación, actuando sobre el tornillo de jación, nalmente encajar con cuidado la junta de estanqueidad que está fuera del fregadero.
RU - Аккуратно поместить прокладку (1), прилагающуюся в комплекте с мойкой, по внешнему периметру имеющегося на поверхности проёма
(770x480 мм - 840x480 мм - 970x480 мм - 1140x480 мм - 410x480 мм для прямоугольных моек, 415 мм для круглой мойки; в зависимости
от модели – для угловых моек неправильной формы необходимо использовать специальный шаблон) и, легко нажимая на неё рукой,
распределить и зажать её по всему периметру. Закрепить вручную с помощью отвёртки крепёжные скобы (4) в специальных просверленных
для этого в мойке гнёздах. Вставить мойку в проем, расположить ее строго в центре проема и установить на уплотнительную прокладку (1),
закрепить мойку фиксирующим кронштейном крепежной скобы с помощью специального винта, затем аккуратно убрать уплотнитель, который
выступает за края мойки.
PRC - 图中(1)所示的密封条应该小心地放置在台面的上表面,开口的边缘。
将其轻轻按下以便于其粘在台面表面(查阅图7所示的开口尺寸:770x480 mm. - 840x480 mm. - 970x480 mm. - 1140x480 mm. - 480x412 mm. -
580x480 mm,是针对长方形水槽;直径415mm,针对圆形水槽;810x810 mm,针对拐角水槽。开口尺寸取决于水槽的型号-对于不规则的拐角水
槽,可以运用图纸)。小心地将水槽放入开口中密封垫的上面。如图所示,用螺丝将水槽固定在固定支架上。然后用螺丝刀将固定支架固定好,确保水
槽压在台面上并压紧密封条。
MONTAGGIO DEL LAVELLO SUL PIANO TOP
EN - INSTALLING THE SINK ONTO THE COUNTER TOP FR - MONTAGE DE L’EVIER SUR LE PLAN
DE - SO WIRD DIE SPÜLE AUF DER ABDECKPLATTE MONTIERT ES - MONTAJE DEL FREGADERO SOBRE LA ENCIMERA
RU - УСТАНОВКА МОЙКИ НА ПОВЕРХНОСТЬ PRC - 在台面上安装水槽
2
4
1
3