Launch Tech Co., Ltd. Automotive Diagnosis Terminal (DBSCar III) Model No.: DS301 User Manual (V1.
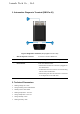
Launch Tech Co., Ltd. 1. Automotive Diagnosis Terminal (DBSCar III) Fig. 1-1 Diagnostic connector (Only applies for 12V cars) ① OBD-16 diagnostic connector To connect on vehicle’s OBD2 DLC. ② Mini USB port For connecting the USB cable to the diagnostic tool. ③ Mode indicator It has three different modes: y It illuminates red when the connector is plugged into the vehicle’s DLC. y It illuminates blue if the connector is communicating with the vehicle via Bluetooth.
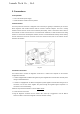
Launch Tech Co., Ltd. 3. Connections 3.1 Preparation y Turn on the vehicle power supply. y Throttle should be closed at its close position. 3.2 DLC location The DLC (Data Link Connector or Diagnostic Link Connector) is typically a standard 16 pin connector where diagnostic code readers interface with the vehicle’s on-board computer. The DLC is usually located 12 inches from the center of the instrument panel (dash), under or around the driver’s side for most vehicles.
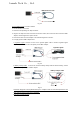
Launch Tech Co., Ltd. Fig. 3-2 For non-OBDII vehicle, proceed as follows: 1. Locate vehicle’s DLC socket. 2. Select the corresponding non-16pin connector. 3. Plug the non-16pin end of the connector into the DLC socket, then connect the other end to the OBD I adaptor, and then tighten the captive screws. 4. Connect the other end of the adaptor to the included diagnostic connector. 5. To supply power to OBD I adaptor from: A.
Launch Tech Co., Ltd. You can help protect the environment! Please remember to respect the local regulations: hand in the non-working electrical equipments to an appropriate waste disposal centre. FCC Caution: This device complies with part 15 of the FCC Rules. Operation is subject to the following two conditions: (1) This device may not cause harmful interference, and (2) this device must accept any interference received, including interference that may cause undesired operation.