Version: V1.00.001 Revised date: 2019-10-15 Statement: LAUNCH owns the complete intellectual property rights for the software used by this product. For any reverse engineering or cracking actions against the software, LAUNCH will block the use of this product and reserve the right to pursue their legal liabilities.
X-431 PROS MINI V3.0 User Manual LAUNCH Copyright Information Copyright © 2019 by LAUNCH TECH. CO., LTD. All rights reserved. No part of this publication may be reproduced, stored in a retrieval system, or transmitted in any form or by any means, electronic, mechanical, photocopying, recording or otherwise, without the prior written permission of LAUNCH. The information contained herein is designed only for the use of this unit.
X-431 PROS MINI V3.0 User Manual LAUNCH Important Safety Precautions Important: To avoid personal injury, property damage, or accidental damage to the product, read all of the information in this section before using the product. Never collide, throw, or puncture the tool, and avoid falling, extruding and bending it. Do not insert foreign objects into or place heavy objects on your device. Sensitive components inside might cause damage.
X-431 PROS MINI V3.0 User Manual LAUNCH If the VCI device remains unused for a long period of time, it is suggested to unplug the connector from vehicle’s DLC to conserve battery power. Wear an ANSI-approved eye shield when testing or repairing vehicles. The vehicle shall be tested in a well-ventilated work area, as engines produce various poisonous compounds (hydrocarbon, carbon monoxide, nitrogen oxides, etc.
X-431 PROS MINI V3.0 User Manual LAUNCH sensors can be damaged by static electricity. When reconnecting the ECU harness connector, be sure it is attached firmly, otherwise electronic elements, such as ICs inside the ECU, can be damaged.
X-431 PROS MINI V3.0 User Manual LAUNCH Contents 1 Introductions ......................................................................................... 1 1.1 Product Profile.......................................................................................... 1 1.2 Features ................................................................................................... 1 1.3 Components & Controls ........................................................................... 2 1.3.1 Display tablet .
X-431 PROS MINI V3.0 User Manual LAUNCH 5 Special (Reset) Function .................................................................... 33 5.1 Oil Reset Service ................................................................................... 34 5.2 Electronic Parking Brake Reset ............................................................. 34 5.3 Steering Angle Calibration ..................................................................... 35 5.4 ABS Bleeding .........................................
X-431 PROS MINI V3.0 User Manual LAUNCH 10.1 Synchronization.................................................................................... 56 10.1.1 Connect to PC .............................................................................. 56 10.1.2 Run on PC .................................................................................... 56 10.1.3 Install an application ..................................................................... 56 10.2 Clear Cache ..................................
X-431 PROS MINI V3.0 User Manual LAUNCH 1 Introductions 1.1 Product Profile X-431 PROS MINI V3.0 is a stylish Android-based vehicle trouble diagnostic tool. It inherits from LAUNCH’s advanced diagnosing technology and is characterized by covering a wide range of vehicles, featuring powerful functions, and providing precise test result.
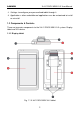
X-431 PROS MINI V3.0 User Manual LAUNCH 3. Settings: to configure your personalized tablet through it. 4. Applications: other android based applications can be customized to install or uninstall. 1.3 Components & Controls There are two main components to the X-431 PROS MINI V3.0 system: Display tablet and VCI device. 1.3.1 Display tablet Fig. 1-1 X-431 PROS MINI V3.
X-431 PROS MINI V3.0 User Manual LAUNCH 1 VCI device 2 Charging/Data I/O port 3 Microphone 4 Rear camera 5 Slot for VCI device 6 Carry strap 7 Speakers 8 LCD screen 9 POWER/Screen lock button To connect to the power adaptor/PC for charging/data exchange. For housing the VCI device. In Off mode, press it to turn the tablet on. In On mode, turn the tablet off with long press or lock screen with short press.
X-431 PROS MINI V3.0 User Manual LAUNCH 1.3.2 VCI device (Only applies to 12V cars) Fig. 1-2 VCI device 1 2 OBD-16 diagnostic connector To connect on vehicle’s OBD II DLC. It illuminates red when the VCI device is connected to the vehicle’s DLC. Mode indicator Blue indicates the VCI device is working in wireless (BT) communication mode. 1.
X-431 PROS MINI V3.0 User Manual LAUNCH LCD screen 7 inch with a resolution of 1024 x 600 pixels Camera Rear-facing 5MP camera Connectivity WLAN 802.11b/g/n BT 4.0 Working temperature 0℃ ~ 50℃ Storage temperature -20℃ ~ 70℃ VCI device: Working voltage 9 ~18V Working temperature 0℃ ~ 50℃ Relative humidity 20% ~ 90% 1.5 Package List While opening the package for the first time, please carefully check the following components.
X-431 PROS MINI V3.
X-431 PROS MINI V3.0 User Manual LAUNCH 2 Preparations 2.1 Charging the tool 1. Plug one end of the included charging cable into the charging port of the tool, and the other end to the power adaptor. 2. Connect the other end to the AC outlet. If appears on the screen, it indicates it is being charged. If the logo changes into , it indicates that the battery is fully charged. Unplug the power adaptor from the tablet. 2.
X-431 PROS MINI V3.0 User Manual LAUNCH 2.4 Tips on finger operations Single-tap: To select an item or launch a program. Double-tap: To zoom in so that the text on a webpage appears in a column that fits your device’s screen. Long press: Tap and hold on the current interface or area until a contextual menu pops up on the screen, and then release it. Slide: To jump to different pages. Drag: Tap the application icon and drop it to other location.
X-431 PROS MINI V3.0 User Manual LAUNCH 2.6 Adjust brightness Tips: Reducing the brightness of the screen is helpful to conserve the battery power. 1. On the home screen, tap Settings -> Display -> Brightness level. 2. Drag the slider to adjust it. 2.7 Set standby time If no activities are made within the defined standby period, the screen will be locked automatically and the system enters sleep mode to save power. 1. On the home screen, tap Settings -> Display -> Sleep. 2. Choose the desired sleep time.
X-431 PROS MINI V3.0 User Manual LAUNCH 3 Network Setup *Note: If you don’t need to use WLAN for a while, you can turn it off to conserve battery life. The tablet has built-in WLAN module that can be used to get online. Once you’re online, you can register your tool, surf the Internet, get apps, send email, launch the remote diagnosis, and check for software updates etc. 3.1 Connect to a WLAN network 1. On the home screen, tap Settings -> WLAN. 2.
X-431 PROS MINI V3.0 User Manual LAUNCH 4 How To Diagnose 4.1 Diagnosis Flowchart For new users, please follow the operation chart shown in Fig. 4-1 to get familiar with and start using the tool. Tap “Diagnostic” No Is Connector Activated ? Yes Tap “Login” to register Tap “Update” to update software …… (Refer to Chapter 4.2) Select vehicle Register & Activate OK Select diagnostic software version Select test function Select test system Fig. 4-1 4.
X-431 PROS MINI V3.0 User Manual LAUNCH Fig. 4-2 1. If you are a new user, tap “New Registration”. See Fig. 4-3. Fig. 4-3 Note: To obtain better service, you need to provide real information. A. Create App account: In Fig.
X-431 PROS MINI V3.0 User Manual LAUNCH Fig. 4-4 B. Activate the VCI device: In Fig. 4-4, input the Serial Number and Activation Code, which can be found in the password envelope. Product SN Product SN Activation code Fig. 4-5 Note: To exit and activate it later, tap “Skip”. In this case, you can activate your connector by tapping “Activate Connector” in “Personal Center”. For details, please refer to Chapter 9.3 Activate Connector. C.
X-431 PROS MINI V3.0 User Manual LAUNCH Fig. 4-6 To download the diagnostic software, tap “Yes” to enter the software download page. Tap “No” to download it later. Fig. 4-7 On the download page, tap “Update” to start downloading. It may take several minutes to finish it, please be patient to wait. To pause downloading, tap “Pause”. To resume it, tap “Continue”.
X-431 PROS MINI V3.0 User Manual LAUNCH Once download is complete, the system will install the software package automatically. 2. If you have registered to be a member, input your name and password, and then tap the “Login” button to enter the main menu screen directly. 3. If you forgot the password, tap “Retrieve Password”, and then follow the on-screen instructions to retrieve it. 4.2.2 Diagnostic software layout 1 2 3 Fig. 4-8 1 Tap to navigate to the Job menu. Refer to “Chapter 4.2.
X-431 PROS MINI V3.0 User Manual LAUNCH Fig. 4-9 Description Name Tradition Diagnose Configures the tablet to operate as a diagnostic tool. Remote Diagnosis This option aims to help repair shops or technicians to get the repair job fixed faster. Special Function To perform all kinds of common repair & maintenance items, including ABS bleeding, DPF regeneration, oil lamp reset etc. Software Upgrade To update vehicle diagnostic software.
X-431 PROS MINI V3.0 User Manual LAUNCH provides a brief description for the operations of the diagnostics toolbar buttons: Name Button Description Home Returns to Job menu screen. Exit To exit the diagnostic application. 4.3 Connections 4.3.1 Preparation Normal testing conditions Turn on the vehicle power supply. Vehicle battery voltage range should be 9-18 Volts. Throttle should be in a closed position.
X-431 PROS MINI V3.0 User Manual LAUNCH Fig. 4-10 4.3.3 Vehicle connection The method used to connect the VCI device to a vehicle’s DLC depends on the vehicle’s configuration as follows: A vehicle equipped with an OBD II management system supplies both communication and 12V power through a standardized DLC.
X-431 PROS MINI V3.0 User Manual LAUNCH 2. Select the corresponding non-16pin connector. 3. Plug the non-16pin end of the connector into the DLC socket, then connect the other end to the OBD I adaptor, and then tighten the captive screws. 4. Connect the other end of the adaptor to the included VCI device. 5. To supply power to OBD I adaptor from: A.
X-431 PROS MINI V3.0 User Manual LAUNCH 4.5 Start Diagnostics Tap “Tradition Diagnose” to enter the vehicle selection page. Tap a corresponding diagnostic software logo, and then follow the on-screen instruction to access the diagnostic software. Take Demo as an example to demonstrate how to diagnose a vehicle. 1. Tap “DEMO” to navigate to the version selection screen. (Note: No communication should be established for DEMO program.) Fig.
X-431 PROS MINI V3.0 User Manual LAUNCH Software introduction: Tap to check the software function list. Note: Tap to read some precautions on using the current diagnostic software. Testable models: Tap to view the vehicle models that the current diagnostic software covers. 2. Tap “Submit” to navigate to the test item selection screen. Fig. 4-15 • Health report: This function varies from vehicle to vehicle.
X-431 PROS MINI V3.0 User Manual LAUNCH the electronic control units of the vehicle and generate a detailed report about vehicle health. Tap “Health Report”, the system start scanning the ECUs and the screen displays as follows: Fig. 4-16 In Fig. 4-16, the tested system with fault code appears in red and the system with OK displays in black (normally). On-screen Buttons: Print: Tap to print the current screen.
X-431 PROS MINI V3.0 User Manual LAUNCH Fig. 4-17 On-screen Buttons: Search: Highlight a certain DTC item, and then tap it to launch the browser to search for more detailed information about the selected DTC online. Report: To save the current data in text format. Fig.
X-431 PROS MINI V3.0 User Manual LAUNCH Input the required information, and then tap “Confirm” to save it. Once you configured the information, it will be automatically generated every time you saved the diagnostic report. All vehicle and workshop information will be appended to the diagnostic report. To skip the information, tap “Skip” to go to the next step. All reports are saved under the tab “Diagnostic Report” in “My Report” from “Personal Center” menu.
X-431 PROS MINI V3.0 User Manual LAUNCH Tap the desired system to advance to the test function selection page. For detailed operations on test function, please refer to Chapter 4.5.3. 4.5.3 System Selection This option allows you manually select the test system and function step by step. In Fig. 4-15, tap “System Selection”, the screen displays as follows: Fig. 4-20 Swipe the screen from the bottom to view the vehicle system on the next page.
X-431 PROS MINI V3.0 User Manual LAUNCH Fig. 4-21 Note: Different vehicle has different diagnostic menus. A. Version Information This function is used to read the version information of system mode, vehicle VIN, software and ECU. B. Read Fault Code This function displays the detailed information of DTC records retrieved from the vehicle’s control system. *Note: Retrieving and using DTCs for troubleshooting vehicle operation is only one part of an overall diagnostic strategy.
X-431 PROS MINI V3.0 User Manual LAUNCH Fig. 4-22 On-screen Buttons: Freeze Frame: When an emission-related fault occurs, certain vehicle conditions are recorded by the on-board computer. This information is referred to as freeze frame data. Freeze frame data includes a snapshot of critical parameter values at the time the DTC is set. Help: Tap to view the help information. : Tap it to search for more information about the current DTC online. Report: To save the current data in text format.
X-431 PROS MINI V3.0 User Manual LAUNCH performing this function, please be sure the vehicle’s ignition key is in the ON position with the engine off. In Fig. 4-21, tap “Clear Fault Code”, a confirmation dialog box pops up on the screen. Tap “Yes” and the system will automatically delete the currently existing trouble code. *Note: The trouble code will not disappear until the trouble was completely cleared. D. Read Data Stream This option lets you view and capture (record) real-time Live Data.
X-431 PROS MINI V3.0 User Manual LAUNCH Fig. 4-23 On-screen Buttons: Select All: Tap it to select all items of the current page. To select certain data stream item, just check the box before the item name. Unselect: Tap it to deselect all data stream items. OK: Tap it to confirm and jump to the next step. After selecting the desired items, tap “OK” to enter the data stream reading screen. Fig. 4-24 Notes: 1.
X-431 PROS MINI V3.0 User Manual LAUNCH value, the whole line will display in red. If it complies with the reference value, it displays in blue (normal mode). 3. The indicator 1/X shown on the bottom of the screen stands for the current page/total page number. Swipe the screen from the right/left to advance/return to the next/previous page. There are 3 types of display modes available for data viewing, allowing you to view various types of parameters in the most suitable way.
X-431 PROS MINI V3.0 User Manual LAUNCH Combine: This option is mostly used in graph merge status for data comparison. In this case, different items are marked in different colors (maximum 4 items can be displayed on the same screen simultaneously). If the graph is more than one page, swipe the screen from the left to jump to the next page. Fig. 4-26 Report: To save the current data in text format. All reports are saved under the tab “Diagnostic Report” in “My Report” from “Personal Center” menu.
X-431 PROS MINI V3.0 User Manual LAUNCH Fig. 4-27 Help: Tap to view the help information. E. Actuation Test This option is used to access vehicle-specific subsystem and component tests. Available test vary by vehicle manufacturer, year, and model.
X-431 PROS MINI V3.0 User Manual LAUNCH 5 Special (Reset) Function In addition to amazing & powerful diagnostic function, the tool also features various service functions.
X-431 PROS MINI V3.0 User Manual LAUNCH Follow the instructions on the screen to operate Select “Reset” Select the service mode (The available mode varies from vehicle to vehicle) Select the desired reset item (e.g. oil lamp reset etc.) Select the car brand Fig. 5-1 5.1 Oil Reset Service This function allows you to perform reset for the engine oil life system, which calculates an optimal oil life change interval depending on the vehicle driving conditions and climate.
X-431 PROS MINI V3.0 User Manual LAUNCH 5.3 Steering Angle Calibration To reset the steering angle, first find the relative zero point position for the car to drive in straight line. Taking this position as reference, the ECU can calculate the accurate angle for left and right steering.
X-431 PROS MINI V3.0 User Manual LAUNCH after the engine is started. The diagnostic device detects the DTC P1336 'tooth not learned'. In this case, you must use the diagnostic device to perform tooth learning for the car. After tooth learning is successful, the MIL turns off. After the engine ECU, crankshaft position sensor, or crankshaft flywheel is replaced, or the DTC 'tooth not learned' is present, tooth learning must be performed. 5.
X-431 PROS MINI V3.0 User Manual LAUNCH After the ECU or injector is replaced, injector code of each cylinder must be confirmed or re-coded so that the cylinder can better identify injectors to accurately control fuel injection. 5.9 Battery Maintenance System Reset This function enables you to perform a resetting operation on the monitoring unit of vehicle battery, in which the original low battery fault information will be cleared and battery matching will be done.
X-431 PROS MINI V3.0 User Manual LAUNCH 5.11 Electronic Throttle Position Reset This function enables you to make initial settings to throttle actuators and returns the “learned” values stored on ECU to the default state. Doing so can accurately control the actions of regulating throttle (or idle engine) to adjust the amount of air intake.
X-431 PROS MINI V3.0 User Manual LAUNCH 6 Remote Diagnosis This option aims to help repair shops or technicians launch instant messaging and remote diagnosis, making the repair job getting fixed faster. Tap “Remote Diagnosis” to enter, the screen appears blank by default. 6.1 Interface layout Fig. 6-1 1 Search bar Directly input the username of the partner to start searching, and then tap the desired one to add it into your friend list.
X-431 PROS MINI V3.0 User Manual LAUNCH 6.2 Add friends Tap “Contact” to enter the contact page. By default it appears blank. In the search bar, input the partner’s username and tap “Search” button next to the search bar to starts searching from Launch’s golo business database. The partner must be the users who have registered their Launch’s diagnostic tools.
X-431 PROS MINI V3.0 User Manual LAUNCH Fig. 6-3 Tap “CONFIRM” to send your request. Once the partner receives the request, a beep will sound. Tap the “Message” tab: • Once the partner agreed your request, he/she will automatically be listed in the Contact tab. • If a technician sent you a friend request, you can tap “Agree” to confirm and his/her name will appear in the friend list (Contact). Or tap “Ignore” to ignore this request. Fig. 6-4 6.
X-431 PROS MINI V3.0 User Manual LAUNCH Fig. 6-5 Tap the input field and use the on-screen keyboard to enter the text message, and then tap “Send” to send it. Tap to send the voice message. Tap to send the emoj. Tap to call out more function options. Fig.
X-431 PROS MINI V3.0 User Manual LAUNCH Add Friend: It only appears if the user does not add the partner into the Contacts list. File: Choose diagnostic reports or local files to send. Picture: Choose screenshots or pictures to send. Remote Diagnostic: To start a remote diagnostic session. For details, refer to Chapter 6.4. Camera: Open camera to take pictures. Tap “Clear” to delete all the partner’s dialog logs. 6.
X-431 PROS MINI V3.0 User Manual LAUNCH Remote diagnosis has the same diagnostic steps as manual diagnosis. In process of remote diagnosis, tap the send a voice message. button to Once vehicle diagnosis is complete, a report will be created. Input your comments on this report, and then tap “Send Report” to send it to the partner.
X-431 PROS MINI V3.0 User Manual LAUNCH Tap “Invite remote diagnostic assistant” Choose the desired diagnostic software Wait for partner’s confirmation Start connecting after request confirmed Start Diagnosis Generate diagnostic report Cancel To cancel this operation.
X-431 PROS MINI V3.0 User Manual LAUNCH 7 Software Update This module allows you to update the diagnostic software & App and set frequently used software. If you did not download the software in process of product registration or a pop-up message prompting you that some new software can be updated, you may use this option to download it or keep it synchronized with the latest version. 7.1 Update Diagnostic Software & APP Tap “Software Update” on the Home screen to enter the update center. Fig.
X-431 PROS MINI V3.0 User Manual LAUNCH please be patient to wait. To pause downloading, tap “Stop”. To resume it, tap “Continue”. If network connection failure occurs, tap “Retry” to try again. Once download is finished, the software packages will be installed automatically. 7.2 Renew Subscription If the software subscription is due or expires, the system will prompt you to renew your subscription and a “Renew” button will appear on the bottom of the update page. Fig.
X-431 PROS MINI V3.0 User Manual LAUNCH transaction. 3. After payment, go to update center to update the diagnostic software. B. Using Subscription Renewal Card 1. Tap “Renewal” to navigate to the renewal type selection screen. 2. Select “Subscription Renewal Card”. Fig. 7-3 Fig. 7-4 3. Input the 24-digit pin code of Subscription Renewal Card and then tap “Submit” to finish the renewal. 4. Go to update center to update the diagnostic software.
X-431 PROS MINI V3.0 User Manual LAUNCH 8 Maintenance Help This option provides abundant repair case and automotive technology handbook for your reference. It mainly includes the following modules: Training video, operation skills, product manual and FAQ etc.
X-431 PROS MINI V3.0 User Manual LAUNCH 9 Personal Center This function allows users to manage your personal information, configure system settings and feedback your vehicle issues or diagnostic reports to us for analysis. 9.1 My report This option is used to view the diagnostic report generated in process of vehicle diagnosis. Additionally, delete, share operations are also supported. Fig. 9-1 Tap “My Report”, there are total 3 options available.
X-431 PROS MINI V3.0 User Manual LAUNCH listed under Diagnostic Report tab. 9.2 My connector This option is used to manage all your activated connectors. If several VCI devices are activated on this tool, a list of connectors will be displayed on the screen. Once you choose the connector that belongs to other account, you have to log out, and then input the right account to continue. 9.3 Activate connector It is used to activate your VCI device. Fig.
X-431 PROS MINI V3.0 User Manual LAUNCH 9.6 My order This item allows you to check all paid and unpaid orders. 9.7 Inquire subscription renewal card status Use this item to inquire the expiry status of the subscription renewal card of diagnostic software. Fig. 9-3 Input the 12-digit subscription renewal card number and tap “Search” to check the result. 9.8 Profile Use this item to view and configure personal information. 9.9 Change password This item allows you to modify your login password. 9.
X-431 PROS MINI V3.0 User Manual LAUNCH 9.10.2 Print information This option lets you define your print information. It mainly includes Workshop, Address, Telephone, Fax and License Plate. Fig. 9-4 After inputting, tap on “Save” to save it. Once you configured the information, it will be automatically generated every time you saved the diagnostic report. All vehicle and workshop information will be appended to the diagnostic report. 9.10.
X-431 PROS MINI V3.0 User Manual LAUNCH Fig. 9-5 A. If it is the first time you have operated this printer, please proceed the following: 2. For initial use, you are suggested to reset the printer: Press and hold [MODE] & [FEED] for 8 seconds, the following resetting command will be printed out: at + default = 1 ok at + reboot = 1 rebooting... 3. Tap “Reset” to configure the mini printer.
X-431 PROS MINI V3.0 User Manual LAUNCH Now you can use the printer to print! If the printer is not found, please reset the printer to default factory settings (refer to Step 2 for details) and check whether the current device and the printer are on the same LAN. B. If you have configured the printer to the LAN: 2. Tap “Connect to Printer”: a). If the local network remains as it is, tap “Test Print” directly to test the printing. b). If the local network changes, you have to reset the printer. 9.10.
X-431 PROS MINI V3.0 User Manual LAUNCH 10 Others 10.1 Synchronization You can transfer media files and APK between the PC and the tablet. 10.1.1 Connect to PC 1. Use the data cable to connect the tablet to your PC. 2. Swipe from the top, a message “Connected as a media device” appears. 10.1.2 Run on PC Perform the following steps: Locate the new disc. Copy the files. 10.1.3 Install an application Do the following steps: 1.
X-431 PROS MINI V3.0 User Manual LAUNCH 11 FAQ 1. How to save power? Please turn off the screen while the tablet keeps idle. Set a shorter standby time. Decrease the brightness of the screen. If WLAN connection is not required, please turn it off. Disable GPS function if GPS service is not in use. 2. Communication error with vehicle ECU? Please confirm: 1. Whether diagnostic connector is correctly connected. 2. Whether ignition switch is ON. 3.
X-431 PROS MINI V3.0 User Manual LAUNCH included password envelope, then tap “Activate”. 3. After activation completed, tap “Personal Center” -> “My Connector” to check if the activated VCI device is displayed in the connector list or not. Multiple VCI devices can be bound to one tool. If you intend to use one of the VCI devices to diagnose or test a vehicle, just switch to the corresponding VCI device. 5.
Warranty THIS WARRANTY IS EXPRESSLY LIMITED TO PERSONS WHO PURCHASE LAUNCH PRODUCTS FOR PURPOSES OF RESALE OR USE IN THE ORDINARY COURSE OF THE BUYER’S BUSINESS. LAUNCH electronic product is warranted against defects in materials and workmanship for one year from date of delivery to the user. This warranty does not cover any part that has been abused, altered, used for a purpose other than for which it was intended, or used in a manner inconsistent with instructions regarding use.
plus return freight. Send the unit pre-paid to: Attn: Customer Service Department LAUNCH TECH. CO., LTD. Launch Industrial Park, North of Wuhe Avenue, Banxuegang, Bantian, Longgang, Shenzhen, Guangdong P.R.China, 518129 Launch website: http://www. cnlaunch.com http://www.x431.com http://www.dbscar.com Statement: LAUNCH reserves the rights to make any change to product designs and specifications without notice.