
Installation Guide


38
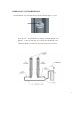
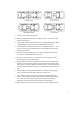
1. Position arms to drive-thru position.
2. Refer to supplied literature prior to loading vehicle. Center the vehicle
between the lift posts.
3. Only lift the vehicle on the manufacturers recommended lift points. Refer
to supplied lift points guide (reference ANSI/SAE J2184-1992).
4. Locate lift pads on auto manufacturer's recommended lift points. Once
you have correctly positioned the lift arms, ensure that all arm restraints
are properly engaged.
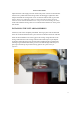
5. Raise the vehicle by pushing the "UP" button on the power pack until
the vehicle's suspension has left the ground.
6. Inspect to make sure there is no interference with any objects and for
proper engagement of the lifting pads.
7. Shake vehicle moderately by pushing on either the front or rear bumper.
Visually inspect the lifting pads again. If the vehicle starts slipping on the
lifting pads, or otherwise appears unstable on the lift, you have positioned
the swing arms and adapters incorrectly. Carefully lower the lift and start
over.
8. When satisfied, continue lift the vehicle to the desired working height,
lower onto the mechanical safety using the lowering lever.
9. Once vehicle is ready to be removed, raise lift so that the mechanical
safety can be released. Pull down and hold the mechanical safety release
lever, then press the hydraulic lowering lever until the lift has fully
collapsed to the grounds and the arm restraints are disengaged.
10. Swing the lift arms to the drive-thru position prior to moving the vehicle.