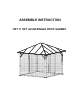
ASSEMBLE INSTRUCTION 10FT X 10FT ALUM SINGLE ROOF GAZEBO
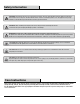
Safety Information WARNING: Keep all flame and heat sources away from this tent fabric. This tent is made with fabric that meets CPAI-84 specification for flame resistance. It is not fire proof. The fabric will burn if left in continuous contact with any flame source. The application of any foreign substance to the tent fabric may render the flame-resistance properties ineffective.
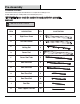
Pre-Assembly PLANNING ASSEMBLY It will take at least two people about 90 minutes to complete the assembly process. A rubber mallet and a free standing ladder are needed during the process. IMPORTANT: Please count the number for each part before assembly. PART LIST NOTE: Parts not shown to actual size. ITEM DESCRIPTION QTY.
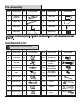
Pre-Assembly ITEM DESCRIPTION QTY. L U-Shaped Connector N ILLUSTRATION ITEM DESCRIPTION QTY. 4 V Roof Sheet 4 Support Arm 8 W Roof Sheet 4 T Roof Sheet 4 X Roof Sheet 4 U Roof Sheet 4 Y Mosquito Net 4 ILLUSTRATION Important: Do not remove the protective film from the roof sheets until you are ready to attach them to the frame in Step 13 . HARDWARE LIST NOTE: Hardware not shown to actual size. ITEM DESCRIPTION QTY. M U-Bracket O ILLUSTRATION ITEM DESCRIPTION QTY.
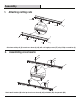
Assembly 1. Attaching netting rails EE A EE A/B EE EE C C EE B EE EE EE C EE Attach one netting rail (C) to each cross beam (A) & (B) with self-tapping screws (EE) using Philips screw driver (II). 2. Assembling cross beams BB M BB M A BB M A/B BB M BB M B Attach two U-brackets (M) to the top of each cross beam (A) & (B) with bolts (BB) using wrench (GG).
Assembly 3. Assembling cross beams A L B A B A L B BB Plug U-shaped connector (L) into each cross beam (B), using bolts (BB) loosely secure them together until the end of this step. Repeat this for cross beam (A) until complete cross beams (A) & (B) are formed. Fully tighten all the bolts (BB). 4. Erecting the main frame B A BB B A A B B A B A D D BB D BB D D Stand the corner post (D) up.
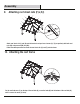
Assembly 5. Attaching support arms N N N N N N N N BB BB N N Adjust corner post (D) upright. Attach support arms (N) to cross beams (A) & (B) and corner posts (D) with bolts (BB) using wrench (GG). 6. Assembling the roof frame click! E E O E O E E E Snap one corner roof tube (E) into each receiver of the roof hub (O) until you hear a click.
Assembly 7. Attaching the roof frame E CC E D D Attach each corner roof tube (E) onto the bracket at the top pf each corner post (D) with bolts and nuts (CC) using wrench (GG). 8. Attaching roof sheet rails (F,G,H,I) H I F G G I/G I H/F F H H F R G I G I F E BB H Attach roof sheet rails (I) and (H) onto the corner roof tube (E) with washer plates (R) and bolts (BB) using wrench (GG).Do not fully tighten bolts until the end of step 15.
Assembly 9. Attaching roof sheet rails (F,G,H,I) H I F G G I F H I/G H F G I G CC I F H Attach roof sheet rails (I) and (H) onto the brackets on top of cross beams (A) / (B) respectively with bolts and nuts (CC) using wrench (GG) and (HH). Follow the above procedure to attach the roof sheet rails (G) and (F) onto the frame. 10.
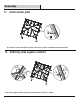
Assembly 11. Install washer plate S S S S S S G/F S S S S BB As illustrated, install washer plate (S) to roof sheet rails (F) & (G) by using bolts (BB) with wrench (GG). 12. Attaching small support crossbars K K K K K K K K K K K K K K K K K K K K R Insert small support crossbars (K) on pins of washer plate (R) and (S) as shown.
Assembly 13. Attaching roof sheets T X W U W V U V G X W W X T T V U V U W U T X Insert one piece of roof sheet (T) into the groove of roof tubes. IMPROTANT: Before insert next roof sheet (U) you should finish till the step 15. The roof sheet should insert one by one. 14. Attaching roof rim J J J J J J J J G J J J J J J J J J J J J J J As illustrated, insert one piece of roof rim (J) at the end of last assembly roof sheet (T).
Assembly 15. Attaching end cover Z AA AA AA AA AA AA Z AA AA AA Z DD AA AA Z AA AA AA AA AA AA DD Z Secure last assembly roof sheet by using corner end cover (Z) and side end cover (AA) with self-tapping screw (DD). In order not to damage inserts, do not over tighten the screws. Repeat step 13 to step 15 to finish insert all roof sheets (T) (U) (V) (W) (X). 16. Assembling mosquito net C Y D Y Y Y Hang up the mosquito net (Y) into the net hooks.
Assembly 17. Fix ground stakes D FF Use the ground stakes (FF) for ground fixing.