USE AND CARE GUIDE 1 LIGHT FLUSH MOUNT Questions, problems, missing parts? Before returning to the store, call our Customer Service THANK YOU We appreciate the trust and confidence you have placed in through the purchase of this fixture.We strive to continually create quality products designed to enhance your home.
Table of Contents Safety Information ....................................................................................................................................... 2 Warranty ...................................................................................................................................................... 2 Pre-Installation ............................................................................................................................................
Pre-Installation PLANNING INSTALLATION Read all instructions before assembly. To avoid damaging this product, assemble it on a soft, non-abrasive surface such as carpet or cardboard. Inspect each part for defects that may have occurred during shipping. Keep your receipt and these instructions for proof of purchase. NOTE: This fixture requires the use of one 120V, 60Hz, 100-Watt max, medium-base type A bulb (not included). Do not exceed the recommended wattage.
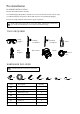
Pre-Installation (continued) PACKAGE CONTENTS A B C D Part Description Quantity A Canopy assembly 1 B Glass shade 1 C Metal cap 1 D Socket ring 1
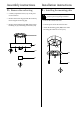
Assembly instructions Installation instructions 1. Remove the socket ring 1. Installing the mounting plate □ Carefully unpack the fixture, lay out all parts on clean surface. □ Remove the socket ring (D) from the socket by unscrewing the socket ring (D). □ Remove the mounting plate (BB) from canopy assembly (A) by unscrewing two finials (GG). CAUTION: Ensure the power is off at the main fuse box prior to beginning installation . □ Turn off the switch at the wall.
Installation instructions (continued) 2. Connecting the wires 3. Installing the fixture and bulb □ Install the fixture bare copper wire (1) under the ground screw (EE) on the mounting plate (BB). □ Push all excess wires into the outlet box. □ Connect the fixture bare copper wire (1) to the green (or bare, or green & yellow) supply ground wire (2) in the outlet box using a wire nut (AA). □ Raise the fixture to the ceiling and secure the canopy assembly (A) in place with two finials (GG).
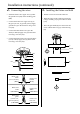
Installation instructions (continued) 4. Installing the bulb □ Prior to installing the bulb, please inspect socket for silica packet, if packet is present, remove and throw away, do not expose to children and pets. Socket □ Install one 120V, 60Hz, 100-watt max. medium-base type A bulb (not included) in the socket of the light fixture. Bulb (not included) Care and Cleaning □ Clean the light fixture with a soft, dry cloth. Do not use any cleaners with chemicals, solvents, or harsh abrasives.