
Installation Guide


One Piece ADA/Barrier Free Showers
36” ADA Gelcoat & Solid Surface Transfer Showers
60” ADA Gelcoat & Solid Surface Roll-In Showers
Installation Instructions
Review the SHOWER FRAMING DIAGRAM (Figure
12) of this manual. This illustrates a typical style shower
enclosure. The framing may be wood studs or metal studs.
When planning your enclosure, be sure to account for pit
requirements, (if applicable). The use of a pit may need to be
considered early in the construction process so the recess
may be fabricated prior to any oor slab installation.
Plan the location of the shower drain and water supply lines.
Since ADA or Barrier Free code requirements may be in
affect, certain shower units may require a specic location of
the water control valve. Plan to route the water supply lines
to account for these specic code requirements.
It is recommended when planning the framing enclosure,
to construct the width 1/4” wider than the shower you are
installing. This will provide “wiggle room” should the shower
be slightly over the width indicated in the dimensioned
product drawing. Due to the nature of the materials
involved, dimensions may vary +,- 1/2”.
Take care when measuring and constructing the framing
enclosure. Make certain the enclosure is square and plumb.
SHOWER INSTALLATION
INSTALLATION VARIABLES: DO NOT USE THIN-
SET WHEN TEMPERATURES MAY DROP BELOW
FREEZING. FREEZING CONDITIONS WILL AFFECT
ADHESION AND RESULT IN AN IMPROPER SHOWER
INSTALLATION.
These instructions apply to all units whether they are
installed directly on the oor slab or are recessed into a pit.
Note: We recommend that you conduct a demonstration
requiring all installers to participate in for the rst shower
unit installation to insure the remainder are installed
properly.
1. Carefully move the shower adjacent to the installation
area. Use care to avoid excessive exing to avoid cracking
the surface. Transport with a hand cart or carry the unit.
Never drag the shower along the ground or oor.
2. Remove protective wood strips and cardboard used for
shipping purposes.
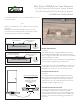
No recess necessary
installation.
Shower framing alcove
with recess or pit built
into sub-floor.
10” area around drain
recessed1/2 inch
(Minimum)
10” area around drain
recessed1/2 inch
(Minimum)
Figure 5
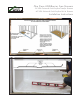
No recess necessary
installation.
Shower framing alcove
with recess or pit built
into sub-floor.
10” area around drain
recessed1/2 inch
(Minimum)
10” area around drain
recessed1/2 inch
(Minimum)
Figure 6