
Installation Guide


Multi-Piece Sectional Product
Installation Instructions
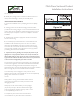
6. Apply silicone caulking around and inside each drilled hole
before installing the grab bar.
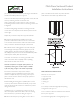
7. Take two (2) of the #10 x 2” Stainless Steel screws. By hand,
start one mounting screw in each end of the bar into the wall.
8. Use a power drill with a Phillips drill bit to fully install these
mounting screws.
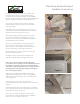
9. Take the remaining #10 x 2” screws and place them into the
remaining open holes. Use care to snug up the screws, but to
not over-torque that the screws strip out the factory installed
backer board.
10. If installing a bar with snap-on covers, move the covers
into place at each ange. Twist the covers clockwise or counter
clockwise to tighten the covers onto the anges.
THIS COMPLETES THE INSTALLATION OF THE GRAB BAR
INSTALLATION INSTRUCTIONS FOR COLLAPSIBLE
WATER RETAINERS
Important considerations before you begin: Most manufactured
units are designed with a radius where the oor transitions
or meets the wall. This is to ensure proper structural strength
where the wall meets the oor. The installation of end caps
is highly recommended on radius models for proper t and
nish. The caps will also help to keep your curtain inside the
water barrier. A properly sized curtain with heavy tape weights
combined with a water retainer is the most complete and
effective system available today.
Installation of radius models: (For Finished End Cap Installation)
Make sure you have ordered the correct length. See chart
below. The water retainer strip is designed to travel along the
oor to the wall radius until vertical, then capped. (Less Cap
Installation) Cut the retainer strip to the shape of the radius
where the wall and the oor meet, then caulk. Caps are not
required in applications where a 90-degree corner is standard.
Size Verication Chart for all Factory Manufactured Shower
Units
For most Acrylic Showers:
• 36” ADA barrier free (36”I.D. opening)
42CWR-White
• 48” barrier free (45-46” I.D opening)
52CWR-White
• 60” ADA barrier free shower (60” I.D. opening)
66CWR-White
• Finished End Cap
CWRCAP-White
Note: 1 ½” wide at mounting surface required.
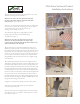
Identifying proper mounting location: It will be helpful to determine
whether your Gel-coat or Acrylic reinforced shower unit model has
a small molded ridge or “water runoff assist” or trench design on
your unit. You will nd this feature on the oor of approximately 1-3
inches from the front entry edge of your shower unit. The inside
edge of the water retainer should rest on the crown of the ridge
allowing the water to run off properly. Use this ridge as your guide
to mounting the retainer parallel with the water run off ridge.
Models less the ridge: All name brand barrier free showers that may
not have a water run off ridge or recessed trench and applications
such as tile, marble or cement oor surfaces, purchaser must
determine the proper mounting location and length. Helpful hint:
determine by desired location of curtain or directly below curtain
rod.
Tools & Materials required: Utility Knife, Tape measure, Straight edge,
Clear or White 100% Silicone Adhesive caulk, Blue Masking tape,
Rubbing Alcohol, bucket of water and clean rags.
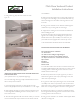
INSTALLATION STEPS WITH FINISHED END CAPS
1. Thoroughly clean threshold surface of all soap scum and debris
using standard bath cleanser. Chemically clean surface with rubbing
alcohol.
2. Verify the required length anticipating the vertical rise, making
certain there is enough retainer strip to make a vertical rise on the
end walls.
3. Determine and mark center point of shower.
4. Determine and mark center point of water retainer strip.
5. Turn over water retainer strip and make cut on orange peel off
strip at half way mark. Peel off a portion (approx. 4”) of the orange
peel off strip in one direction exposing the adhesive.
6. Align strip with pre-determined pencil mark or molded ridge
crown of shower unit starting at the half way mark. Press on and
adhere approximately 4” of strip. Pull and stretch to wall and align
before removing remainder of orange peel off strip. Press into place.
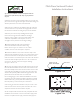
7. Peel, stretch, alien and pull remaining half to wall. Press into place.
8. Push in the male end of your end cap into the water retainer.
Adhere end cap to unit with adhesive caulk and wipe clean. White
or clear adhesive type caulk is recommended.
9. Use masking tape to temporarily hold cap in place until adhesive
cures.
10. Optional: The outer edges beneath the retainer may be caulked
if desired to prevent soap and shower debris from lodging beneath