
Installation Guide


Multi-Piece Sectional Product
Installation Instructions
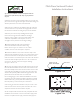
the retainer. The adhesive tape does not extend to the edge (by
design) to allow the retainer to absorb the impact energy of a
rolling shower chair in high use applications. Wipe off excess
caulk and let cure (according to caulk specications) prior to
shower use.
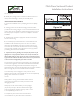
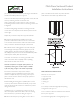
STEPS LESS FINISHED END CAPS
1. Thoroughly clean threshold surface of all soap scum and debris
using standard bath cleanser. Chemically clean surface with
rubbing alcohol or equal.
2. Verify the required length anticipating the radius shaping
required on each end of the strip.
3. Determine the shape of the end cut required for proper t
and nishing.
4. Begin at one end only.
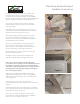
5. Create template of wall shape (if necessary) with cardboard or
material of choice.
6. Trace shape onto retainer, cut and trim with utility knife.
7. Beginning on the shaped end, peel back a small 4” section of
the orange peel off strip.
8. Align strip with pre-determined pencil mark or molded ridge
crown of unit. Press on and adhere the 4” section of exposed
strip into place.
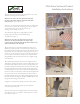
9. Before removing remainder of orange peel off strip, stretch
retainer to opposite wall, mark and template for proper location
proceeding nal cut.
10. Remove remaining orange peel off strip and stretch retainer
to its nal position. Press and adhere into place.
11. Caulk end cuts and wipe clean. A silicone adhesive caulk is
recommended.
12. Optional: The outer edges beneath the retainer may be
caulked if desired to prevent soap and shower debris from
lodging beneath the retainer. The adhesive tape does not extend
to the edge by design to allow the retainer to absorb the impact
energy of a rolling shower chair in high use applications. Wipe off
excess caulk and let cure (according to caulk specications) prior
to shower use.
©
2014, Laurel Mountain
14
Revised: 4-27-12
LAMPSEC | 072214