
Installation Guide


Multi-Piece Sectional Product
Installation Instructions
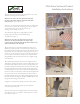
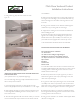
10. Conrm the pan is level by using a long level on top of the
threshold, and along the sides and back.
Note the level is used on the same horizontal surface that
has the pins. This will be important to allow the wall panels
to t correctly. See Figures 9A and 9B
If the pan is not level, shim the appropriate areas to achieve level.
Do not shim more than 1/8”. If shimming over 1/8” is required,
remove the pan and correct the sub-oor area by
“oating” a oor leveling compound.
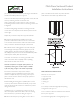
11. Drill holes through the mounting anges into each
framing stud. These holes should be drilled using a
1/8” drill bit. See Figure 10
Note: Plan on using at or pan head screws to secure the
shower pan. An 1/8” gap is provided in the shower design
to account for the screw heads. This gap will allow clearance so the
walls may assembled to the shower pan.
12. The next step is to permanently install the shower pan. A
helpful tip to make this easier is to rotate the pan upward and
lean against the back framing studs of the pocket. This will remove
the pan from the work zone without removing it from the stud
pocket. Do not secure the pan to the studs at this point because
you may need to reach around the pan as you install the drain
tting detailed in the next step. Make sure pan is angled enough
so it will not fall.
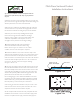
13. Install the drain tting on the shower pan. Apply a bead of
100% silicone caulking around the recessed molded drain area on
the nished side of the pan. Remove the nut and all gaskets from
the drain body. Slip the threaded shank of the drain body through
the hole. Follow the instructions provided with the drain tting
to install the gaskets in the proper location. When all gaskets and
locknut are in place on the bottom side of the shower, tighten the
nut to secure the shower drain assembly. From the top side of
the drain assembly, remove the rubber caulking gasket located on
the inside of the drain tting. This will allow the drain pipe to slip
through the drain tting on the shower.
A diagram of a typical drain assembly is shown in this manual.
Wipe away any excess caulking that may have squeezed
out on the inside of the pan.
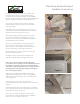
Now secure the pan in the upright position to the back framing.
Use a piece of scrap 2 x 4 lumber to temporarily secure it. See
the example in Figure 12.
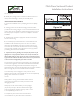
12.
The next step is to permanently install the
shower pan. A helpful tip to make this easier is to
rotate the pan upward and lean against the back framing
studs of the pocket. This will remove the pan from the
work zone without removing it from the stud pocket. Do
not secure the pan to the studs at this point because you
may need to reach around the pan as you install the
drain fitting detailed in the next step. Make sure pan is
angled enough so it will not fall.
6
Figure 11
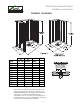
10.
Confirm the pan is level by using a long level on
top of the threshold, and along the sides and back.
Note the level is used on the same horizontal surface that
has the pins.This will be important to allow the wall panels
to fit correctly. (See Figures 9A and 9B).
11.
Drill holes through the mounting flanges into each
framing stud. These holes should be drilled using a
1/8” drill bit. (See Figure 10).
Note: Plan on using flat or pan head screws to secure the
shower pan. An 1/8” gap is provided in the shower design
to account for the screw heads. This gap will allow
clearance so the walls may assembled to the shower pan.
Wipe away any excess caulking that may have squeezed
out on the inside of the pan.
If the pan is not level, shim the appropriate areas
to achieve level. Do not shim more than 1/8”. If
shimming over 1/8” is required, remove the pan
and correct the sub-floor area by
“floating” a floor leveling compound.
Figure 10
Figure 9B
Figure 9A
13.
Install the drain fitting on the shower pan.
Apply a bead of 100% silicone caulking around
the recessed molded drain area on the finished side of
the pan. Remove the nut and all gaskets from the drain
body. Slip the threaded shank of the drain body through
the hole. Follow the instructions provided with the drain
fitting to install the gaskets in the proper location. When
all gaskets and locknut are in place on the bottom side
of the shower, tighten the nut to secure the shower drain
assembly. From the top side of the drain assembly,
remove the rubber caulking gasket located on the inside
of the drain fitting. This will allow the drain pipe to slip
through the drain fitting on the shower.
A diagram of a typical drain assembly is shown on
Page 14 of this manual.