
Installation Guide


Multi-Piece Sectional Product
Installation Instructions
14. A solid wood oor adhesive or 100% silicone adhesive
will be used to “glue” the bottom side of the shower pan to
the sub oor. The following steps will detail the appropriate
steps to accomplish this.
15. Clean the sub-oor thoroughly, wiping away all lose
debris. Wipe up any moisture. Never use adhesive on a dirty
or damp surface.
16. To secure the shower pan to the oor a solid wood
oor adhesive must be applied to the entire sub oor area
where the shower pan will rest, 3/8” thick and 3” apart.
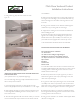
Using a 1/2” notched trowel, apply adhesive evenly over the
pan contact area. Bring the adhesive up to the threshold
pencil mark and also make sure the adhesive will be in
contact with the back side of the pan. The long edge of the
trowel may be needed to get the adhesive to the far back of
the contact area where the pan is resting against the framing
studs in a vertical position. (Pan not shown in Figures 13 A
and B).
After the adhesive is troweled over the sub oor, use a
spatula to wipe the adhesive over the entire area where the
pan will sit. The exception will be the drain box area. This area
will be lled with thin-set non shrink mortar. Do not ll this
area above the oor line and do not spill any of this thin-set
material onto the contact adhesive. See Figure 13B
Non shrink thin-set mortar can be purchased at any local
home improvement store. Please follow the mixing directions
on the bag.
In this step, apply the adhesive to the at oor area and ll
the boxed area around the drain pipe with the Thin-Set
mortar.
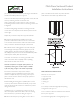
17. After the adhesive and thin-set materials are in place,
rotate the pan back into place for installation.
(Hint) In order to reach the pan without stepping on the
adhesive, place a short piece of wood over the drain area. Use
this to step on to remove the 2 x 4 that is holding the pan
against the back framing. See Figure 15
NOTE: The working life of the ooring adhesive is roughly
one hour. (Refer to the label on the adhesive for actual
working time). After step 16 is complete, the entire
installation process though step 23 must continue. If for
Non shrink thin-set mortar can be purchased at Lowes or
The Home Depot. Please follow the mixing directions on the
bag.
In this step, apply the adhesive to the flat floor area and fill
the boxed area around the drain pipe with the Thin-Set
mortar.
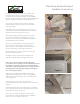
After the adhesive is troweled over the sub floor, use a
spatula to wipe the adhesive over the entire area where the
pan will sit.
The exception will be the drain box area. This area will be
filled with thin-set non shrink mortar. Do not fill this area
above the floor line and do not spill any of this thin-set
material onto the contact adhesive.
(See Figure 13B.)
7
14.
A solid wood floor adhesive will be used to “glue” the
bottom side of the shower pan to the sub floor.
The following steps will detail the appropriate steps to
accomplish this.
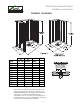
NOTE: Models 4836 SH and 6030 SH are not glued as described
above. The models must have the bottom supported by shims
placed under the leveling legs at the underside of the pan.
This step is described on Page 5 Step 8.
15.
Clean the sub-floor thoroughly, wiping away all lose debris.
Wipe up any moisture. Never use adhesive on a dirty or
If installing these models, the following instructions refering to
adhesive do not apply.
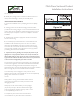
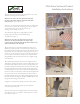
16.
Now secure the pan in the upright position to the back framing.
Use a piece of scrap 2 x 4 lumber to temporarily secure it. See
the example in Figure 12.
Figure 12
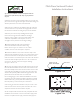
To secure the shower pan to the floor a solid wood
floor adhesive must be applied to the entire sub floor
area where the shower pan will rest.
Using a 1/2” notched trowel, apply adhesive evenly over the
pan contact area. Bring the adhesive up to the threshold
pencil mark and also make sure the adhesive will be in
contact with the back side of the pan. The long edge of the
trowel may be needed to get the adhesive to the far back of
the contact area where the pan is resting against the framing
studs in a vertical position.
(Pan not shown in Figures 13 A and B).
Figure 13A
Figure 13B