
Installation Guide


Multi-Piece Sectional Product
Installation Instructions
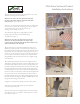
framing if required. This is the last access to the plumbing before
the wall is permanently installed.
21. If all ts are good, proceed with the installation of the the
back wall. The installation procedures described in this step apply
for installation of one or two piece back walls.
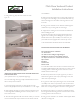
Wipe clean the ledges on top of the pan. Apply a continuous
bead of 100% RTV silicone caulking along the back ledge of the
pan where the back wall will sit. The bead should be placed at
the middle of the ledge, and be 3/8” wide. The bead should go
completely around each alignment pin.
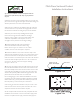
There are slots on the underside of the wall. There are alignment
pins in the pan that will insert into the slots on the bottom of the
wall. See the detail in Figure 19.
The lower section of the back wall is the panel with a single,
molded soap dish. Lift this panel up and carefully lower it onto
the back ledge on the pan.
Push the wall panel down to seat it in the caulking.
Check the t for level and plumb.
Note to installer: There is a difference having the bubble
between the lines and a plumb wall. The wall must be
VERY plumb or a gap larger than 1/8” will be present
where the side walls mate the back wall. Use wood shims
or furring strips to ll any space between the back wall
ange and the studs.
Align the wall section where it meets the shower pan so it is
centered on the pan, and install wood shims or furring strips if
necessary.
Pre-drill the mounting anges. Attach the wall with screws
through the back wall ange into the framing. Be sure the wall
panel remain level and plumb. (For the 4836 4 piece, this step will
apply for the entire back wall as one piece).
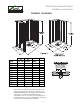
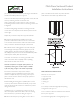
22. For ve piece units, the next step is to place the top section
of the back wall. Clean the back ledge and apply a continuous
bead of 100% RTV silicone caulking along the ledge of the back
wall where the top part of the wall will sit. The bead should be
3/8 wide and placed at the middle of the ledge. It should go
completely around each alignment pin.
Lift the top back wall panel and set it on top of the lower wall.
Press the panel down to seat in the caulking. The top and bottom
wall panels must be level and plumb. Shim if necessary. The seam
between the panels should be no more than 1/8”. Pre-drill holes
and attach with screws along the top back ange into the
framing studs. Make sure the two wall panels are in alignment
and are level and plumb. Place level or straight edge on both
vertical ange where the wall will mate to the back wall and
check to assure there are no gaps. (For the 4836 four piece
which has a single piece back wall panel, skip this step).
23. Side wall installation. The side wall panels are slotted on
the bottom. The alignment pins in the pan will index with these
slots. The slots will allow the side wall panel to slide about one
inch to meet the back wall panel.
If the water control valve is located on one of the side walls, it
is important to dry trial t that panel rst. Carefully measure
and mark the location of the valve on the surface of the side
wall. Read the installation instructions provided by the valve
manufacturer. Carefully drill the valve hole(s).
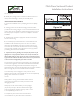
Trial t the side wall panel to the shower pan. Wipe clean the
side ledge. This next step is a two person job.
Lift the side wall panel and set it on the ledge. Set the panel so
it is within one inch of the vertical back wall seam. Make sure
the pins in the pan index with the slots on the bottom of the
wall. Clear your ngers and slide the wall panel toward the
back wall. Make sure the alignment pins in the back wall index
into the holes on the side wall. See Figure 24
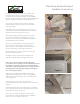
When seated, the seam should have a minimal gap of 1/8”
or less. If not, push the end of the side panel until the vertical
seam closes. See Figure 25 When in place, check the t of the
valve hole. Adjust size and location if required.
When the t is good, lift the wall panel away. Complete the
valve installation and connection to hot and cold water supply
at this time. Also complete shower supply connection. Strap
pipes to framing if required. This is the last
access to the plumbing before the wall is permanently installed.
Clean the side ledge and apply a continuous 3/8” bead of
100% RTV silicone caulking along the entire length of the
mating ledge of the shower pan. Apply the caulk completely
around each alignment pin.
Clean and apply a continuous 3/8” bead of 100% RTV silicone
caulk along the entire length of the vertical surface of the back
wall where the side wall panel mates to the back wall. Apply
the caulk completely around each alignment pin. See Figure 23
Lift the side wall and place it on the pan. Make sure alignment