
User's Manual


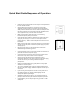


Table Of Contents

Quick Start Guide/Sequence of Operation
• Inspect the shock mount bands to ensure they are securely attached
and not cracked or broken.
• Securely attach the microphone in its mount to a high quality,
weighted, microphone stand. It is easiest to spin the microphone
stand post/arm to thread into the mount, rather than attempt to twist
the entire microphone. Once the stand is securely threaded into the
mount, tighten the wing nut at the shock mount elbow.
• Make sure the phantom power and gain on your recording
interface/microphone preamp is turned off.
• Check that the proper voltage is selected on the back of the power
supply for your country (i.e. 115V for U.S. and Japan, 230V for
Europe) (Figure 1).
.
Refer to “Power Requirement” section for more
information.
• Make sure the on/off switch on the power supply is in the off position
and then connect the power cord from the power supply to a power
outlet (Figure 2).
• Place the power supply in a safe location where it will not be
disturbed during the recording process.
• Connect the black, male, 5-pin connector of tube mic cable to the 5-
pin female connector of the power supply.
• Connect the silver, female, end of the 5-pin tube mic cable to the
bottom of the 5-pin male connector on the microphone.
• Securely connect the female end of a standard 3-pin XLR
microphone cable to the 3-pin male connector on the power supply
and the male end to your recording interface/microphone
preamp/mixer.
• Select your preferred Multi-voicing, polar pattern, and high-pass
selections on the microphone.
• Turn on the LT386PSU power supply (a red light will illuminate on
the front of the power supply). Allow the microphone to warm up for
30 minutes.
• If you are using the microphone for vocals or voice, please use a
high quality pop-filter. Any foreign materials getting onto the
microphone capsule may damage it.
• Gradually increase the input gain on your recording interface or
preamp to test and achieve your desired microphone input levels.
• Congratulations, you are ready to begin using your Eden LT-386
microphone.
Figure 2
Figure 1