
User's Manual

17
18
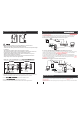
4) The functions of the other icons on the live view:
Unlock.
Snapshot .
: to capture a frame of the video stream as a still photo
Record: Click it to start manual record video on the current channel, and the right top corner
of the channel has a normal recording video symbol “[REC]”. And click it again to stop manual
record.
Click it to turn the sound on or disable.
Click it to start to talk, and the background of the button will be highlighted. Click it again to
stop talking.
Click it to display or hide the buttons “ ”.
Click it to enter the device list interface.
Click it to enter the snapshot file and record file.
Click it to enter the local setting interface.
Click it to enter user guide interface.
5) On the live view, users can touch a channel on the screen and drag it to the other channel
position directly.
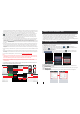
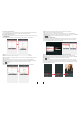
6) On the interface of “Devices”, user can edit the parameters of one device, click “ ” to the next
interface as below. Click “ ” to enter edit mode to adjust the parameters. Click “ ” to save.
And click “ ” to remove the information of the current device.
[Alarm Setting]: To access the interface about the parameters of one device, there is an option
“Alarm Setting” for alarm push function. When select “Open”, it indicates that the alarm push function
of the current device is enabled. To enable alarm push function, users need to make sure the
outdoor camera and the mobile phone are both connected to internet.
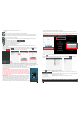
Note: 1) The alarm push function can be effective, and the device must be
added by UID type.
2) When the option “Alarm Setting” on the mobile software interface is
set to “On”, someone press the call button on the outdoor camera, the
notification message will be pushed onto the master’s phone(shown as
the right figure). And users can click the alarm list to access to the video
live view of the channel directly or access to the video live view to unlock
for the outdoor camera.
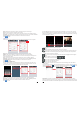
[WIFI Setting]: To access the interface about the parameters of one device,
there is an option “WIFI Setting” for the outdoor device. Click “WIFI setting”,
and available wireless devices will be shown on the list. Choose one and
click it, if the wireless password of the wireless router is enabled, it pop-up a
window to enter the password of the wireless router, input the correct
password and setting ok, the outdoor device will reboot automatically, it will be connected to the
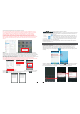
7) Click “ ” to enter the snapshot and record file interface. Click “snapshot” or “record” to switch
display interface. Click “ ” to enter edit
mode, users can remove the file list that they want to.
Click one on the list to see the picture or the record.
wireless router after starting when hearing a beep again.
Note: If users want to connect the device via wireless network, when the device restarts
automatically after completing set of the parameters about WIFI, please unplug the Ethernet
cable connected to the device, otherwise the device will run via wired network.
8) Click “ ”to enter the “Settings” interface as follows.
[Video Views]: Options include “1" and “4". Select “1" and only one
channel view will be shown on live view. Select “4" and quad channels
view will be shown on live view.
[Video Style]: Options include “Original” and “Covered”.
5. Web Browser Operation For IP Outdoor Camera
2.1 Mouse Control
Users could set up parameters for the stand-alone IP outdoor camera via Web browser.