
User's Manual

7 8
* Avoid installation of the device near strong radiation e.g. AC motor and lift.
* Maintenance should be complied with qualified technician.
* Avoid hard shake, beating and collision, otherwise the internal exact components maybe
be damaged.
* Do not expose the outdoor camera under strong light or sunshine.
* Do not install the outdoor camera in the environment e.g. direct sunlight, contact rain,
High temperature, high humidity, full of dust and chemistry corrosive.
* Select the most suitable position where the camera is located at user’s eye level.
* Switch off power supply before installation.
* Keep more than 30cm away from AC power supply to avoid external interference.
* Keep it away from the water and magnetic field.
Please follow these steps as reference:
1.Select the most suitable position where the outdoor camera is located at user’s eye level, then
drill 2 holes according the weather shield, embed 2 plastic anchors into the holes.
2.Use a screwdriver to affix the weather shield with the installation screws.
3.Drag the connection cable through the hatch at the bottom side.
4.Embed the outdoor unit into the weather shield and affix with the supplied screws.
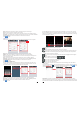
2.2 Tool Bar
2. Device Connect--Through wired network or wireless network(optional)
A. User can connect the outdoor camera through network cable, operation steps:
1. Connect the network cable to the outdoor camera according to section
.
2. Connect the power adapter to the electrical outlet of the outdoor camera and power on.
3. Wait for a while until hearing a beep, this time the outdoor camera starts completely.
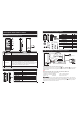
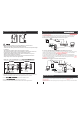
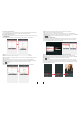
Network connection diagram through wired network as Figure 1.
1.4 wiring diagram of
the IP outdoor camera
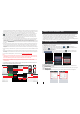
B. The device with WIFI function can be also work with WIFI wireless network.
1. If user connects a network cable to the outdoor camera, the parameters for WIFI can be set up
via web browser, please see section for more information,
network connection diagram please refer to on the above.
2. If user doesn’t want to connect a wired cable to the device, and user needs to prepare a
wireless router and a smart-phone or a pad with IOS or Android system. The parameters for WIFI
can be set up via a smart-phone or a pad with IOS or Android system, please see section
for more information.
Network connection diagram via wireless network as Figure 2.
5.7.3.3 Network--WIFI(optional)
Figure 1
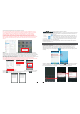
3. Soft
AP function
Figure 2
Figure 1
DOOR
AC/DC power
lock
(not Included)
(not Included)
Router
Internet
Reset
WAN
LAN
3G/WIFI
IOS/Android
To WAN
To LAN
To LAN
Modem
PC
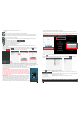
3. Soft AP Function
The outdoor camera with wifi function can be worked in wireless mode. If user doesn’t want to connect a wired
cable to the device, and user need prepare a wireless router and a smart-phone or a pad with IOS or Android
system. The network connection diagram via wireless network please refer to on section
Figure 2
2.Device Connect.
1.5 Installation process of Outdoor Units
DOOR
AC/DC power
lock
(not Included)
(not Included)
WIFI(LAN)
IOS/Android
Reset
WAN
LAN
Internet
To WAN
AP mode
WIFI
(LAN)
WIFI(LAN)
WIFI(LAN)
1
2
3
3G/WIFI
IOS/Android
Modem
Router
PC
Antenna
(optional)
Antenna connector
(optional)
1) First user must install a mobile operating system specific program onto his mobile or pad. The Android mobile