
Installation Guide
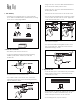
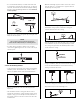

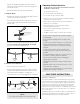
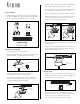
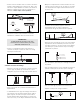
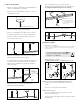
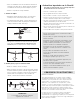
Table Of Contents

MR16 BULB
SOCKET
FIXTURE CAP
SPRING
FOCUS HEAD (5)
TRANSFORMER POWER
FEED CAP
5. Secure the Rail to the Ceiling
– Remove the transformer power feed cap from the base
of the power feed.
– Turn the power feed base so it is aligned with the rail.
6. Prepare the Heads
– Locate the five Heads.
– Remove the caps from each of the ceiling posts.
– Use the Allen wrench to loosen the screw at the base of
the ceiling post (do not remove it completely).
– Turn the ceiling post assembly so it is aligned with the rail.
FIXTURE
CAP
CASUAL/SPIRE/KIRI/REVIVAL/SOLA KIT HEADS:
– Insert the pins of the bulb into the holes of the socket.
– Remove the fixture cap from each of the fixtures.
– Slide the rail into the ceiling posts and the transformer
power feed.
– While supporting the rail, screw the transformer power
feed cap back onto the transformer. The connection must
be flush with the rail and tight.
– Screw the caps back onto each of the ceiling posts.
CAP
USE A MAXIMUM 12 VOLT, 20 WATT,
MR16 FRONT COVER HALOGEN BULB
– Use the Allen wrench to tighten the set screw and secure
the location of the ceiling post.
– If a support location falls directly over a joiner, remove
the plastic insulator from the ceiling post or power feed;
otherwise, skip this step.
N
OTE: The top of the METAL
s
tem inside of the power feed
c
ap must rest FLUSH against
the bottom of the rail.
INSULATOR
RAIL
JOINER
CEILING
POST
Only remove the
insulator from a
ceiling post if it
will be located
over a rail joiner.
*The drawings in this document show the tiella Sola Head. Your heads
may not look like the Sola Head, but they install the same way.
SOLA HEAD (5)
CASUAL HEAD (5)
REVIVAL HEAD (5)
CASUAL/SPIRE/KIRI/
REVIVAL/SOLA KIT HEADS:
FOCUS KIT HEADS:
FOCUS KIT HEADS:
– Squeeze the spring ends together and pull spring out
of Focus head.
– Insert the pins of the bulb into the holes of the socket.
POWER FEED CAP