
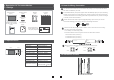
Users Manual


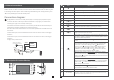

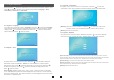

1.7 Description On Indoor Monitor
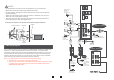
1.6 Alarm Instructions
Be applicable to connect 2 normally closed (NC) or normally open (NO) alarm inputs.
2 camera channels of alarm input without limitations on input type (can either be the
normally open type or the normally closed type).
ALM terminal of the alarm detector is connected in parallel with the ALM terminal
(The
alarm detector shall be supplied by external power supply).
Ground terminal of the alarm detector is connected in parallel with the GND terminal of
the camera.
For NO alarm inputs, when the GND and ALM are in the connection state, it will trigger
the alarm.
For NC alarm inputs,
when the GND and ALM are in the disconnect state, it will trigger
the alarm.
It applys to any alarm sensor.
CAM1 and CAM2 of this production have each an alarm function. When the trigger terminal and
GND is shorted, the alarm is activate, the indoor monitor will emit alarm sound, the alarm ring time
is according to the menu option “Alarm->CAM1 ring time/CAM2 ring time. During this time, press
“ ” to stop alarming and enter the standby mode.
Connection diagram:
9
10
GND
DC1
2V
Video
ALM
CAM
GND
ALM
Switch power adapter
for camera(not included)
Hang up
Monitoring
Unlock
Talk
Hang up
1
2
1
2
3
5
4
9
11
11
13
TF
12
6
7
8
10
TFT display
View visitor’s image displayed on the TFT screen.
Microphone
Transmit the voice to outdoor camera.
Name
Descriptions
Power LED, the power indicator of the indoor monitor.
The door 1 state lights, to door 1 working when the LED is on.
8
9
10
11
1
2
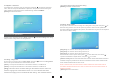
The door 2 state lights, to door 2 working when the LED is on.
Intercom call or transfer calls to another indoor monitor.
Release the door lock.
Unlock
Monitoring
Setting
Watch the door and camera images.
Activate conversation mode by pressing this button.
Talk
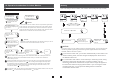
1. The button is a composite key, users can press the button, scroll
the button upward or downward. For more details, please refer to
the section “Menu Operations”.
2. In standby mode, press the button “ ” once to quickly access the
menu.
3.
In main menu settings, scroll the button “ ” upwards or
downwards to select sub-menu, then press “ ” again to enter
sub-menu. In sub-menu settings, press “ ” to select menu
options, scroll “ ” upwards or downwards to adjust values of
each option, then press “ ” to confirm. When select option
“Return” on the main menu, press “ ” to exit menu interface,
and the indoor device will be into standby mode.
Transfer call
Hang up
Hang up or return button on menus.
4. When the menu option on section 5.3.6 “Parameters->Event->
Record->Record mode” set up as “Snapshot”, in monitoring/talking
mode, press “ ”
to capture a frame of the current video stream as
a still photo manually.
5. When the menu
set up as “Record”, in monitoring/talking
mode, press “ ” to start manual record, and press this button
again to stop manual record.
option on section 5.3.6 “Parameters->Event->
Record->Record mode”
Speaker
Sound from outdoor camera.
For the models with TF card, insert the TF card for video records and
photographs, supports up to 64GB. And suggest that it’s better to use a TF
card more than class 10 onto the device.
TF card slot
12
13
6. In talking mode, scroll “ ” upwards or downwards to adjust the
communication volume of the indoor monitor.