WinFast TV Series Quick Installation Guide Code: LR66XX P/N: W05G0312 Version J
Table of Contents Connect Input & Output Devices................................................1 Driver & Application Installation English ...............................................................................7 Deutsch..............................................................................8 ............................................................................9 ...........................................................................10 繁體中文 ...........................................
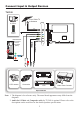
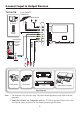
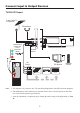
Connect Input & Output Devices TV2100 From Cable TV or Antenna PC Monitor TV Remote Control Remote control Audio In Audio Out Motherboard/ Sound card Line-in Connector (Blue) DVD/VCD Player PlayStation SELECT START ANALOG CCD camera Camcorder VCR Video Game Console Input sources Note: 1. The diagram is for reference only. The actual board appearance may differ from the diagrams. 2. Audio In, S-Videio and Composite cable for TV2100 is optional.
Connect Input & Output Devices TV2100 FM From Cable TV or Antenna FM Antenna PC Monitor TV Remote Control Remote control Audio In Audio Out Motherboard/ Sound card Line-in Connector (Blue) DVD/VCD Player PlayStation SELECT START ANALOG CCD camera Camcorder VCR Video Game Console Input sources Note: 1. The diagram is for reference only. The actual board appearance may differ from the diagrams. 2. Audio In, S-Videio and Composite cable for TV2100 is optional.
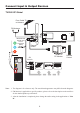
Connect Input & Output Devices TV2000 XP Expert From Cable TV or Antenna FM Antenna R L Audio Out Motherboard/ Sound card Line-in Connector (Blue) Remote control AV Line-in PC Monitor Camcorder VCR Remote Control DVD/VCD Player Note: 1. The diagram is for reference only. The actual board appearance may differ from the diagrams. 2. FM and Remote Control functions are optional. Please refer to the descriptions on the retail box for the detailed product specifications 3.
Connect Input & Output Devices TV2000 XP Global From Cable TV or Antenna FM Antenna R L Audio Out Motherboard/ Sound card Line-in Connector (Blue) Remote control PC Monitor AV Line-in Camcorder VCR Remote Control DVD/VCD Player Note: 1. The diagram is for reference only. The actual board appearance may differ from the diagrams. 2. FM function is applicable to specific products, please refer to the description on the retail box for the detailed product specifications. 3.
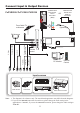
Connect Input & Output Devices Motherboard/ Sound card Line-in Connector (Blue) PxPVR2200/ PxTV1200/ PVR2100 From Cable TV or Antenna OR Motherboard/ Sound card Audio-in Connector (Optional) FM Antenna R L Component Video (Yellow cable) Remote control Pr (Red) Pb (Blue) Y (Green) Audio In Composite (CVBS) S-Video Audio Out PC Monitor Remote Control Input sources DVD/VCD Player PlayStation SELECT START ANALOG CCD camera Camcorder VCR Video Game Console Note: 1.
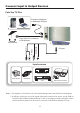
Connect Input & Output Devices PalmTop TV Plus Connect to Notebook or Desktop's USB port From Cable TV or Antenna, or FM Antenna Composite S-Video Audio FM Antenna AV input Input sources DVD/VCD Player PlayStation SELECT START ANALOG CCD camera Camcorder VCR Video Game Console Note: 1. The diagram is for reference only. The actual board appearance may differ from the diagrams. 2. If difficulty in trying to receive the signals from remote control occurs, please use the USB 2.
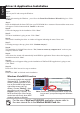
English Driver & Application Installation Step 1: Turn on your PC and start up the Windows. Step 2: Shortly after entering the Windows , you will see the Found New Hardware Wizard dialog box. Click "Cancel". Step 3: Insert the Multimedia Software DVD into your DVD-ROM drive. Autorun will start and the menu screen will appear. Click the button marked “Install” on the menu. Step 4: Choose the language for the installation. Click “Next”. Step 5: The driver installation is going to start. Click “Next”.
Installation von Treiber & Anwendung Schritt 1: Schalten Sie Ihren PC ein und starten Windows. Schritt 3: Legen Sie nun die mitgelieferte DVD mit der Multimediasoftware in Ihr DVD Rom ein. Die Autorun Funktion sollte nun folgendes Fenster öffnen. Klicken Sie hier auf den Knopf "Install". Schritt 4: Klicken Sie auf den Eintrag Driver (Treiber), um mit der Installation zu beginnen. Schritt 5: Sie müssen für die Installation eine Sprache wählen. Treffen Sie Ihre Auswahl und klicken auf OK.
Installation des pilotes et des applications Etape n°1: Démarrez votre ordinateur et attendez que Windows soit démarré. Etape n°2: Peu après le démarrage de Windows, une boîte de dialogue Found New Hardware Wizard (Nouveau Matériel Détecté) s'affichera (tel que montré sur le premier dessin à droite). Cliquez “Cancel (Annuler)”. Français Etape n°3: Insérez le DVD du Logiciel Multimédia dans votre lecteur de DVD-ROM. Autorun démarrera et l'écran du menu apparaîtra.
Instalación del Controlador y la Aplicación Paso 1: Encienda el equipo e inicie Windows. Paso 2: Poco después de entrar en Windows, aparecerá el cuadro de diálogo del Found New Hardware Wizard (Asistente para hardware nuevo encontrado). Haga clic en “Cancel (Cancelar)”. Paso 3: Inserte el DVD de software multimedia en su unidad de DVD-ROM.Autorun se abrirá y aparecerá la pantalla del menú. Haga clic en el botón Install en el menú.
安裝驅動程式及軟體 步驟 1 : 啟動電腦,進入 Windows 。 步驟 2 : 開啟 Windows 之後,會出現「增加新的硬體」對話框,點「取消」離開。 步驟 3 : 將多媒體軟體光碟放入光碟機中。自動安裝的畫面會出現。按「安裝」按鈕。 步驟 4: 「選取安裝語言」對話框出現,請選擇您所使用的語言,然後按「確定」。 步驟 5 : 驅動程式即將開始安裝,按「下一步」繼續。 步驟 6: 一對話框出現,顯示安裝狀態及進度。(在此時按「取消」會離開安裝程式。) 步驟 7 : 若有警告訊息出現,請按「繼續安裝」。 繁體中文 步驟 8 : 安裝完成的對話框出現,並問您是否要重新啟動電腦,點選「是,立即重新啟動電腦。」然後點 「確定」。 步驟 9 : 電腦重新啟動後,「選擇安裝語言」的對話框再度出現,請選擇您所使用的語言,然後按「下一 步」。 步驟 10 : 安裝程式的對話框出現,告訴您即將安裝「 WinFast PVR2 」應用軟體。按「下一步」開始安裝。 步驟 11 : 接下來幾個步驟請點選 「 確定」。 步驟 12 : 應用軟體結束安裝,按 「OK 」。 Windows Vista MCE 功能 遙控器也
ドライバとアプリケーションのインストール ステップ1: PCの電源を入れて、Windowsを起動します。 ステップ2: Windowsが起動すると間もなく、[新しいハードウェアが検出されましたウィザード]ダイア ログボックスが開きますので、[キャンセル]をクリックしてください。 ステップ3: DVD-ROMドライブにMultimedia Software DVDを挿入します。自己起動ファイルが自動的に実 行され、メニュースクリーンが表示されます。メニュースクリーンで[Install]と示されたボ タンをクリックしてください。 ステップ4: インストールしたい言語を選択し、[次へ]をクリックします。 ステップ5: ドライバのインストールが開始されます。そこで[次へ]をクリックしてください。 ステップ6: ウィザードがドライバをインストールしています。インストール状況を知らせるウィンドウが 開きます。インストールが完了するまでしばらく待ちください。 ステップ7: 警告メッセージが表示されたら、[続行する]クリックしてください。 ステップ8: インストールが完了しました。[はい、今すぐコンピュータを再起動します]を
Instalacja Sterownika & Programu Etap 1: Proszę włączyć PC i wystartować Windows. Etap 2: Chwile po włączeniu się Windows, pojawi się informacja Pojawił się Nowy Hardware, Kreator, proszę nacisnąć "Anuluj". Etap 3: Włóż dysk DVD 'Multimedia Software' do napędu DVD-ROM. Autorun uruchomi menu, które pojawi się na ekranie. Naciśnij przycisk 'Install' widoczny w menu. Etap 4: Proszę wybrać język, w którym ma się odbyć instalacja i nacisnąć: "Następny". Etap 5: Rozpocznie się instalacja sterownika.
Čeština Instalace aplikace a ovladače Krok 1: Zapnìte poèítaè a spust te systém Windows. Krok 2: Krátce po nastartování Windows se zobrazí dialogové okno Průvodce nalezeným novým hardwarem. Klikněte na tlačítko "Storno". Krok 3: Vložte Multimedia Software DVD do Vaší DVD-Rom mechaniky. Autorun spustí menu. Klikněte na tlačíto označené Install z menu. Krok 4: Zvolte jazyk pro instalaci. Klepněte na tlačítko "Další". Krok 5: Instalace ovladače je připravena. Klepněte na tlačítko "Další".
Установка драйвера и приложения Русский Шаг 1: Включите ПК и запустите Windows. Шаг 2: После входа в систему на экране появится сообщение Обнаружено новое устройство. Нажмите «Отменить» (Cancel). Шаг 3: Вставьте Multimedia Software DVD в привод DVD-ROM. Появится меню автозапуска. Нажмите кнопку «Установить» (Install). Шаг 4: Выберите язык для установки. Нажмите «Далее» (Next). Шаг 5: Драйвер готов в установке. Нажмите «Далее» (Next). Шаг 6: Помощник устанавливает драйвер.
Instalarea driverelor si a aplicatiei. Pasul 1: Porniti calculatorul si asteptati incarcarea sistemului de operare. Pasul 2: Imediat dupa intrarea in Windows, va fi afisata fereastra "Found New Hardware Wizard". Apasati "Cancel". Pasul 3: apasati pe butonul, In cadrul meniului ce va fi afisat. ul Multimedia Software-Introduceti in unitatea op tica DVD “Install”. Pasul 4: Alegeti limba interfetei si apasati "Next". Romana Pasul 5: Se vor instala driverele. Apasati "Next”.
Meghajtó & Szoftver Telepítés Lépés 1: Kapcsolja be a PC-t, és várja meg, míg a Windows betöltődik. Lépés 2: A Windows betöltése után rövidesen, az Új Hardver hozzáadása Varázsló párbeszéd-panel fog megjelenni. Kattintson a "Mégse" gombra. Lépés 3: Helyezzük be a Multimedia Software DVD-t a DVD-ROM meghajtóba. Autómatikusan elindul a telepítő és menu megjelenik. Klikkeljünk az Install ikonra a menüben. Lépés 4: Válassza ki a telepítés nyelvét. Kattintson a “Tovább”-ra.