
User's Manual
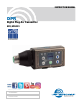


Digital Plug-On Transmitter
Rio Rancho, NM
5
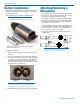
Features
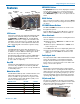
LCD Screen
The LCD is a numeric-type Liquid Crystal Display with
several screens that allow settings to be made with
the MENU/SEL and BACK buttons, and the UP and
DOWN arrow buttons to configure the transmitter. The
transmitter can be turned on in a “standby” mode with
the carrier turned off to make adjustments without the
risk of interfering with other wireless systems nearby.
Power LED
The PWR LED glows green when the batteries are
charged. The color changes to red when there is about
20 minutes of life left. When the LED begins to blink
red, there are only a few minutes of life.
A weak battery will sometimes cause the PWR LED to
glow green immediately after being put into the unit,
but will soon discharge to the point where the LED will
go red or shut off completely.
Key LED
The blue Key LED will blink if an encryption key is not
set and “no key” will blink on LCD. The Key LED will
remain on if the encryption is set correctly and will turn
off in Standby mode.
Modulation LEDs
The Modulation LEDs provide a visual indication of the
input audio signal level from the microphone. These
two bicolor LEDs can glow either red or green to indi-
cate modulation levels. Full modulation (0 dB) occurs
when the -20 LED first turns red.
Signal Level -20 LED -10 LED
Less than -20 dB Off Off
-20 dB to -10 dB Green Off
-10 dB to +0 dB Green Green
+0 dB to +10 dB Red Green
Greater than +10 dB Red Red
MENU/SEL Button
The MENU/SEL button is used to display the transmit-
ter menu items. Press once to open the menu, then
use the UP and DOWN arrows to scroll menu items.
Press MENU/SEL again to choose an option from the
menu.
BACK Button
Once a selection is made in a menu, press the BACK
Button to save your selection and go back to the previ-
ous menu.
UP/DOWN Arrow Buttons
The UP and DOWN arrow buttons are used to scroll
through menu options.
From the Main Screen, use the UP Arrow to turn the
LEDs on and the DOWN Arrow to turn the LEDs off.
Menu Shortcuts
From the main/home screen, the following menu short-
cuts are available:
Simultaneous press of BACK button + UP arrow but-
ton: Begin record
Simultaneous press of BACK button + DOWN arrow
button: Stop record
Press MENU/SEL: Shortcut to adjust input gain menu
Press the UP arrow button to turn the control panel
LEDs on; press the DOWN arrow button to turn
them off
Audio Input Jack
The 3 pin female XLR to AES standard balanced input
jack on the transmitter accommodates hand-held,
shotgun and measurement microphones. Phantom
power can be set at various levels for use with a wide
variety of electret microphones.
Antenna
An antenna is formed between the housing and the
attached microphone, operating much like a dipole. At
UHF frequencies the length of the housing is similar to
1/4 wavelength of the operating frequency, so the an-
tenna is surprisingly efficient, which helps extend the
operating range and suppress noise and interference.
IR (infrared) Port
The IR port is available on the side of the transmitter
for quick setup using a receiver with this function avail-
able. IR Sync will transfer the settings for frequency
from the receiver to the transmitter.
IR Port
Battery Compartment
XLR Input Jack
MENU/SEL Button
LCD
Input
Coupler
BACK Button
Modulation
LEDs
PWR LED
UP Arrow
DOWN
Arrow
KEY LED
POWER Button