
User's Manual

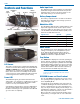


Wideband Digital Hybrid
®
Plug-On Transmitter
Rio Rancho, NM
9
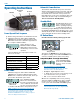
RF Power Output (Up Button Menu)
Pr (RF Power output) may be selected as either 100 or
50.
Selecting the Audio Polarity (Up Button Menu)
The character P denotes
“positive” polarity and
the character n denotes
“negative” polarity.
NOTE: The audio polarity can
also be reversed at the output of
most Lectrosonics receivers.
Selecting Step Size mode (Up Button Menu)
The frequency increments can be set at either 25 kHz
or 100 kHz. Hold the UP arrow in while powering up the
unit to enter the setup screen. Press the AUDIO button
repeatedly to step through the setup items to reach the
Step Size Mode screen. Use the UP or DOWN arrow
button to select the desired setting.
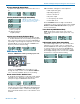
DOWN Button Menu
Hold the DOWN button while powering up the unit.
Hold
Then press both
Then press the AUDIO button repeatedly to scroll
through the setup screens. Use the UP and DOWN ar-
row to select the available options for each setting.
Remote Control Enable “Dweedle Tones”
rc on allows the transmitter to respond to audio signals
(“dweedle tones”) delivered to the microphone from a
smart phone app. rc oFF disables this function.
If a remote control signal is detected but the function is
turned off, the message rc oFF will be displayed briefly
on the transmitter’s LCD to confirm that a valid signal
was received, but that the remote control function is not
enabled.
HMa transmitter settings that can be adjusted:
• Audio input level (gain)
• Operating frequency
• Panel Lock/Unlock
• RF power output
• Low frequency roll-off filter
• Power LED on/off
The LectroRM Smart Phone App is used almost
exclusively for remote control. See the section entitled
Remote ‘Control with Dweedle Tones on page 12
for more information.
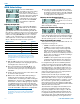
Power Back On (DOWN Button Menu)
PbAc (Power back on after power loss) sets the
unit to either (1) turn back on after power loss or (0)
remain off.
LCD Backlight Setting (Down Button Menu)
The LCD backlight can be set to turn off after either
5 minutes or 30 seconds or stay on continuously.
Hold the DOWN arrow in while powering up the unit
to enter the setup screen. Press the AUDIO button
repeatedly to step through the setup items to reach
the backlight settings screen. Use the UP or DOWN
arrow button to select the desired setting.