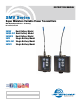
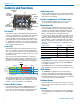
INSTRUCTION MANUAL SMV Series Super Miniature Variable Power Transmitters With Digital Hybrid Wireless® Technology US Patent 7,225,135 SMQV Dual Battery Model SMQV-941 Dual Battery Model SMQV/X Dual Battery Model SMV Single Battery Model SMV-941 Single Battery Model SMV/X Single Battery Model Fill in for your records: Serial Number: Purchase Date: Rio Rancho, NM, USA www.lectrosonics.
SMV Series Introduction The SM Series variable power transmitters are the product of many years of engineering and experience in professional audio markets.
Super-Minature Belt Pack Transmitter Table of Contents Introduction............................................................................2 General Technical Description.............................................4 Controls and Functions........................................................6 LCD Screen.........................................................................6 Power LED...........................................................................6 Power LED Off Feature..................
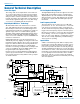
SMV Series General Technical Description Servo Bias Input No Pre-Emphasis/De-Emphasis The voltage and current requirements of the wide variety of electret microphones used in professional applications has caused confusion and compromises in the wiring needed for wireless transmitters. To address this problem, the unique Servo Bias input circuit provides an automatically regulated voltage over a very wide range of current for compatibility with all microphones.
Super-Minature Belt Pack Transmitter Signal Encoding and Pilot Tone In addition to controlling the limiter, the DSP also encodes the digitized audio from the A/D converter and adds an ultrasonic pilot tone to control the squelch in the receiver. A pilot tone squelch system provides a reliable method of keeping a receiver output muted (audio mute) even in the presence of significant interference.
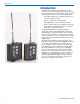
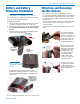
SMV Series Controls and Functions Audio Input Jack Modulation LEDs LCD Battery Compartment Cover Plate UP Arrow Antenna Jack Audio Input Jack Battery Compartment Thumb Screw DOWN Arrow PWR LED AUDIO Button FREQ Button LCD Screen The LCD is a numeric-type Liquid Crystal Display with screens for adjusting power, frequency, audio level and low frequency audio roll-off. The transmitter can be powered up with or without the RF output turned on.
Super-Minature Belt Pack Transmitter Battery and Battery Eliminator Installation Note: Standard zinc-carbon batteries marked “heavy-duty” or “long-lasting” are not adequate. The battery status circuitry is designed for the voltage drop over the life of lithium batteries. To install new batteries: 1. Turn the Battery Cover Plate Thumbscrew counterclockwise a few turns until the door will rotate. 2. Insert the new batteries into the housing. The positive (+) battery terminal goes into the transmitter first.
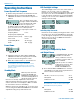
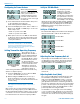
SMV Series Operating Instructions Power Up and Boot Sequence 1) Ensure that good batteries are installed in the unit. 2) Simultaneously press and hold the AUDIO and FREQ buttons until the Power On Boot Sequence is initiated. LCD Backlight Settings The LCD backlight can be set to turn off after either 5 minutes or 30 seconds, or stay on continuously. Hold the UP arrow in while powering up the unit to enter the setup screen.
Super-Minature Belt Pack Transmitter X • 100 Series mode: CP 100 • 200 Series mode: CP 200 • Mode 3 (contact the factory for details): CP 3 • 400 Series mode: CP 400 • IFB Series mode: CP IFB • Mode 6 (contact the factory for details): CP 6 4) Press either AUDIO or FREQ button to select the power setting screen and use the Up and Down down arrows to select the desired level of power. 5) Simultaneously press the AUDIO and FREQ buttons to exit this mode and turn off the power.
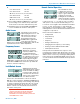
SMV Series Configuring for Power Restore Power Restore Screens When using external power source through a battery eliminator, Power Restore will return your transmitter to settings it had before it was powered off. This eliminates the need to power on through the unit itself. 1) Press and hold the Down Arrow Button then power on the transmitter by pressing the Audio and Freq buttons simultaneously. 2) The LCD will display the status, either “rc ON” or “rc OFF.
Super-Minature Belt Pack Transmitter Less than -20 dB Off Off -20 dB to -10 dB Green Off -10 dB to +0 dB Green Green +0 dB to +10 dB Red Green Greater than +10 db Red Red Note: Different voices will usually require different gain settings, so check this adjustment as each new person uses the system. If several different people will be using the transmitter and there is not time to make the adjustment for each individual, adjust it for the loudest voice.
SMV Series Installing the Connector: Line Level Signals 1) If necessary, remove old connector from microphone cable. 2) Slide Rubber Boot onto microphone cable with the large end facing away from the microphone. (See illustration above.) 3) If necessary, slide the 1/8-inch black shrink tubing onto the mircrophone cable. (This tubing is needed for some cables to ensure the cable fits snugly in the rubber boot.
Super-Minature Belt Pack Transmitter Microphone Cable Termination for Non-Lectrosonics Microphones TA5F Connector Assembly Mic Cord Stripping Instructions 1 4 5 2 3 VIEW FROM SOLDER SIDE OF PINS 0.15" 0.3" Crimping to Shield and Insulation Strip and position the cable so that the clamp can be crimped to contact both the mic cable shield and the insulation. The shield contact reduces noise with some microphones and the insulation clamp increases ruggedness.
SMV Series Wiring Hookups for Different Sources In addition to the microphone and line level wiring hookups illustrated below, Lectrosonics makes a number of cables and adapters for other situations such as connecting musical instruments (guitars, bass guitars, etc.) to the transmitter. Visit www.lectrosonics.com and click on Accessories, or download the master catalog. A lot of information regarding microphone wiring is also available in the FAQ section of the web site at: http://www.lectrosonics.
Super-Minature Belt Pack Transmitter Silver Paste on SM Series Transmitter Thumbscrews Silver paste is applied to thumbscrew threads on new units at the factory to improve the electrical connection from the battery compartment through the housing on any SM Series transmitter. This applies to the standard battery door and the battery eliminator. Threads provide electrical contact Simply hold the cloth around the threads and turn the thumbscrew. Move to a new spot on the cloth and do it again.
SMV Series LectroRM Android By New Endian LLC LectroRM is a mobile application for iOS and Android operating systems. Its purpose is to remotely control Lectrosonics Transmitters, including: • SM Series • WM • L Series The app remotely changes settings on the transmitter through the use of encoded audio tones, which when received by the attached microphone, will alter the configured setting. The app was released by New Endian, LLC in September 2011.
Super-Minature Belt Pack Transmitter Straight Whip Antennas This is a full size cutting template used to cut the length of the whip for a particular frequency. Lay the uncut antenna on top of this drawing and trim the whip length to the desired frequency. The supplied caps can be used several different ways: 1) A color cap on the end of the whip 2) A color sleeve next to the connector with a black cap on the end of the whip (trim the closed end of the colored cap off with scissors to make a sleeve).
SMV Series Accessories for single battery models: Accessories for dual battery models: PSM Leather pouch with integrated belt clip PSMD Leather pouch with integrated belt clip SMBCUPSL Spring-loaded machined aluminum clip SMDBCSL Spring-loaded machined aluminum clip SMBCDN Machined, wire belt clip for SMV transmitters, antenna down SMDBC Machined, wire belt clip for SMQV transmitters SMBCUP Machined, wire belt clip for SMV transmitters, antenna up 35924 Themal insulated pad installed for SMQV
Super-Minature Belt Pack Transmitter Accessories for Both Models SMBATELIM External power adapter (battery eliminator) for all SM Series transmitters. 6 to 36 volt external sources. Handles up to 1 amp consumption. Protected against shorts and reverse polarity. To install the battery eliminator, loosen the thumbscrew completely and remove the battery door. Insert the battery eliminator and tighten the thumbscrew. SMKITTA5 Microphone connector kit with watertight sleeve for all SM Series transmitters.
SMV Series Troubleshooting Before going through the following chart, be sure that you have a good battery in the transmitter. It is important that you follow these steps in the sequence listed. SYMPTOM POSSIBLE CAUSE TRANSMITTER PWR LED OFF 1) Battery is inserted backwards or dead. 2) Transmitter not powered up. (See Operating Instructions, Power UP and Boot Sequence.
Super-Minature Belt Pack Transmitter SYMPTOM POSSIBLE CAUSE HISS AND NOISE -- AUDIBLE DROPOUTS 1) Transmitter gain (audio level) far too low. 2) Receiver antenna missing or obstructed. 3) Transmitter antenna broken or missing. 4) Operating range too great. 5) Signal interference. Turn off transmitter. If receiver’s signal strength indicator does not drop to nearly zero, this indicates an interfering signal may be the problem. Try a different operating frequency.
SMV Series Specifications and Features Operating frequencies: US Block 470 470.100 - 495.675 Block 19 486.400 - 511.975 Block 20 512.000 - 537.575 Block 21 537.600 - 563.175 Block 22 563.200 - 588.775 Block 23a 588.800 - 607.950 941 941.525 - 951.975 952.875 - 956.225 956.475 - 959.
Service and Repair If your system malfunctions, you should attempt to correct or isolate the trouble before concluding that the equipment needs repair. Make sure you have followed the setup procedure and operating instructions. Check the interconnecting cables and then go through the Troubleshooting section in this manual. We strongly recommend that you do not try to repair the equipment yourself and do not have the local repair shop attempt anything other than the simplest repair.
LIMITED ONE YEAR WARRANTY The equipment is warranted for one year from date of purchase against defects in materials or workmanship provided it was purchased from an authorized dealer. This warranty does not cover equipment which has been abused or damaged by careless handling or shipping. This warranty does not apply to used or demonstrator equipment. Should any defect develop, Lectrosonics, Inc. will, at our option, repair or replace any defective parts without charge for either parts or labor.