
User's Manual

UHF Digital Hybrid Wireless
®
Rio Rancho, NM
19
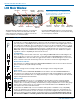
Main Window
The appearance of the LCD Main Window will change
according to which diversity mode is selected:
• SWITCH (2-channel mode) splits the screen to
indicate activity and levels on both receivers and
transmitters.
• RATIO combines the audio outputs of both receiv-
ers to deliver a single audio channel.
With the DIV MODE set to
SWITCH, two audio channels will
be displayed.
With the DIV MODE set to RATIO,
a single audio channel will be
displayed.
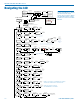
Frequency Screen
1 24 : B7
632 . 700
Receiver
Block
Freq in
hex
Freq in MHz
Press MENU/SEL from the Main
Window once for Receiver 1 and
twice for Receiver 2. The
selected receiver is shown in
the upper left corner of the LCD.
In this example, the upper
screen denotes that receiver 1
is set at 632.700 MHz, requiring
that any transmitter with hex switches be set at B7 for
this frequency. Lectrosonics transmitters with LCD inter-
faces allow frequency to be set in MHz or hex settings.
Press the UP and DOWN buttons to change the fre-
quency of the receiver. When the tuning mode is set to
NORMAL, the UP and DOWN buttons tune in single
channel increments. In the group tuning modes, the UP
and DOWN buttons step through the frequencies stored
in the particular group. Refer to the menu item named
TUNING for details.
Setup Screens
From the Main Window, press MENU/SEL three times
to enter the setup screens. Press UP and/or DOWN to
scroll through the available items and press MENU/SEL
to enter the desired screen. For those items that allow
separate settings for each receiver, press MENU/SEL
repeatedly to toggle back and forth between Receiver 1
and Receiver 2, then press the UP and DOWN buttons
to select the value or option, then press BACK to return
to the previous screen.
SHORTCUT: Hold the MENU/SEL button in while
pressing the UP or DOWN arrow to jump in 16 channel
increments (1.6 MHz steps).
Locking and Unlocking the
Front Panel Controls
The front panel controls can be LOCKED to prevent
accidental changes being made during operation and
handling.
Note: Whether locked or unlocked, the setting persists
when the unit is off and even when the power is turned
off.
From the Main Window, press and hold the UP and
DOWN arrows at the same time and observe the
display. The current state is displayed as LOCKED or
UNLOCKED, and numerals appear as a 3, 2, 1 count-
down takes place. When the countdown is complete the
state is reversed and the new state is displayed.
LCD Backlight Setup
With the power on, simultaneously press the UP but-
ton AND the POWER/BACK button. The unit will then
display the Backlight Options screen. Use the UP and
DOWN arrows to select the desired backlight operating
mode.
DOWN
DOWN
ON
BKLIGHT
30 SEC
BKLIGHT
OFF
BKLIGHT
UP
UP
DOWN
5 MIN
BKLIGHT
UP
Remains on
Dims after 30 seconds
Dims after 5 minutes
Backlight turns OFF
and Remains OFF
Battery Timer Reset
Navigate to TXBAT in the menus and select anything
other than AAT, 9VT or LBT. Then set it back to the
timer setting that matches the batteries you are using
in the transmitter. There is no need to exit the setup
screen. The timer will be reset when you select a non-
timer mode.