
User's Manual

SRc5P and SRc Dual Receivers
LECTROSONICS, INC.
24
SmartTune is the easiest and fastest way to scan the
local RF spectrum and find clear operating frequencies.
The receiver will scan through its tuning bandwidth and
automatically find “empty” areas within the tuning range
that have little or no RF energy. The receiver will then
be set to a frequency within an empty area and prompt
you to continue or use the IR function to sync to a trans-
mitter.
Note: Pressing BACK during an active scan will restore
the operating frequency to what it was set at pre-scan.
When the DIVMODE is set to SWITCHED, there are
two different frequencies that can be discovered, so the
LCD screens will prompt you through the procedure for
one receiver, then continue to repeat the process for
the other receiver. When the DIVMODE is set to RATIO,
there is only one frequency to be found.
The sample screens shown here are for the
SWITCHED mode. Similar screens appear for the
RATIO mode, but there is only one frequency to be
discovered.
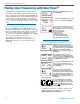
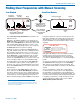
Finding Clear Frequencies with SmartTune
TM
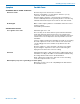
SETUP
SMARTUNE
Navigate to the SMARTUNE screen and
press MENU/SEL.
SMART
TUNE
1
Use the UP and DOWN arrows to select
receiver 1 or 2, and press MENU/SEL.
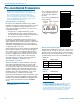
TX 1
BAND
B1
The scan can cover all three blocks in the
band, or only one of the three. Use the
UP and DOWN arrows to select the tuning
range to be scanned:
B1 - the entire Band B1
21 - block 21 only
22 - block 22 only
23 - block 23 including TV37
23N - block 23 bypassing TV37*
B1N - Band B1 bypassing TV37*
*NOTE: 23N and B1N (“N” refers to North America)
scans skip past TV Channel 37 (608 to 614 MHz) since
it is reserved for radio astronomy in North America.
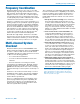
OK
SYNC
1
After the scanning is complete, the
newly discovered frequency will be set
automatically. The LCD will then prompt
to SYNC the frequency to the matching
transmitter via the IR port (DOWN
ARROW), or to continue by pressing OK
(MENU/SEL).
TUNE RX2
NOW? YES
After leaving the SYNC screen, the
LCD will ask about setting up the other
receiver. Use the UP and DOWN arrows to
select YES to tune the other receiver, then
press MENU/SEL to continue.
IS TX1
ON? YES
Turn on the transmitter that matches the
first receiver that was tuned. Use the
UP and DOWN arrows to select YES and
press MENU/SEL.
OK
SYNC
2
After the scanning is complete, the
newly discovered frequency will be set
automatically. The LCD will then prompt
to SYNC the frequency to the matching
transmitter via the IR port (DOWN
ARROW), or to continue by pressing OK
(MENU/SEL).
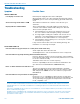
Press the BACK button several times
to return to the Main Screen and verify
that both transmitters show a strong RF
signal strength and that the Pilot Tone
icons are NOT blinking (when Pilot Tone
is enabled).
Pilot Tone icons (P)
RF signal strength
It is always good practice to verify the frequencies by
going through the procedure in the section entitled
Multi-channel System Checkout.