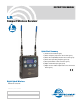
INSTRUCTION MANUAL LR Compact Wireless Receiver Quick Start Summary 1) Install receiver batteries (p.8). 2) Select frequency step size in the receiver (p.12). 3) Select the compatibility mode in the receiver (p.12). 4) Find a clear operating frequency (p.12,13). 5) Set up transmitter to match receiver (p.14). 6) Adjust transmitter input gain (p.14). 7) Adjust receiver audio output level for the connected device (p.15).
LR 2 LECTROSONICS, INC.
Compact Portable Receiver Table of Contents Digital Hybrid Wireless®..................................................................................................1 Quick Start Summary............................................................1 Introduction.............................................................................4 Three Band Tuning Range....................................................4 RF Front-End with Tracking Filter..........................................
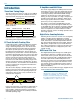
LR Introduction IF Amplifiers and SAW Filters Three Band Tuning Range The LR receiver tunes across a range of over 76 MHz. This tuning range covers three standard Lectrosonics frequency bands. See page 9 for more information. TUNING RANGE BAND BAND BAND Three tuning ranges are available covering standard bands as follows: Band Bands Covered Freq. (MHz) A1 470, 19, 20 470.1 - 537.5 B1 21, 22 23 537.6 - 614.3 C1 24, 25, 26 614.4 - 691.
Compact Portable Receiver SmartSquelch™ A DSP-based algorithm named SmartSquelchTM optimizes the receiver performance in very weak signal conditions. The RF level and supersonic noise in the audio are continuously monitored to determine the appropriate noise reduction needed and the point at which squelch (complete muting of the audio) is necessary.
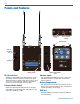
LR Panels and Features IR PORT IR (infrared) Port AUDIO OUT Balanced Audio Output Antenna Inputs Belt clip mounting hole USB Port CAN ICES-3 (B)/NMB-3(B) Model: LR-XX Made in the USA Serial No. XXXXX Frequency block XXX (XXX.X - XXX.X MHz) This device complies with part 15 of the FCC rules. Operation is subject to the condition that this device does not cause harmful interference.
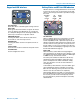
Compact Portable Receiver Keypad and LCD Interface Battery Status and RF Link LED Indicators Alkaline, lithium or rechargeable batteries can be used to power the receiver. For accurate battery status indications, select the type of batteries you will be using in the menu. Transmitter signal received RF signal strength Battery status LED RF LINK LED Glows blue when a valid RF signal is being received. BATT LED Glows green when the batteries are good.
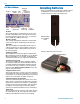
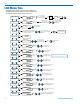
LR LCD Main Window RF level Audio level Diversity activity Pilot tone Transmitter battery elapsed time Frequency in MHz Frequency band in use Frequency in hex code Installing Batteries Power is provided by two AA batteries. Alkaline, lithium or NiMH types can be used. The batteries are connected in series by a plate in the battery door. Full modulation RF level The triangle graphic corresponds to the scale on the left side of the display.
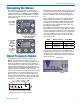
Compact Portable Receiver Navigating the Menus Menu setup items are arranged in a vertical list on the LCD. Press MENU/SEL to enter the menu, then navigate with the UP and DOWN arrows to highlight the desired setup item. Press MENU/SEL to enter the setup screen for that item. Refer to the menu map on the following page. Press MENU/ SEL to enter the menu Press the UP and DOWN arrows to navigate and highlight the desired menu item Press BACK to return to the previous screen About Frequency Blocks A 25.
LR LCD Menu Tree The menus presented on the LCD are arranged in a straightforward manner, with those that are likely to be used more often located at the top of the tree. Smart Tune B1 B1 NA 23 NA Frequency Frequency SEL BACK IR Sync IR Sync SEL Press BACK RF Scan Press SEL to stop scanning, SEL select WideView, ZoomView BACK or resume scanning 21 22 23 Use arrow keys to select desired scanning range Block 21 B1 B1 555.
Compact Portable Receiver Menu Item Descriptions Smart Tune An automatic scanning function that identifies a usable frequency and sets the receiver on it. After the scan is complete, an option will appear to transfer the settings to an IR enabled transmitter. The receiver will remain set on the newly discovered frequency whether or not the IR transfer option was used. Frequency Allows manual selection of the operating frequency.
LR System Setup Procedures Mode 3 is a special compatibility mode for use with another brand of wireless. Contact the factory for details. Summary of Steps 200 Series works with legacy Lectrosonics models such as all UM200, UH200 and UT200 Series transmitters. 1) Install receiver batteries and select the battery type in the setup screen. 2) Select frequency step size in the receiver. 3) Select the compatibility mode in the receiver.
Compact Portable Receiver Cursor scrolls across screen during scanning When the scan is complete a screen will appear briefly to display the frequency chosen by Smart Tune, and then it will change to IR Sync. If you are using a Lectrosonics transmitter that has an IR port, the settings can be transferred from the receiver to the transmitter in a few seconds with a single button.
LR 5) Set Up Transmitter to Matching Frequency and Compatibility Mode If you have not already set the frequency on the transmitter in the previous procedures, use IR Sync or complete the settings manually. Lectrosonics transmitters with IR Sync: On the LR receiver, navigate to IR Sync on the menu and press the MENU/SEL button. Hold the transmitter and receiver fairly close to each other (within two feet or so) and position them so the IR ports are facing one another.
Compact Portable Receiver 7) Set Receiver Audio Output Level The audio output can be adjusted from -50 dBu (mic level) to +5 dBu (line level) in 1 dB steps. It is best to use an output level high enough to drive the connected device to an optimal level without the need for additional gain. If the receiver is set to full output and the level is still not sufficient to drive the connected device to an optimal level, then some gain will need to be applied by the connected device.
LR Firmware Update As of the date of this writing, the firmware update program runs only on a Windows operating system. Updating the firmware is simply a matter of downloading a utility program and file from the web site and running the program with the receiver connected to a computer via the USB port. Go to www.lectrosonics.com/US. Click on SUPPORT in the top bar, then click on L-Series in the categories list. Click on the link labeled Firmware Updates at the bottom of the screen.
Compact Portable Receiver Accessories MCLRTRS Audio cable; LR output; TA3F to 3.5 mm TRS male; 20 inch length. Wired for mono output (tip and ring are combined). AMJ(xx) Rev. A Whip antenna; swiveling. Specify frequency band. AMM(xx) Whip antenna; straight. Specify frequency band. MCSRTRS Audio cable; dual LR output; two TA3F to one 3.5 mm male TRS; 11 inch length. About Whip Antenna Frequencies: Frequencies for whip antennas are specified by the band number.
LR Specifications Operating Frequencies: Tuning range A1: 470.100 - 537.575 MHz Tuning range B1: 537.600 - 614.375 MHz* Tuning range C1: 614.400 - 691.175 MHz *North American transmitter models exclude the radio astronomy band from 608 to 614 MHz. Frequency selection steps: Selectable; 100 kHz or 25 kHz Receiver Type: Dual conversion, superheterodyne IF Frequencies: 243.950 MHz and 250.000 kHz Frequency stability: ±0.001 % Front end bandwidth: 20 MHz @ -3 dB Sensitivity: 20 dB SINAD: 1.
Compact Portable Receiver Service and Repair If your system malfunctions, you should attempt to correct or isolate the trouble before concluding that the equipment needs repair. Make sure you have followed the setup procedure and operating instructions. Check the interconnecting cables. We strongly recommend that you do not try to repair the equipment yourself and do not have the local repair shop attempt anything other than the simplest repair.
LIMITED ONE YEAR WARRANTY The equipment is warranted for one year from date of purchase against defects in materials or workmanship provided it was purchased from an authorized dealer. This warranty does not cover equipment which has been abused or damaged by careless handling or shipping. This warranty does not apply to used or demonstrator equipment. Should any defect develop, Lectrosonics, Inc. will, at our option, repair or replace any defective parts without charge for either parts or labor.