
Installation Guide

Pleose
reod
instructions completely
before
beginning
instollation.
Save
lhese
instructions
for
{uture re{erence.
I
m
patant
Safety
lnstructi
ons
-
: :-::-:-
hos o
polorizeC
.
-:
:-:
: ll:
:
"'
.."'.^'-:
ciher)
os
:
t::--':
-.
':duce
lhe
risk c-
::'--::-:-\.
--
s
:
-3
/'
j'
'
c
polorize:
outlet
oniy one
woy.
lf
the
pLug
does
not
{it iully
in ihe outelt,
reverse
il-:
plug. lf ii
still
does
not
{it, contocl
o
quoli{ied electricion.
Never use
with on
extension
cord unless
plug
con
be
fully
inserted.
Do
nol olter
the
plug'
Coution:
To reduce
the risk of
fire, electric
shock,
or
iniury:
'
Disconnect
power lo
the unit
prior to instollotion.
'Use
only
insuloted
stoples
or
plostic iies to secure
cords.
.
R.oute ond secure
cords
so
thot
they will
not be
pinched
or
domoged
when
the cobinet
is pushed io
the woll.
'
Not inlended
{or recessed
inslollotion
in
ceilings
or
soffits.
.
Noi intended
for
su#oce
insiollotion
in enclosed
cobinetry.
.
The Notionol
Electrkol Code
(NEC)
does
noi
permil
cords
lo be conceoled
.
where
domoge
lo
insulolion
moy
go
unnoficed.
To prevent
{ire, do
nol
run
cord
where
ii moy be
inoccessible
for
exominotion.
'-,
.
eords
sheu++be+
.
Do noi
look direcily oi the
lighied
LED.
.
Do nol operote
lomp with
o
missing
or domoged
lens.
'
The LED
lomps inside
the fixture ore
nol reploceoble.
Mounting:
This
product is
designed
to
be
mounied
to the
underside
of
o
horizontol
surfoce
such
os the bottom
o{ o cobinel
or shelf.
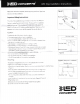
. ploce
{ixiure
in
desired
locotion.
Use
ihe mounting
hooks
(plostic/meiol) lo hold
the {ixture.
(Fisure
1)
.
Mork
the
position
of
the mounting
holes occording
io
the mounting
hooks.
.
Pre-drill
holes ot
morked locotions
ond ottoch
mounting
hooks with
wood
screws
(included)
to horizontol
su rfoce.
.
For mounting
onto su
rfoces olher
thon wood, use
suitoble
{osteners
(not
included).
.
lnsioll
the
fixture by
inserting
into the mouniing
hooks.
{Figure
2}
{Figure
3)
.
Plug
in
power
cord.
Extensions
ore sold seperotely
{or linking
multiple fixtures
together.
Do not
link more ihon
20
uniis
in
o series.
Figure
1.
Hooks
!33:IED,
Figure
3
(Completed installation)
Mouniing
surface
Fixtu
re
CONCEPTS
ETEI_J
LED Strip
lnstollotion
lnstructions
lVc \
I
\ _,___\
llml
Mountins
Hook[
ll
^
-l
I
\ts
l\
Mounting
Scre,', s
Figure 2