INSTALLATION INSTRUCTIONS GD-8823 & BL-8823 EXPOSED LEVER THERMOSTATIC BATH/SHOWER VALVE WITH CRADLE & CLASSIC HANDSET, DECK MOUNTED GD-8823 BL-8823
Dimensions in Inches (& Millimetres) GD-8823 6 5/16” (160 mm) 16 11/16” (424 mm) 2 15/16” (74 mm) 5 1/8” (130 mm) 3 1/16” (78 mm) 2” (53 mm) MAX 2” (50 mm) 1 3/8” (35 mm) 7 3/8” (188 mm) Whilst every effort is made to ensure accuracy, design and dimensions are subject to change without notice as part of the company’s product development process.
What you need to know Tools: Maintenance Adjustable Wrench Groove Joint Pliers Hacksaw Phillips Screwdriver Pipe Tape Spatula Spirit Level Your new bathroom faucet is designed for years of trouble-free performance. Safety Tips Important Points If you are soldering during faucet installation, remove cartridges, seats, gaskets and washers prior to applying flame, otherwise you will void the warranty. Prior to beginning installation.
Steps 1-4 Installation Procedure Lefroy Brooks always recommends that plumbing products be installed by a licensed professional. Shut off main water supply before installation. - 2” m) /6” 1 1 - 51m m (1m Ø1 1 Ø 27 /16”-1 3 / mm -Ø 3 16” 0mm 6 5/ 16” Opt (160mm - 7 7/8” ima l 18 - 200m 2mm m) - (7 3/16 ”) 1 1 4 Before installation, mark out the deck to the dimensions as shown above. 2 2 Install the legs to the deck.
Steps 3-4 Installation Procedure Lefroy Brooks always recommends that plumbing products be installed by a licensed professional. Shut off main water supply before installation. 4 3 3 Fix the legs with nuts. 4 Install the faucet onto either the return bends or the cranked legs as chosen. Screw the nut tightly to seal securely.
Steps 5-6 Installation Procedure Lefroy Brooks always recommends that plumbing products be installed by a licensed professional. Shut off main water supply before installation. 5 5 6 Unscrew the set screw and take off the handle. 6 6 Undo the screw and take off the adaptor and stopper.
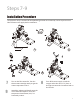
Steps 7-9 Installation Procedure Lefroy Brooks always recommends that plumbing products be installed by a licensed professional. Shut off main water supply before installation. H Thermometer 8 7 9 7 9 Turn on the flow controller. Turn the thermostatic cartridge untill you get the water temperature at 38°. C 8 Turn off the water supply. Install the stopper and make sure its "H" plane as the figure mentioned is horizontal and on the left side. Attach the adaptor and handle onto the valve.
Step 10 Installation Procedure Lefroy Brooks always recommends that plumbing products be installed by a licensed professional. Shut off main water supply before installation. B A 10 10 After the cradle is installed, attach the hand shower and hose side B and side A (vacuum breaker) to the cradle.
For additional assistance or service call 718-302-5292 9am to 5pm EST Monday to Friday www.lefroybrooks.com LEFROY BROOKS INC, 1828 TROUTMAN STREET, RIDGEWOOD, NY, 11385 TELEPHONE: 718-302-5292. FAX: 718-302-4177 The use of trademarks, product design and artwork is subject to licence or agreement with Christo A. Lefroy Brooks. The design registrations, trademark registrations and copyrights are protected by law and the use or reproduction outside the terms of an agreement is prohibited.
Dimensions in Inches (& Millimetres) BL-8823 5 1/10" (130mm) 5 4/5" (130mm) 2 6/ 10" mm ) 17" (424 mm) (66 3 1/10" (78 mm) 2 1/10" (53 mm) 2" (50 mm) 1 2/5" (35 mm) 1" (26mm) 7 2/5" (188 mm) 7 3/10" (185 mm) Whilst every effort is made to ensure accuracy, design and dimensions are subject to change without notice as part of the company’s product development process.