R WWW.LEGACYCARAUDIO.
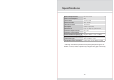
Specifications Power Requirements DC 12~14.4V Power Consumption 9W Screen Size 7 T F T- L C D Screen Format 16 9 Resolution Pixel 1440*234 A/V Inputs Video Input 3EA Dimensions (L)7.7 ( W)5.0 ( H)0.92inch IR Power Requirements DC 12V IR Power Consumption 3W IR Transmitter Frequency A Right 2.8MHz Left 2.3MHz IR Transmitter Frequency B Right 3.8MHz Left 3.
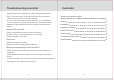
Troubleshooting check list * Please make these simple checks before calling for assistance. * If the TV is to be used in conjunction with any other equipment, , read the other product s instruction manual. * If you choose not follow the below checklist or any problems you are experiencing with this product are not solved, never attempt to repair a defective monitor yourself. Check with your dealer . No picture & no sound * Power cord inserted into power source incorrectly.
Caution Connections , Read this page in detail in order to protect people s health or assets. Driver never operates while driving. Driver may cause car accident by watching monitor while driving. POWER AV Do not disassemble the device. MENU + Use proper volume while driving. - AV3 Do not watch the monitor for a long period of time without the engine running. It will drain your battery and you will have issues starting your car. Do not drop or give strong impact to LCD panel.
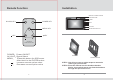
Remote Function Installation REMOTE CONTROL SENSOR IR TRANSMITTER AV1 /AV2 POWER POWER POWER KEY AV1/AV2 KEY AV MENU + - AV3 MENU AV3 INPUT HEADPHONE OUTPUT MENU KEY MENU POWER AV MENU + - SELECT KEY KEY LCD MONITOR REMOTE CONTROL UNIT 41-20-1001 POWER AV1/AV2 MENU Power ON/OFF Signal Select Press this button for OSD menu. After that it is the ENTER button.
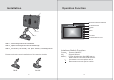
Operation Function Installation REMOTE CONTROL SENSOR IR TRANSMITTER POWER AV MENU + - POWER AV MENU Metal bracket + - AV3 INPUT AV3 Locking knob HEADPHONE OUTPUT STEP 1 Put the locking knob into the metal bracket. STEP 2 Adjust to the locking knob to select the desired angle. STEP 3 Connect the DC terrninal and RCA terrninal to the Wiring Harness.