
Instruction Manual


Assembl
y
Instruction
490
-
8
9
20
TODDLER
BED/
DAY
BED
Page
3
of
6
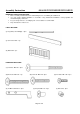
TOOLS REQUIRED:
Hex Allen Wrench with Ball tip
-
1pc (
I
ncluded)
Phillips Screwdriver (not included)
PRE
-
ASSEMBLY
:
Remove all part
s and hardware from the box and lay out on a clear carpeted or scratch
-
free work surface, as
this will avoid damaging parts during assembly. The shipping box provides an ideal work surface.
Do not dispose of any packaging or contents of the shipping carto
n until assembly is completed to avoid
accidentally discarding small parts or hardware.
Use the parts and hardware lists above to identify and separate each of the pieces included.
The illustrations provided allow for easier assembly when used in conjunct
ion with the assembly instructions.
The use of power tools for assembly is not recommended. Power tools can damage hardware or split wood.
ASSEMBLY INSTRUCTIONS
:
1.
Remove the assembly instructions from the envelope attached and review. Keep them handy for
referring to the
part and hardware descriptions.
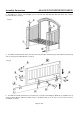
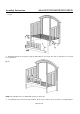
2.
To
convert
the
C
rib
in
to a Toddler
B
ed
/ Daybed
,
stand your Crib
on a smooth floor
as shown and
r
emove the
Front
Gate
from the
C
rib
.
Please refer to the gate installation instruction
(
step
3 of the Crib A
ssembly Instructions)
and follow them in reverse order
.
(see Fig 1)
F
ig
(
1
)