User Guide
Table of Contents Introduction + Welcome .. ..................................................................................................................... 3 EV3 Technology + Overview ...................................................................................................................... 4 + EV3 Brick . . .................................................................................................................... 5 Overview ........................................
Introduction Welcome Welcome to the world of LEGO® MINDSTORMS® In this LEGO® MINDSTORMS® EV3 robotics set you have all the elements you need to create and command thousands of LEGO robots. If you have never built a LEGO MINDSTORMS robot before, we recommend that you start by building one of the five cool robot characters pictured on the EV3 packaging. In the Robot Missions inside the EV3 programming software, you’ll find building instructions and examples of how to program these robots.
EV3 Technology Overview Large Motor EV3 Brick Touch Sensor + Lets you program precise and powerful robotic action. + Serves as the control center and power station for your robot. + Recognizes three conditions: touched, bumped, and released. Color Sensor + Recognizes seven different colors and measures light intensity. Remote Infrared Beacon + Remote controls your robot from a distance. Medium Motor + Maintains precision, while trading some power for compact size and faster response.
EV3 Technology EV3 Brick Overview The Display shows you what is going on inside the EV3 Brick and enables you to use the Brick Interface. It also allows you to add text and numerical or graphic responses into your programming or experiments. For example, you might want to program the Display to show a happy face (or a sad face) for a comparison response or to display a number that is the result of a mathematical calculation (learn more about using the Display Block in the EV3 Software Help).
EV3 Technology Technical Specifications for the EV3 Brick EV3 Brick The Brick Status Light that surrounds the Brick Buttons tells you the current status of the EV3 Brick. It can be green, orange, or red, and can pulse.
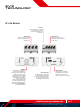
EV3 Technology EV3 Brick PC Port The Mini-USB PC Port, located next to the D port, is used to connect the EV3 Brick to a computer. Output Ports Input Ports Output Ports A, B, C, and D are used to connect motors to the EV3 Brick. Input Ports 1, 2, 3, and 4 are used to connect sensors to the EV3 Brick. Speaker All sounds from the EV3 Brick come through this speaker— including any sound effects used in programming your robots.
EV3 Technology EV3 Brick Installing Batteries in the EV3 Brick 1 2 The EV3 Brick requires six AA/LR6 batteries. Alkaline or rechargeable Lithium Ion AA batteries are recommended. To install the AA batteries, remove the battery cover on the back of the EV3 Brick by pressing the two plastic tabs on the side. After you have inserted the six AA batteries, attach the battery cover again. AA, 1.
EV3 Technology EV3 Brick Turning On the EV3 Brick To turn on the EV3 Brick, press the Center button. After you press the button, the Brick Status Light will turn red and the Starting screen will be displayed. When the light changes to green, your EV3 Brick is ready. To turn the EV3 Brick off, press the Back button until you see the Shut Down screen. The Abort X will already be selected. Use the Right button to select the Accept check mark, then press the Center button for OK.
EV3 Technology EV3 Motors Large Motor The Large Motor is a powerful “smart” motor. It has a built-in Rotation Sensor with 1-degree resolution for precise control. The Large Motor is optimized to be the driving base on your robots. By using the Move Steering or Move Tank programming block in the EV3 Software, the Large Motors will coordinate the action simultaneously.
EV3 Technology EV3 Sensors Color Sensor The Color Sensor is a digital sensor that can detect the color or intensity of light that enters the small window on the face of the sensor. This sensor can be used in three different modes: Color Mode, Reflected Light Intensity Mode, and Ambient Light Intensity Mode. Color Sensor In Color Mode, the Color Sensor recognizes seven colors—black, blue, green, yellow, red, white, and brown—plus No Color.
EV3 Technology EV3 Sensors Touch Sensor The Touch Sensor is an analog sensor that can detect when the sensor’s red button has been pressed and when it is released. That means the Touch Sensor can be programmed to action using three conditions—pressed, released, or bumped (both pressed and released). Touch Sensor Using input from the Touch Sensor, a robot can be programmed to see the world as a blind person might, reaching a hand out and responding when it touches something (pressed).
EV3 Technology EV3 Sensors Infrared Sensor and Remote Infrared Beacon Infrared Sensor The Infrared Sensor is a digital sensor that can detect infrared light reflected from solid objects. It can also detect infrared light signals sent from the Remote Infrared Beacon. 70cm// 27inch 27inch 70cm The Infrared Sensor can be used in three different modes: Proximity Mode, Beacon Mode, and Remote Mode.
EV3 Technology EV3 Sensors The Remote Infrared Beacon is a separate device that can be handheld or built into another LEGO® model. It requires two AAA alkaline batteries. To turn the Remote Infrared Beacon on, press the big Beacon Mode button on the top of the device. A green LED Indicator will turn on, indicating the device is active and transmitting continuously. Another press on the Beacon Mode button will turn it off (after one hour of inactivity, the beacon will automatically turn itself off).
EV3 Technology Connecting the EV3 Technology Connecting Sensors and Motors In order to function, motors and sensors must be connected to the EV3 Brick. Using the flat black Connector Cables, link sensors to the EV3 Brick using Input Ports 1, 2, 3, and 4. If you create programs while the EV3 Brick is not connected to your computer, the software will assign sensors to default ports.
EV3 Technology Connecting the EV3 Technology Connecting the EV3 Brick to Your Computer Connect the EV3 Brick to your computer by USB Cable or wirelessly using either Bluetooth or Wi-Fi. USB Cable Using the USB Cable, plug the Mini-USB end into the EV3 Brick’s PC Port (located next to Port D). Plug the USB end into your computer. USB Cable connection LEGO.
EV3 Technology Connecting the EV3 Technology Wireless—Bluetooth If your computer is not Bluetooth enabled, you will need a Bluetooth USB dongle for your computer. Making a Bluetooth Connection to the Computer Before you can make a Bluetooth connection between the EV3 Brick and the computer running the EV3 Software, you will need to enable Bluetooth on the EV3 Brick. Directions for this can be found on page 27.
EV3 Technology Connecting the EV3 Technology Wireless—Wi-Fi Your first step in connecting to Wi-Fi is to acquire a Wi-Fi USB dongle. For a list of compatible dongles, go to the official LEGO® MINDSTORMS® website (www. LEGO.com/mindstorms). To begin the setup, you must have access to a wireless network, and know the network’s name and its password. If the EV3 Software is open, close it and insert your Wi-Fi dongle into the EV3 Brick using the USB Host Port.
EV3 Technology Connecting the EV3 Technology Connecting the EV3 Brick to a network After selecting Wi-Fi on the Settings screen, use the Up and Down buttons to select Connections and press the Center button for OK. The EV3 Brick will now search for and list available Wi-Fi networks. Using the Up and Down buttons for navigation, find your network on the list. If the EV3 Brick is not already connected to your network (indicated by a check mark), select your network using the Center button.
EV3 Technology Connecting the EV3 Technology Making a Wi-Fi Connection from the Computer to the EV3 Brick Using the USB Cable, connect the EV3 Brick to the computer. Open an EV3 Software program. Access the Wireless Setup tool in the Hardware Window (at the bottom right of the screen), or select Wireless Setup from the Tools Menu. The computer will display which networks it detects. Select the network you want to connect to and click on “Connect” to configure the connection.
EV3 Technology EV3 Brick Interface The EV3 Brick is the control center for bringing your robots to life. Using the Display and the Brick Buttons, the EV3 Brick Interface contains four basic screens that give you access to an amazing array of functions unique to the EV3 Brick. It can be something as simple as starting and stopping a program, or something as complicated as writing the program itself. Run Recent This screen will be blank until you begin to download and run programs.
EV3 Technology EV3 Brick Interface Brick Apps The EV3 Brick comes with four brick applications preinstalled and ready to use. In addition, you can also make your own apps in the EV3 Software. Once downloaded to the EV3 Brick, the homemade apps will be displayed here. The four preinstalled apps are the following: Port View On the first screen in the Port View, you will see, at a glance, which ports have sensors or motors attached.
EV3 Technology EV3 Brick Interface IR Control Control the forward and reverse motion of any motor connected to one of the four output ports using the Remote Infrared Beacon as remote control and the Infrared Sensor as receiver (the Infrared Sensor must be connected to Port 4 in the EV3 Brick). There are two different modes. In one mode, you will be using Channels 1 and 2 on the Remote Infrared Beacon.
EV3 Technology EV3 Brick Interface Brick Program The EV3 Brick comes with an on-brick programming application similar to the software installed on your computer. These instructions provide you with the basic information you will need to get started. Create a Program Open up your Brick Program App. The Start screen provides you with a Start and a Loop block that are connected via a Sequence Wire. The vertical broken Add Block line in the middle indicates that you can add more blocks to your program.
EV3 Technology EV3 Brick Interface Delete Blocks If you want to delete a block from a program, highlight the block you want to delete and press the Up button to go to the Block Palette. In the Block Palette, navigate to the trashcan on the far left and press the Center button. The block is now deleted. Run Program To run your program, use the Left button to navigate to the Start block at the very beginning of the program. Press the Center button and your program will run.
EV3 Technology EV3 Brick Interface Settings This screen will enable you to see and adjust various general settings on the EV3 Brick. Volume There may be occasions when you will want to adjust the volume of the sound coming from the EV3 Brick Speaker. To change the speaker volume, go to the Settings screen. As the top menu, Volume will already be highlighted. Press the Center button. Use the Right and Left buttons to change the volume setting, which can be intervals from 0% to 100%.
EV3 Technology EV3 Brick Interface Bluetooth This is where Bluetooth is enabled on the EV3 Brick, and where you can choose some specific privacy and Apple iOS settings. Here you can also connect to other Bluetooth devices such as another EV3 Brick. When you select Bluetooth on the Settings page, there are four options presented—Connections, Visibility, Bluetooth, and iPhone/ iPad/iPod.
EV3 Technology EV3 Brick Interface Connections This option allows you to discover and choose other available Bluetooth devices (make sure Bluetooth is enabled). If you click on “Connections,” you will be taken to a Favorites screen, where the devices you trust are displayed and identified with a check mark. No passkeys are needed for your trusted devices. Using the check boxes, you can manage which devices you wish to have as Favorites.
EV3 Technology EV3 Brick Interface Wi-Fi This is where you enable Wi-Fi communication on the EV3 Brick and connect to a wireless network. After selecting Wi-Fi on the Settings screen, use the Up and Down buttons to select the word “WiFi” and press the Center button for OK. A check mark will appear in the WiFi box. Wi-Fi is now enabled on your EV3 Brick, and a Wi-Fi icon will be shown in the top left of the EV3 Brick Display.
EV3 Software Minimum System Requirements Operating Systems: + Windows: Windows XP (32 bit); Vista (32/64 bit), excluding Starter Edition; Windows 7 (32/64 bit); and Windows 8 desktop mode, excluding Starter Edition —all with the latest service packs + Macintosh: MacOS X v.10.6, 10.7, and 10.8 (Intel only) —with the latest service packs While building robots is fun, the heart of robotics is bringing them to life—making them move and accomplish tasks.
EV3 Software Lobby 4. Open Recent—Get easy access to the latest projects you have worked with. Every time you open the EV3 Software, you will automatically start out in the Lobby area. The Lobby makes it easy to locate and work with the software and gives you access to everything you need. 5. Quick Start—Support resources such as short introduction videos, EV3 User Guide, and Software Help. In the Lobby you will find the following options and resources: 1.
EV3 Software Project Properties and Structure When you open a new program, it will automatically create a project folder file. All programs, images, sounds, videos, instructions, and other assets that are used within a project will automatically be stored in this project folder. This makes it easy to store your project and share it with others. Project and Program tabs Each project will be displayed in the form of a tab at the top of the screen.
EV3 Software Project Properties and Structure Project Properties displayed include: 1. Project Description—Give your project a title, describe it, and insert any images and video you would like to appear in the Lobby when the project is previewed. 2. Project Content Overview—Here you will find all assets included in the project: for example, programs, images, sounds, and My Blocks. 3. Daisy Chain Mode—This check box enables the Daisy Chain Mode, so you can program up to four connected EV3 Bricks. 4.
EV3 Software Robot Missions In the EV3 Software Lobby area, five cool robots are featured: TRACK3R, SPIK3R, EV3RSTORM, R3PTAR, and GRIPP3R. These robots have been created by LEGO® designers to demonstrate some of the ways you can build and program with LEGO® MINDSTORMS® EV3. Click on any of the robots and you will be taken to the Mission Overview of that particular robot. Missions are designed to take you through the essentials of programming and getting to know the EV3 hardware and building system.
EV3 Software Programming Program your robot in the intuitive icon-based programming interface. Drag and drop the actions that you want into the programming window and adjust them to suit your robot’s behavior. 3. Hardware Page—Establish and manage your communication with the EV3 Brick here and see what motors and sensors are connected where. This is also where you download programs to the EV3 Brick. The EV3 Programming interface consists of the following main areas: 1.
EV3 Software Programming Blocks and Palettes All the programming blocks that are used for controlling your robot are located in Programming Palettes at the bottom of the Programming interface underneath the Programming Canvas. The Programming blocks are divided into categories according to type and nature, making it easy to find the block you need.
EV3 Software Programming Blocks and Palettes Data Blocks (In order from left to right) + Variable + Constant + Array Operations + Logic Operations + Math + Round + Compare + Range + Text + Random Advanced Blocks (In order from left to right) + File Access + Messaging + Bluetooth Connection + Keep Awake + Raw Sensor Value + Unregulated Motor + Invert Motor + Stop Program My Blocks When you are repeatedly using the same segment of a program in many programs, that is a good time to create
EV3 Software Hardware Page The Hardware Page provides a range of information about your EV3 Brick. It is always located in the lower right-hand corner when working with programs and can be collapsed when needed using the Expand/Collapse tab. Even when collapsed, the Hardware Page Controller will be visible, allowing you to download your program or experiment. The different Hardware Page Controller buttons have the following functionality: 1 2 3 Hardware Page Controller 1.
EV3 Software Hardware Page Brick Information The Brick Information tab displays important information about the EV3 Brick that is currently connected, such as EV3 Brick name, battery level, firmware version, connection type, and memory bar. It also gives you access to the Memory Browser and Wireless Setup tools. Port View The Port View tab displays information about the sensors and motors connected to the EV3 Brick.
EV3 Software Content Editor The Content Editor offers a convenient way for users to document the purpose, process, and analysis of their projects. You can include text, images, videos, sound effects, and even building instructions. Content Editor is also the place where already-made content—for example, the Robot Missions—are displayed and used. 2. Edit/View Mode—Allows you to view or edit your pages.
EV3 Software Tools In the top menu bar of the EV3 Software you will find a number of small Tools that can add extra functionality and support to your EV3 Software experience. You can learn more about the Tools in the EV3 Software Help. Sound Editor Create your own sound effects or customize one from our selection of official EV3 Sound files. The sounds can then be used for programming your robot by use of the Sound Programming Block.
EV3 Software Tools Memory Browser It is easy to lose track of what you have stored on your EV3 Brick. The Memory Browser provides an overview of memory use on your EV3 Brick (including an SD card if you have it inserted). You can use the Memory Browser to transfer programs, sounds, graphics, and other files between your EV3 Brick and a computer, and copy and delete files that are already on your EV3 Brick.
Trouble shooting EV3 Software Help Under Help at the top menu bar of the EV3 Software, you will find access to the Help section. The EV3 Help section is a comprehensive and structured resource that provides helpful information about and guidance with all of the EV3 Software, including how to best use and program with sensors and motors. This is the first place to look if you need help or more information on how to use the EV3 Software.
Trouble shooting Firmware Update Firmware is the software that is inside the EV3 Brick. Without its firmware, the EV3 Brick will not work. Occasionally, the LEGO Group may release new versions of the firmware that add enhanced functions or fix software bugs. To update the firmware, you need a USB connection from your computer to your EV3 Brick. Your computer must also be connected to the Internet. 1. Turn your EV3 Brick on and connect it to your computer. 2. Select Firmware Update in the Tools menu.
Trouble shooting Resetting the EV3 Brick If your EV3 Brick suddenly stops working and cannot be shut down through the normal process, you will need to reset your EV3 Brick. Resetting the EV3 Brick does not delete existing files and projects from previous sessions in the EV3 Brick memory. Files and projects from the existing session will be lost. 1. Make sure that the EV3 Brick is turned on. 2. Hold down the Back, Center, and Left buttons on the EV3 Brick. 3.
Useful Information Sound File List Animals Colors Cat purr Dog whine Snake hiss Black White Dog bark 1 Elephant call Snake rattle Blue Yellow Dog bark 2 Insect buzz 1 T-rex roar Brown Dog growl Insect buzz 2 Green Dog sniff Insect chirp Red LEGO.com/mindstorms LEGO, the LEGO logo, MINDSTORMS and the MINDSTORMS logo are trademarks of the/ sont des marques de commerce de/son marcas registradas de LEGO Group. ©2013 The LEGO Group. 041329. p.
Useful Information Sound File List Communication Expressions Bravo Goodbye Okay Boing Kung fu Smack EV3 Hello Okey-dokey Boo Laughing 1 Sneezing Fantastic Hi Sorry Cheering Laughing 2 Snoring Game over LEGO Thank you Crunching Magic wand Uh-oh Go MINDSTORMS Yes Crying Ouch Good job Morning Fanfare Shouting Good No LEGO.
Useful Information Sound File List Information Mechanical Activate Error Start Air release Blip 4 Motor stop Analyze Flashing Stop Airbrake Horn 1 Ratchet Backwards Forward Touch Backing alert Horn 2 Sonar Color Left Turn Blip 1 Laser Tick tack Detected Object Up Blip 2 Motor idle Walk Down Right Blip 3 Motor start Error alarm Searching LEGO.
Useful Information Sound File List Movements Numbers Arm 1 Servo 1 Speed down Eight One Three Arm 2 Servo 2 Speed idle Five Seven Two Arm 3 Servo 3 Speed up Four Six Zero Arm 4 Servo 4 Speeding Nine Ten Drop load Slide load Lift load Snap LEGO.com/mindstorms LEGO, the LEGO logo, MINDSTORMS and the MINDSTORMS logo are trademarks of the/ sont des marques de commerce de/son marcas registradas de LEGO Group. ©2013 The LEGO Group. 041329. p.
Useful Information Sound File List System Click Overpower Confirm Power down Connect Ready Download Start up General alert LEGO.com/mindstorms LEGO, the LEGO logo, MINDSTORMS and the MINDSTORMS logo are trademarks of the/ sont des marques de commerce de/son marcas registradas de LEGO Group. ©2013 The LEGO Group. 041329. p.
Useful Information Image File List Expressions Eyes Big smile Sad Angry Dizzy Neutral Tired left Heart large Sick Awake Down Nuclear Tired middle Heart small Smile Black eye Evil Pinch left Tired right Mouth 1 open Swearing Bottom left Hurt Pinch middle Toxic Mouth 1 shut Talking Bottom right Knocked out Pinch right Up Mouth 2 open Wink Crazy 1 Love Sleeping Winking Mouth 2 shut ZZZ Crazy 2 Middle left Tear Disappointed Middle right LEGO.
Useful Information Image File List INFORMATION LEGO Accept No go Thumbs down Color sensor IR sensor Sound sensor Backward Question mark Thumbs up EV3 icon Large motor Temp. sensor Decline Right Warning EV3 LEGO Touch sensor Forward Stop 1 Gyro sensor Medium motor US sensor Left Stop 2 IR beacon MINDSTORMS LEGO.com/mindstorms LEGO, the LEGO logo, MINDSTORMS and the MINDSTORMS logo are trademarks of the/ sont des marques de commerce de/son marcas registradas de LEGO Group.
Useful Information Image File List Objects Progress Bomb Lightning Bar 0 Dial 2 Hourglass 0 Timer 4 Boom Night Bar 1 Dial 3 Hourglass 1 Water level 0 Fire Pirate Bar 2 Dial 4 Hourglass 2 Water level 1 Flowers Snow Bar 3 Dots 0 Timer 0 Water level 2 Forest Target Bar 4 Dots 1 Timer 1 Water level 3 Light off Dial 0 Dots 2 Timer 2 Light on Dial 1 Dots 3 Timer 3 LEGO.
Useful Information Image File List System Accept 1 Dot empty Slider 0 Slider 6 Accept 2 Dot full Slider 1 Slider 7 Alert EV3 small Slider 2 Slider 8 Box Busy 0 Slider 3 Decline 1 Busy 1 Slider 4 Decline 2 Play Slider 5 LEGO.com/mindstorms LEGO, the LEGO logo, MINDSTORMS and the MINDSTORMS logo are trademarks of the/ sont des marques de commerce de/son marcas registradas de LEGO Group. ©2013 The LEGO Group. 041329. p.
Useful Information Brick Program App—Assets List Sounds Images 1. Hello 7. Object 1. Neutral 7. Question mark 2. Goodbye 8. Ouch 2. Pinch right 8. Warning 3. Fanfare 9. Blip 3 3. Awake 9. Stop 1 4. Error alarm 10. Arm 1 4. Hurt 10. Pirate 5. Start 11. Snap 5. Accept 11. Boom 6. Stop 12. Laser 6. Decline 12. EV3 icon LEGO.
Useful Information Element List 2x 4128594 1x 6015596 3x 4558797 14x 4175442 17x 4128598 10x 4140806 12x 4142865 3x 4513174 1x 6015597 3x 4547581 4x 4514554 3x 4666999 3x 4547582 1x 4565452 1x 6031962 3x 4558802 4x 4173975 4x 4562805 3x 4545430 6x 4657296 6x 4185661 28x 4206482 4x 4254606 38x 4514553 11x 4239601 1x 4544143 6x 4234429 4x 6031821 4x 4656205 4x 4189936 4x 4173941 8x 4188298 9x 4227155 1x 4189131 LEGO.
Useful Information 10x 6006140 2x 4246901 12x 4142822 3x 6028041 2x 6044688 10x 4142135 4x 4299389 6x 4184169 95x 4121715 1x 4558692 4x 4552347 6x 4495935 1x 6024109 8x 4120017 4x 4184286 4x 4248204 2x 4177431 8x 4645732 6x 4142823 4x 4128593 1x 6024106 4x 4522933 4x 4542573 4x 4177430 12x 4140327 5x 4255563 9x 370626 2x 4629921 12x 4111998 2x 4143187 4x 4141300 LEGO.
Useful Information 6x 4560175 2x 4538007 4x 6013936 4x 4211758 4x 4560177 6x 4499858 5,5 1x 4502595 12x 4225033 2x 4211510 4x 4211888 4x 4211807 2x 4211553 6x 4211375 2x 4526985 2x 4508553 2x 4514558 22x 4211815 9x 4211639 2x 4211805 1x 4535768 1x 4211566 2x 4539880 2x 4630114 3x 4494222 2x 4540797 LEGO.com/mindstorms LEGO, the LEGO logo, MINDSTORMS and the MINDSTORMS logo are trademarks of the/ sont des marques de commerce de/son marcas registradas de LEGO Group. ©2013 The LEGO Group.
Useful Information 25 cm / 10 in. 1x 6008919 1x 6014051 4x 6024581 35 cm / 14 in. 1x 6008472 1x 6008577 2x 6024583 50 cm / 20 in. 1x 6009811 2x 6009430 1x 6009996 1x 6024585 1x 6036901 iPad, iPhone and iPod touch are trademarks of Apple Inc., registered in the U.S. and other countries. iPod Touch (4th gen.) iPhone 4 iPhone 4S iPad 1 iPad 2 iPad 3 (3rd gen.) LEGO.