Outdoor 802.11n Wireless Access Point (P/N DA2131-V1A) Owner’s Manual 1308197 Rev.
Federal Communications Commission Statement This device complies with Part 15 of the FCC Rules and RSS-210 Issue 8 of Canada. Operation is subject to the following two conditions: • This device may not cause harmful interference, and • This device must accept any interference received, including interference that may cause undesired operation.
FCC Radio Frequency Exposure Caution Statement In order to maintain compliance with the FCC RF exposure guidelines, this equipment should be installed and operated with minimum distance 20cm between the radiator and your body. Use only with supplied antenna. Unauthorized antenna, modification, or attachments could damage the transmitter and may violate FCC regulations. Any changes of modifications not expressly approved by the grantee of this device could void the users authority to operate the equipment.
WARNING: POSTPONE INSTALLATION UNTIL THERE IS NO RISK OF THUNDERSTORM OR LIGHTNING ACTIVITY IN THE AREA. When using this device, basic safety precautions should always be followed to reduce the risk of fire, electric shock and injury to persons, including the following: Read all of the instructions {listed here and/or in the user manual} before you operate this equipment. Give particular attention to all safety precautions. Retain the instructions for future reference.
TABLE OF CONTENTS Chapter 1 Introduction ...........................................................................................................................1 Overview .......................................................................................................................................... 1 Product Features ............................................................................................................................ 1 Package Content ...................................
- vi -
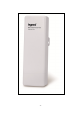
Owner’s Manual of DA2131-V1A Chapter 1 Introduction Overview The DA2131-V1A Outdoor Wireless Access Point from Legrand now extends your home network’s wireless reach to locations outside the home, such as patios or pool areas. With its environmental protection, the DA2131-V1A can perform under rigorous weather conditions including heavy rain and wind. With its Power over Ethernet (PoE) design, it can be easily installed in the areas where power outlets are not available. With built-in IEEE 802.
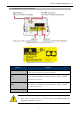
Owner’s Manual of DA2131-V1A Physical Details The following figures illustrate the physical details of the Outdoor N-WAP. 1.1 The Rear Panel – LED Wireless LAN LED Power LED LAN Port LED WAN Port LED Figure 1-1 Rear Panel LED Identification 1.2 LED Indications LED Power WLAN WAN LAN State Meaning On System On Off System Off On Wireless Radio ON. Off Wireless Radio Off. Blinking Data is transmitting or receiving on the wireless. On Port linked. Off No link.
Owner’s Manual of DA2131-V1A 1.3 The Rear Panel – Port & Connector Figure 1-2 Port and Connector of DA2131-V1 Figure 1-3 Port and Connector description label Interface Function RP-SMA Connector For external antenna. You can use the RP-SMA connector to connect a 2.4GHz external antenna (not supplied by Legrand). The RJ-45 jack allows LAN connection through a Category 5 cable. Supports LAN auto-sensing on 10/100M speed and half/ full duplex; complys with IEEE 802.3/ 802.3u respectively.
Owner’s Manual of DA2131-V1A 1.4 PoE Injector PoE Module Figure 1-4 Top view of PoE Injector 3.
Owner’s Manual of DA2131-V1A Chapter 2 Physical Installation Physical Installation Steps 2.1 Preparation before Installation 2.1.1 Professional Installation Required Please seek assistance from a professional installer who is well trained in Wireless data product installation and knowledgeable in the local regulations. 2.1.2 Safety Precautions 1. To keep you safe and install the hardware properly, please read and follow these safety precautions. 2.
Owner’s Manual of DA2131-V1A 2.2 Hardware Installation 2.2.1 Installation Steps Step 1. Push the latch in the bottom of DA2131-V1A to remove the sliding cover. Figure 2-1 Move the cover Step 2. Plug the RJ-45 Ethernet cable into the LAN Port of DA2131-V1A. Figure 2-2 Cable Connection RJ-45 8P8C Ethernet cable is required.
Owner’s Manual of DA2131-V1A Step 3. Slide the cover back to seal the bottom of the DA2131-V1A. Figure 2-3 Seal the bottom Step 4. Take out the AC adapter and PoE injector, plug the power cord into the DC port and plug the other side of the RJ-45 cable from STEP 2 into the POE port of the PoE injector. DC: Insert adapter DC power cord POE: This jack is connected to LAN port of the Outdoor N-WAP with the supplied Cat5 cable.
Owner’s Manual of DA2131-V1A Step 5. Complete the hardware installation as indicated on the illustration below. Figure 2-5 Cabling complete It will take about 50 seconds to complete the boot up sequence after powering on the Outdoor N-WAP; Power LED will be active, and after that the WLAN Activity LED will be flashing to show the WLAN interface is enabled and working now. To avoid lightening strike damage, consider installing a lightening arrestor between the NWAP and PoE injector.
Owner’s Manual of DA2131-V1A 2.2.2 Pole Mounting Step 1. Turn the DA2131-V1A over. Feed a pole mounting tie through the middle hole of the rear structure. Step 2. Mount DA2131-V1A securely to the pole by fastening both mounting ties tightly. Step 3. Now you have completed the hardware installation of DA2131-V1A as shown in the figure below. Mounting Tie Figure 2-6 Pole Mounting 2.2.
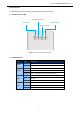
Owner’s Manual of DA2131-V1A Chapter 3 Network Settings Configuring and monitoring your DA2131-V1A from a web browser The DA2131-V1A integrates a web-based graphical user interface that can cover most configurations and machine status monitoring. Via a standard web browser, you can configure and check machine status from anywhere around the world. NOTE: The DA2131-V1A comes from the factory with the following IP configuration: Default IP Address: 192.168.40.252 Default IP Subnet Mask: 255.255.255.
Owner’s Manual of DA2131-V1A 4. Select Protocol in the Network Component Type dialog box and click Add button. 5. Select TCP/IP in Microsoft of Select Network Protocol dialog box then click OK button to install the TCP/IP protocol, it may need the Microsoft Windows CD to complete the installation. Close and go back to Network dialog box after the TCP/IP installation. 6. Select TCP/IP and click the properties button on the Network dialog box. Figure 3-2 7.
Owner’s Manual of DA2131-V1A 40 2 Figure 3-3 8. Click OK to complete the IP parameters setting. For OS of Microsoft Windows Vista / 7: 1. Click the Start button and select Settings, then click Control Panel. The Control Panel window will appear. 2. Move mouse and double-click the right button on Network Connections item. The Network Connections window will appear. Double click Local Area Connection icon, then User Account Control window shown. Right click Continue button to set properties. 3.
Owner’s Manual of DA2131-V1A Figure 3-4 4. Move mouse and click General tab, Select Specify an IP address and type in values as following example. IP Address: 192.168.40.2, or any IP address within 192.168.40.2 to 192.168.40.251 is good to connect to the Outdoor NWAP. IP Subnet Mask: 255.255.255.
Owner’s Manual of DA2131-V1A 5. Click OK to complete the IP parameters setting. For OS of Microsoft Windows NT: 1. Click the Start button and select Settings, then click Control Panel. The Control Panel window will appear. 2. Move mouse and double-click the right button on Network icon. The Network window will appear. Click Protocol tab from the Network window. 3. Check the installed list of Network Protocol window.
Owner’s Manual of DA2131-V1A 40.252 40.252 Figure 3-7 Login Window Default User name: admin Default Password: admin If the above screen does not pop up, it may mean that your web-browser has been set to a proxy. Go to Tools menu>Internet Options>Connections>LAN Settings, in the screen that appears, cancel the Using Proxy checkbox, and click OK to finish it.
Owner’s Manual of DA2131-V1A Chapter 4. Basic System Settings Setup Wizard This Setup Wizard page guides you to configure the Internet connection and Wireless Settings quickly. Figure 4-1 Setup Wizard Click Next button to next step for Internet connection settings. There are five options (DHCP, Static Mode, PPPOE, L2TP, PPTP) for Internet connection on WAN port. a.
Owner’s Manual of DA2131-V1A The page includes the following fields: Object Host Name Description This option specifies the Host Name of the Router. b. Static IP Address If your ISP provides a static or fixed IP Address, Subnet Mask, Gateway and DNS setting, select Static Mode (fixed IP). The Static IP settings page will appear, shown as following. Figure 4-3 Step 1.
Owner’s Manual of DA2131-V1A c. PPPOE Connection If your ISP provides a PPPoE connection, select PPPoE option. And enter the following parameters. Figure 4-4 Step 1. PPPOE The page includes the following fields: Object User Name/Password Description Enter the User Name and Password provided by your ISP. These fields are case-sensitive. Verify Password Fill in the password again for verification. Keep Alive: Keep the PPPoE connection all the time. Please also configure the Redial Period field.
Owner’s Manual of DA2131-V1A d. L2TP If your ISP provides L2TP connection, please select L2TP option. And enter the following parameters. Figure 4-5 Step 1. L2TP The page includes the following fields: Object Description L2TP Server IP Address Allow user to make a tunnel with remote site directly to secure the data transmission among the connection. User can use embedded L2TP client supported by this router to make a VPN connection.
Owner’s Manual of DA2131-V1A IP Address Fill in the IP address for WAN interface. Subnet Mask Fill in the subnet mask for WAN interface. Default Gateway Fill in the default gateway for WAN interface out going data packets. Operation Mode Keep Alive: Keep the L2TP connection all the time. Please also configure the Redial Period field. Manual: Let user connect the L2TP connection manually. e. PPTP If your ISP provides PPTP connection, please select PPTP option.
Owner’s Manual of DA2131-V1A The page includes the following fields: Object PPTP Server IP Address Description Allow user to make a tunnel with remote site directly to secure the data transmission among the connection. User can use embedded PPTP client supported by this router to make a VPN connection. If you select the PPTP support on WAN interface, fill in the IP address for it. User Name/Password Enter the User Name and Password provided by your ISP. These fields are case-sensitive.
Owner’s Manual of DA2131-V1A Step 2: configure Wireless Settings There are five options (Disable, OPENWEP, SHAREDWEP, WPA-PSK, WPA2-PSK) for Wireless security connection. Figure 4-7 Step 2. Configure Wireless Settings Object Network Mode Description This field determines the wireless mode which the NWAP works on. This field determines which operating frequency will be used. The Frequency (Channel) default channel is set to AutoSelect, so the NWAP will choose the best channel automatically.
Owner’s Manual of DA2131-V1A 4.2 Operation Mode Figure 4-8 Operation Mode Configurations a. Bridge: The Bridge mode allows that all Ethernet and wireless interfaces are bridged into a single Bridge interface. b. Gateway: The Gateway mode allows that the first Ethernet port is treated as WAN port and the Ethernet port and the wireless interface are bridged together and are treated as LAN ports. c.
Owner’s Manual of DA2131-V1A 4.3 Internet Settings 4.3.1 WAN Figure 4-9 WAN Settings a. STATIC Object IP Address Description Enter the IP address in dotted-decimal notation provided by your ISP. Subnet Mask Enter the subnet Mask in dotted-decimal notation provided by your ISP, usually is 255.255.255.0 Default Gateway (Optional) Enter the gateway IP address in dotted-decimal notation provided by your ISP.
Owner’s Manual of DA2131-V1A c. PPPoE Object User Name/Password Description Enter the User Name and Password provided by your ISP. These fields are case-sensitive. Verify Password Fill in the password again for verification. Keep Alive: Keep the PPPoE connection all the time. Please also configure the Redial Period field. Operation Mode On Demand: Please configure the Idle Time field. When time is up, the PPPoE connection will disconnect. The connection will re-connect when any outgoing packet arise.
Owner’s Manual of DA2131-V1A If you select the PPTP support on WAN interface, fill in the IP address for it. User Name/Password Enter the User Name and Password provided by your ISP. These fields are case-sensitive. Address Mode Static: To configure the IP address information by manually, please fill in the related setting at below. Dynamic: The option allows the machine to get IP address information automatically from DHCP server on WAN side.
Owner’s Manual of DA2131-V1A Object MAC Address IP Address Subnet Mask Description The physical address of the NWAP, as seen from the LAN. The value can't be changed. Enter the IP address of your NWAP or reset it in dotted-decimal notation (factory default: 192.168.40.252). An address code that determines the size of the network. Normally use 255.255.255.0 as the subnet mask. Default Gateway Fill in the default gateway for LAN interfaces out going data packets.
Owner’s Manual of DA2131-V1A 4.3.3 DHCP Clients The “DHCP clients” page shows all the active DHCP clients. The table window shows the active clients with their Hostname, MAC address, assigned IP address, and time expired information. Figure 4-11 DHCP Clients 4.3.4 VPN Passthrough Figure 4-12 VPN Passthrough The page includes the following fields: Object L2TP Passthrough Description Select enable or disable the L2TP pass-through function from pulldown menu.
Owner’s Manual of DA2131-V1A 4.4 Wireless 4.4.1 Basic Figure 4-13 Basic Wireless Settings The page includes the following fields: Object Wireless On/Off Description Click Wireless OFF button to turn off wireless RF radio. Click Wireless ON button to turn on wireless RF radio. Antenna Switch Select Internal antenna or External antenna for using. The default is using Internal antenna. Wireless Mode Click to select wireless mode from pull down menu. SSID It is the wireless network name.
Owner’s Manual of DA2131-V1A Broadcast Network Enable or disable the SSID broadcast function. Name (SSID) AP Isolation Wireless network is similar to the virtual local area network. All of the Wireless client devices can access each other completely. When you enable this function, it will turn off connection between wireless clients. Only allows connection between wireless client and this AP router.
Owner’s Manual of DA2131-V1A 4.4.2 Advanced Figure 4-14 Advanced Wireless Settings The page includes the following fields: Object B/G Protection Mode Description Default: Auto. You can select the other options including On and Off. The B/G protection technology is CTS-To-Self. It will try to reserve the throughput for 11g clients from 11b clients connecting to the device as AP mode. Beacon Interval Beacons are the packets sending by Access point to synchronize the wireless network.
Owner’s Manual of DA2131-V1A buffered data according to this value. For example, selecting “1” means to check the buffered data at every beacon. Fragment Threshold The fragmentation threshold determines the size at which packets are fragmented (sent as several pieces instead of as one block). Use a low setting in areas where communication is poor or where there is a great deal of radio interference. This function will help you to improve the network performance.
Owner’s Manual of DA2131-V1A 4.4.3 Security a. Disable Figure 4-15 Wireless Security Settings If you set Security Mode to “Disable”, the wireless data transmission will not include encryption to prevent from unauthorized access and monitoring.
Owner’s Manual of DA2131-V1A b. OPEN-WEP Figure 4-16 OPEN-WEP If you set Security Mode to “OPEN-WEP” or “SHARED-WEP”, please fill in the related configurations at below. Object Description Default Key Specify a Key number for effective. WEP Keys When you select the encryption type as WEP, please input 5, 13 (1~4) (ASCII), 10 or 26 (HEX) characters for WEP Key.
Owner’s Manual of DA2131-V1A c. SHARED-WEP Figure 4-17 SHARED-WEP If you set Security Mode to “OPEN-WEP” or “SHARED-WEP”, please fill in the related configurations at below. Object Description Default Key Specify a Key number for effective. WEP Keys When you select the encryption type as WEP, please input 5, 13 (1~4) (ASCII), 10 or 26 (HEX) characters for WEP Key.
Owner’s Manual of DA2131-V1A d. WPA-RADIUS Figure 4-18 WPA-RADIUS The page includes the following fields: Object Description WPA Cipher Suite Select TKIP, AES or TKIPAES for WPA algorithms. Key Renewal Interval Please fill in a number for Group Key Renewal interval time. IP Address Enter the RADIUS Server’s IP Address provided by your ISP. Enter the RADIUS Server’s port number provided by your ISP. Port (The Default is 1812.
Owner’s Manual of DA2131-V1A e. WPA-PSK Figure 4-19 WPA-PSK The page includes the following fields: Object Description WPA Cipher Suite Select TKIP, AES or TKIPAES for WPA algorithms. Pre-Shared Key Please fill in a passphrase like ‘test wpa 123’, or a hexadecimal string like '65E4 E123 456 E1'. Key Renewal Interval Please fill in a number for Group Key Renewal interval time.
Owner’s Manual of DA2131-V1A f. WPA2-RADIUS Figure 4-20 WPA2-RADIUS The page includes the following fields: Object Description WPA Cipher Suite Select TKIP, AES or TKIPAES for WPA algorithms. Key Renewal Interval Please fill in a number for Group Key Renewal interval time. PMK Cache Period Only valid in WPA2 security. Set WPA2 PMKID cache timeout period, after time out, the cached key will be deleted. PMK Cache Period unit is minute. Only valid in WPA2 security.
Owner’s Manual of DA2131-V1A Session timeout interval is for 802.1x re-authentication setting. Set to zero to Session Timeout disable 802.1x re-authentication service for each session. Session timeout interval unit is second and must be larger than 60. IP Address Enter the RADIUS Server’s IP Address provided by your ISP. Port Enter the RADIUS Server’s port number provided by your ISP. (The Default is 1812.) Shared Secret Enter the password that the Wireless Router shares with the RADIUS Server.
Owner’s Manual of DA2131-V1A h. 802.1X Figure 4-22 802.1X The page includes the following fields: Object Description WEP Enable or Disable WEP encryption. IP Address Enter the RADIUS Server’s IP Address provided by your ISP. Port Enter the RADIUS Server’s port number provided by your ISP. (The Default is 1812.) Shared Secret Enter the password that the Wireless Router shares with the RADIUS Server. Session Timeout Session timeout interval is for 802.1x re-authentication setting.
Owner’s Manual of DA2131-V1A e. Access Policy Figure 4-23 Access Policy The page includes the following fields: Object Description Policy Select the Disabled, Allow or Reject of drop down menu choose wireless access control mode. This is a security control function; only those clients registered in the access control list can link to this NWAP. Add a station MAC Fill in the MAC address of client to register this AP router access capability.
Owner’s Manual of DA2131-V1A 5.4.4 WDS In the Basic Wireless Settings page, select the Wireless Mode to “WDS” to setup the WDS connection. a. WDS Mode WDS mode allows user to operate as a standard WDS that forwards traffic between WDS links (links that connect to other units in Repeater). The MAC addresses of WDS peers must be configured on the Wireless 11n Access Points/ Repeaters. Basically this mode is used when you have a 2.4GHz outdoor router with more than one WDS link to other AP/Repeaters.
Owner’s Manual of DA2131-V1A Step 2. Go to “Wireless Settings-> WDS”, fill in the MAC Address of the remote site. Figure 4-25 WDS Configuration 1. To Setup the WDS Connection, the channel must be the same in both sites. You should fix the channel from “AutoSelect” to a static one. 2. You must fill in the MAC Address by each other. For example, enter the MAC Address of the remote site to the settings of local site; and enter the MAC Address of the local site to the settings of remote site. 3.
Owner’s Manual of DA2131-V1A Step 1. In the Basic Wireless Settings, configure Wireless Mode to “AP+WDS”.
Owner’s Manual of DA2131-V1A Step 3. Go to “Wireless Settings-> WDS”, fill in the MAC Address of the remote site. Figure 4-27 WDS Configuration 1. To Setup the WDS Connection, the channel must be the same in both sites. You should fix the channel from “AutoSelect” to a static one. 2. You must fill in the MAC Address by each other. For example, enter the MAC Address of the remote site to the settings of local site; and enter the MAC Address of the local site to the settings of remote site. 3.
Owner’s Manual of DA2131-V1A 4.4.5 Site Survey This page is used to view or configure other APs near yours. To connect with other AP by site survey, you need to configure the DA2131-V1 as “AP Client” mode in the Basic Wireless Settings page as following. Step 1. Go to “Wireless Settings-> Basic”, select the Wireless Moe to “AP Client”, Figure 4-28 Basic Wireless Settings Step 2. Go to “Wireless Settings->Site Survey” to scan the AP. Select the AP that you choose to connect, and then click “Next”.
Owner’s Manual of DA2131-V1A Figure 4-29 Site Survey - 1 The page includes the following fields: Object SSID Description It shows the SSID of AP. BSSID It shows BSSID of AP. RSSI It shows the signal strength of current AP. Channel It show the current channel of AP occupied. Encrypt It shows the encryption status. Wireless Mode It show the wireless mode of AP. Step 3. If the AP has encryption setting, it will pop out a window for you filling the encryption setting.
Owner’s Manual of DA2131-V1A Figure 4-30 Site Survey - 2 - 48 -
Owner’s Manual of DA2131-V1A Step 4. After connected with AP, you can open “Status” page under Administrator to check link status.
Owner’s Manual of DA2131-V1A 4.4.6 WPS This section will guide you to add a new wireless device quickly to an existing network by WPS (Wi-Fi Protected Setup) function. Step 1. Choose menu “WPS”, you will see the next screen. Figure 4-32 WPS Setup The page includes the following fields: Object WPS Description Select Enable or Disable the Wi-Fi Protected Setup function. Then click Apply button to take effect function after change. Step 2.
Owner’s Manual of DA2131-V1A Step 1: Choose PBC, and click “Apply”. Figure 4-33 WPS - PBC Step 2: Press and hold the WPS Button equipped on the adapter directly for 2 or 3 seconds. Or you can click the WPS button with the same function in the configuration utility of the adapter. 1) Step 1 & 2 should process within two minutes. 2) DA2131-V1 only supports PBC method. Step 3: Wait for a while until the connection established to complete the WPS configuration.
Owner’s Manual of DA2131-V1A 4.5 Firewall 4.5.1 MAC /IP /Port Filtering Figure 4-37 MAC/IP/Port filtering The page includes the following fields: Object Description MAC/IP/Port Filtering Select Enable or Disable the MAC/IP/Port Filtering function. Source MAC address Fill in the MAC address of source NIC, to restrict data transmission. Dest IP Address Fill in the IP address of destination, to restrict data transmission.
Owner’s Manual of DA2131-V1A Action Select Accept or Drop to specify the action of filtering policies. Comment Make a comment for the filtering policy. Delete Selected Click Delete Selected button to delete all that you selected. Reset Click Reset button to clear selected items. 4.5.2 Port Forwarding Figure 4-38 Port Forwarding The page includes the following fields: Object Description Port Forwarding Select Enable or Disable the Port Forwarding function.
Owner’s Manual of DA2131-V1A that hosted in local network behind the NAT firewall, fill in the port range. Protocol Specify protocol, TCP&UDP, TCP or UDP. Comment Make a comment for the port forwarding policy. Delete Selected Click Delete Selected button to delete all that you selected. Reset Click Reset button to clear selected items. Virtual Server Select Enable or Disable the Virtual Server function.
Owner’s Manual of DA2131-V1A 4.5.4 System Security Figure 5-40 System Security The page includes the following fields: Object Description Remote management Select Deny or Allow for remote management function. Ping form WAN Filter Select Disable or Enable for Ping permit from WAN. SPI Firewall Select Disable or Enable for SPI firewall function.
Owner’s Manual of DA2131-V1A 4.5.5 Content Filtering Figure 4-41 Content Filtering The page includes the following fields: Object Description Keyword Fill in a word for Webs Host Filter policy. URL Fill in a URL string for URL filter. Then click Add button to save the URL filter policy or click Reset button to clear the field. Delete Click Delete button to delete all that you selected. Reset Click Reset button to clear selected items.
Owner’s Manual of DA2131-V1A 4.6 Administrator 4.6.
Owner’s Manual of DA2131-V1A Object Description Username Fill in the user name for web management login control. Password Fill in the password for web management login control. Current Time It shows the current time. Time Zone Select the time zone in your country from pull-down menu.. NTP Server Fill in NTP server IP address. NTP synchronization Fill in a number to decide the synchronization frequency with NTP server.
Owner’s Manual of DA2131-V1A 4.6.3 Settings Management Figure 4-44 Setting Management The page includes the following fields: Object Description Export Button Click Export button to export the current configuration to your PC. Settings file location Click Browse button to select the configuration file from your PC, then click Import button to update the configuration. Load Default Button Click the Load Default button to reset the configuration parameter to factory defaults.
Owner’s Manual of DA2131-V1A 4.6.4 Status This page shows the current status and some basic settings of the device, includes system info, Internet Configurations and Local Network.
Owner’s Manual of DA2131-V1A 4.6.5 System Log This page is used to view the system logs. Figure 4-46 System Log The page includes the following fields: Object Description Refresh Click the Refresh button to refresh the log shown on the screen. Clear Click the Clear button to clear the log display screen.
Owner’s Manual of DA2131-V1A Appendix A: Specifications Product DA2131-V1 150Mbps 802.11n Wireless Outdoor Access Point Hardware Specification Standard support IEEE802.11b/g IEEE 802.11n IEEE 802.3 10Base-T IEEE 802.3u 100Base-TX IEEE 802.3x Flow Control Chipset Ralink RT3050 Memory 16 Mbytes DDR SDRAM 4 Mbytes Flash Interface Wireless IEEE802.
Owner’s Manual of DA2131-V1A WDS PtP WDS PtMP WDS Repeater (AP+WDS) Universal Repeater (AP+Client) Channel Width 20MHz / 40MHz Encryption Security 64/128-bits WEP WPA, WPA-PSK WPA2, WPA2-PSK 802.1X Wireless Isolation Enable it to isolate each connected wireless clients, to let them cannot access mutually.