
Installation Instructions


Ceiling Box
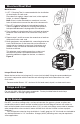
1. Nail-On or J-Bracket types, just nail the ceiling box
accurately to the stud.
Note: The stud should rest on the built-in step (see
diagram) of the ceiling box to allow for flush mounting with
either 3/8" or 1/2" wallboard.
Bar-Hanger type, loosen both screws on bracket used to
secure box to hanger. Adjust bar hanger for either 16" or
24" joist spacing by aligning tab lock with proper slot. Fully
close tab lock with pliers until flush with bar surface. Nail
hanger to studs. Slide box to position desired and tighten
screws to secure box to hanger.
2. Auto/Clamps – Push nonmetallic cable (stripped or
unstripped) through the Auto/Clamp cable entry. Pull cable
to proper length.
3. When ceiling is finished, proceed to mount the lighting
fixture to the ceiling box, using the mounting strap supplied
with the fixture. Align the holes in the strap with the ceiling
box mounting holes.
4. Secure the lighting fixture to the mounting strap.
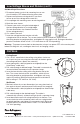
3-3/4" Round Ceiling and Wall Boxes
1. Cut a 3-3/4" round hole in the ceiling or wall using a hole saw.
2. Insert nonmetallic cable (stripped or unstripped) into the Auto/Clamp
®
cable entry.
3. Pull cable through to desired length. The cable is automatically secured without the need to
install separate clamps.
4. Insert the box into the hole and fasten using 3 - #6 screws that fully penetrate 3/8" trade size
or thicker plywood, or 7/16 trade size or thicker Oriented Strand Board (OSB), or 1/2" or
thicker solid wood.
Rating: 8 lbs. max. fixture rating when installed with 3 - #6 screws that fully penetrate 3/8"
trade size or thicker plywood, or 7/16 trade size or thicker Oriented Strand Board
(OSB), or 1/2" or thicker solid wood, for use on ceiling or walls. Not for fan support.
Low-Voltage Boxes and Divider
If you are installing video, telephone, or network wiring, you must use a low-voltage box or a
low-voltage divider to separate the low-voltage wiring from high-voltage electrical wiring.
Nail-On
J-Bracket
Bar-Hanger
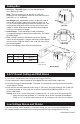
See chart for
offset spacing.
Dia. Volume Offset Spacing
3-1/4 18 1-7/8 inch
4 20 1 inch
(continued on back)