Leica EG 1160 Paraffin Embedding Center Instruction manual Leica EG 1160 V 4.
1. Serial No. ................................................. Year of manufacture ................................................. Manufactured in: Federal Republic of Germany Important information The information, numerical data, notes and value judgments contained in this manual represent the current state of scientific knowledge and state-of-the-art technology as we understand it following thorough investigation in this field.
2. Table of contents 1. Important information ..................................................................................................................................... 3 2. Table of contents ............................................................................................................................................. 4 3. Installation...............................................................................................................................................
3. Installation The Leica EG 1160 is a compact bench-top unit and can be set up easily. All components come in a cardboard box. The components that are packed separately can be attached to the instrument easily (see page 5 "Part list"). 1. Transport and assembly position The Leica EG 1160 must never - not even for a short while - be positioned as shown. These positions will inevitably cause damage to the condenser.
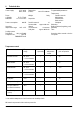
4. Technical data Power supply: 115 V / 60 Hz 230 V / 50 Hz Fuses: 115V/60Hz 230V/50Hz Programmable parameters: 910 x 575 x 320 mm Weight: F1, F2 = T5.0 A acc.
5. Features 1. Paraffin flow rate is pump con trolled. 2. Paraffin flow rate adjustable in 10 increments 3. Paraffin quantity level indicated in the display 4. Separate paraffin collecting tray 5. Removable cassette bath 6. Forceps holder on the right (ba sic instrument) or on the right and left (not basic instrument) 7. Paraffin dispenser with inte grated illumination 8. User menu available in 5 lan guages 9. Fault detection by error codes in the display 10.
6. Safety precautions - The instrument may be used by qualified personnel only. - To avoid any operating mistakes from the beginning, it is necessary to read the operating instructions to familiarize oneself with the technical details. - Paraffin is flammable and should be handled with care. Spillage should be avoided. Paraffin on the surfaces must not be removed with sharp tools as it would ruin the coating. It should be avoided to allow xylene to react on all surfaces.
6. Safety precautions - When using the optional vacuum attachment, please ensure that, after infiltration, the vacuum is neutralised very slowly. Therefore, open the aeration knob very cautiously. Air entering too rapidly could cause hot paraffin to splash and should therefore be avoided. - Prior to connecting the instrument to the power supply in the laboratory, please make sure that the power supply complies with the values specified on the nameplate.
7.
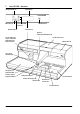
7. Leica EG 1160 – Overview Fuses Main switch (21) Socket for foot pedal Spacers Condenser fins Power cord Vacuum attachment (25) Areation knob (28) Conection branch (27) Magnifier (24) Lid (26) The Leica EG 1160 is a compact benchtop unit. It is available in two different configurations: basic instrument and model with an additional forceps holders on the left. Both models are shipped in a wooden crate.
8. Components and features Paraffin reservoir (13) The paraffin reservoir can hold up to 3 liters. The paraffin temperature can be adjusted in a range from 45 to 70°C. The reservoir has an overheat protection in case of a temperature control failure. The paraffin quantity level is indicated in the display graphically both in the standby and operating condition. The display indicates two levels: 1. Reservoir filling quantity: 1 l - 3 l 2. Reserve: max.
8. Components and features Mold warmer (14) The temperature of the mold warmer is adjustable from 35 to 70°C. The hinged lid can be locked in position while open. Cassette bath (15) The cassette bath temperature is adjustable from 45 to 70°C. The cas– sette bath can hold more than 100 cassettes. It can be easily removed. An integrated lid protects against thermal loss and contamination.
8. Components and features Work area (20) The temperature of the work area is adjustable from 45°C to 70°C. It includes the embedding area, forceps holder (11), recessed area for cassettes (10) and space to remove the lids. The forceps holder (11) is separately heated. The heated recessed area is designed for approximately eight cassettes. By closing the drain hole with the stopper provided, it can be utilised as a paraffin tray.
8. Components and features Instrument with additional forceps holder on the left Forceps holder left (11a) The instrument configuration with an addional forcesp holder on the left covers the needs of left-handers in particular. This forceps holder also is separately heated. Optional accessories Magnifier (24) When correctly mounted, the magnifier can be swung horizontally and vertically.
9. Controls / Display Control panel (1) The control panel with push buttons and the 2-line display (2) is protected with a PE foil.
10. Operation Please ensure that all preparatory steps described in chapter 11 have been completed: 1. Putting the instrument into operation after delivery Turn the instrument on with the main switch (green toggle switch in the lower right corner on the back of the instrument) while pushing the ARROW UP button on the control panel for approx. 2 seconds. Then push the ON/OFF button. The instrument will then be initialised. The main switch should always remain in ON position even after daily work.
10. Operation ACT Mode (Operation) 5. Normal operation of the Leica EG 1160 takes place in the ACT mode. In this mode, all display readings are actual values.
10. Operation ACT Mode (Operation) 5.4 The paraffin flow rate is selectable in 10% increments: 10 %, 20 %, 30 %, 40 %, 50 %, 60 %, 70 %, 80 %, 90 %, 100 % Increase/decrease of the flow rate The display reading will change with the selected flow rate. It always reads the percentage flow rate selected.
10. Operation SET Mode (Programming) 6. The SET mode is activated by pushing the SET/ACT button. The SET mode is used for programming only.
10. Operation SET Mode (Programming) The ARROW buttons are used to preselect the temperature, time and days. The speed of the display increases (1-2 step mechanism), the longer the button is held down. 6.1 TEMPERATURE SETTING The temperature is preselected with the ARROW buttons. Once the minimum or maximum value is reached, the indication will stop. The value displayed when releasing the ARROW button will be stored automatically, and heating and cooling will be activated accordingly.
10. Operation SET Mode (Programming) 6.4 WORKDAYS The workdays are selected with the ARROW buttons. Releasing the button, the indicated day will be put in the memory automatically. The ON/ OFF button is used to confirm if the program shall be activated (YES) or not (NO) the day indicated in the display. If the programming of workdays is not desired, i.e. if the user can do entirely without the automatic turn-on function of the tissue embedding center, "NO" must be entered for each day of the week.
Flow chart Main switch + 2 sec ▼ Self test ▼ I SPEAK..
11. Tissue embedding The paraffin reservoir is filled with wax pellets (e.g. Leica HISTO–WAX). The level of the molten wax should reach up to 2-3 cm under the upper edge of the reservoir. When the symbol for "paraffin tank on reserve" is displayed, there is still approximately 1 litre left. However, the paraffin reservoir should be refilled immediately at that stage.
11. Tissue embedding 5. Open the cassette and transfer the sample to the mold using warm forceps. 6. The mold is placed on the refrigeration spot for a moment. The tissue is oriented with forceps as required. Within a few seconds, the clear consistency of the wax will change. Small tissue specimens can be oriented by slowly pushing the mold from the embedding spot to the refrigeration spot.
12. Cleaning, maintenance, service Regular cleaning and maintenance will keep your Leica EG 1160 in good operating condition for many years. 1. General instructions: Paraffin - Paraffin is flammable and therefore must be handled with care. Avoid spillage of liquid paraffin. - All Leica EG 1160 components that come into contact with paraffin and the interior of the instrument are carefully sealed to prevent wax from entering. Nevertheless, if paraffin is spilled, it should always be removed carefully.
12. Cleaning, maintenance, service 2. Cleaning of paraffin reservoir, filter and dispenser outlet The grid separating solid from liquid wax and the filter can be removed from the paraffin reservoir for cleaning. The reservoir is cleaned inside with a paper tissue. Care should be taken that the reservoir is contaminated. Any dirt inside should be removed prior to removing the grid and the filter. 3.
13. Troubleshooting Whenever a malfunction occurs, please ensure that it is not the result of an operating mistake. The list below includes the most frequent operating errors. Equipment malfunctions are indicated as error messages (error codes 1 to 13) in the LCD display. If such an error code is displayed, please contact your local Leica service center.
13.
13.
14. Ordering information Catalog Number Leica EG 1160 Paraffin embedding center Basic instrument 115 V/60 Hz ........................................................................ 0386 30527 230 V/50 Hz ........................................................................ 0386 30528 Model with additional forceps holder on the left 115 V/60 Hz ........................................................................ 0386 30351 230 V/50 Hz .................................................................
15. Warrenty and service Warranty Leica Microsystems Nussloch GmbH guarantees that the contractual product delivered has been subjected to a comprehensive quality control procedure based on the Leica inhouse testing standards, and that the product is faultless and complies with all technical specifications and/or agreed characteristics warranted. The scope of the warranty is based on the content of the concluded agreement.