
Instructions / Assembly
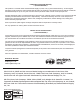

Place all parts on a clean and level surface before
assembling. Put body (E) upside down. Connect each leg
(G/H) to the body (E) by using 3 bolts (J).
Attach cap catcher (F) to the body (E). Attach the lid (B).
Connect bottle opener (C) to body (E) by using 2 bolts
(J).
Use the bolts (J) to secure the handle (D) and body (E).
Unscrew the Lid Knobs (A) from under the Lid (B) with a
#2 Phillips Screwdriver and secure them on top of the Lid
(B) by re-using the 2 Bolts (K).
Mettez toutes les pièces sur une surface plane et propre
avant l'assemblage. Mettez corps (E) à l'envers. Connectez
chaque jambe (G/H) au corps (E) en utilisant trois vis (J).
Serrer à fond en utilisant la clé (L).
Attachez le capuchon récepteur (F) sur le corps (E).
Attachez le couvercle (B).
Connectez l’ouvre-bouteille (C) au corps ( E ) à l'aide de 2
vis (J).
Utilisez les vis (J) pour fixer la poignée (D) et le corps (E).
Dévissez les boutons du couvercle (A) sous le couvercle (B)
avec un tournevis cruciforme n ° 2 et fixez-les sur le dessus
du couvercle (B) en réutilisant les 2 vis (K) .
1.
Assembly Instructions Instructions De Montage
2.
3.
4.
1.
2.
3.
4.
5.
5.
Tools Required:
#2 Philips Screwdriver (Not Included)
1.
2.
3.
4.
Outils requis:
Tournevis de Phillips #2 (Non Inclus)
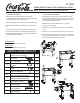
PARTS & HARDWARE LIST
Lid Knob
Boutons Pour le Couvercle
Lid
Couvercle
Bottle Opener
Ouvre-bouteille
Handle
Poignée
Body
Corps
Cap Catcher
Capuchon Récepteur
Leg & Caster Without Lock
Pied avec Roulette Sans Frein
Leg & Caster With Lock
Pied avec Roulette avec Frein
Drain Plug
Bouchon de Vidange
M6 x 13 Boulon
M6 x 13 Bolt
A
B
C
D
E
F
G
H
I
J
K
L
x 1
x 2
x 2
x 1
x 20
x 2
x 1
x 2
x 1
x 1
x 1
x 1
M4 x 30 Boulon
M4 x 30 Bolt
Clé Hexagonale
Hex Wrench
L
J
G
G
H
H
J
J
A
B
K
J
60qt. Retro Coca-Cola Cooler Ice Cold
CP 98111
60qt. Glaciere Rétro Coca-Cola Ice Cold