
User's Manual


FIRST TIME USE
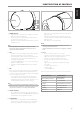
Out of the box and connecting the VISO 1 AP to the mains power source for
the rst time, the “S” indicator will alternately switch to green and red light
after initializing. This indicates that the VISO 1 AP is ready to be congured.
Refer to the following sections to fully enjoy and appreciate your VISO 1 AP.
SETTING UP NETWORK CONNECTION
AirPlay lets you stream music from your AirPlay-enabled device to the VISO
1 AP. The AirPlay-enabled device and the VISO 1 AP must be in the same
network to send and receive streaming audio with AirPlay.
The VISO 1 AP can be connected to a network using any of the following
methods
A Wired connection
B Wireless connection
C Share Wi-Fi setting
Start playback of your device after successful network connection using any
of the above methods.
WIRED CONNECTION
Network connection using Ethernet broadband connection. Set up a Wired
Ethernet broadband router with broadband internet connection. Your
router or home network should have a built-in DHCP server to consummate
the connection.
• Using a standard straight-through Ethernet cable, connect one end of
the Ethernet cable (not supplied) to the LAN port of your wired Ethernet
broadband router and the other end to VISO 1 AP’s LAN port.
• The ”S” indicator will turn to solid green upon successful network
connection.
It is advisable that wired connection is utilized when possible. Wired
connection is less likely to have “drop-out” or range problem and not
vulnerable to interference or eavesdropping.
WIRELESS CONNECTION
Wireless (WiFi) broadband router with broadband internet connection is
required for wireless connection to be established. Wireless connection for
VISO 1 AP can be setup by the following procedure.
1 Press and hold “S” until it turns ashing green – this indicates it is in
Access point/setup mode already.
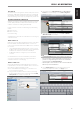
2 Using your iOS device (iPad is used here for reference), select among
the list of available network connections the unique network ID (NAD_
VISO1_DF601A in this example) of your VISO 1 AP.
3 Launch Safari and enter http://192.168.1.12 . The VISO 1 AP User
Interface menu window will appear. Select Prole Conguration.
4 Select your local network from the drop down SSID list (NADLAB
(WPA2 TKIP+CCMP) in this example).
NOTES
• TheStatus Information displays current details about your VISO 1 AP
like connection status, signal strength, rmware version and others. If
your VISO 1 is congured already, locate and access the TCP/IP address
of your VISO 1 AP to check Status Information.
• FirmwareUpdateisnotforconsumeruse-thisisrestrictedtoauthorized
NAD service personnel and distributors.
5 Type the WPA Passphrase (if it is password protected) of your local
network in the eld provided and then select Apply to join in.
VISO 1 AP OPERATION
7
ENGLISHFRANÇAISESPAÑOLITALIANODEUTSCHNEDERLANDSSVENSKAРУССКИЙ