INSTRUCTION MANUAL L-3866/67USB For information and support, www.lenco.
CONTENTS CONTENTS---------------------------------------------------2 DESCRIPTION-----------------------------------------------3,4 INITIAL STARTING-UP-----------------------------------5 Main Connection Amplifier Connection---------------------------------------5 Playing a record---------------------------------------------5 MAINTENANCE ---------------------------------------------6 To replace the stylus---------------------------------------6 To disassemble the cartridge-----------------------------6 To i
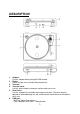
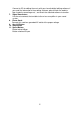
DESCRIPTION 1. 2. 3. 4. 5. 6. Adapter: Use this adapter when playing 45 RPM records. Platter: Platter change in the record will be placed here Tonearm Tonearm Lock: Use this lock to keep the tonearm in place when not in use. Dust Cover: Use this to protect the turntable from exposure to dust. The cover may be opened or removed during use, but should remain closed when the turntable is not in use. USB port: - With Full-Speed Transceivers - Fully Compliant With USB 1.
7. 8. 9. 10. 11. Connect to PC for editing the music with your favorite digital editing software, if you need the information of free editing software; please check the website http://audacity.sourceforge.net/ , and check the attached software instruction. Signal Connectors: Use these to connect the turntable to the mixer or amplifier in your sound system. Power Cord: Connect this cord to a grounded AC outlet of the proper voltage.
INITIAL STARTING-UP MAINS CONNECTION Ensure that the mains voltage of your home corresponds to the operating voltage of the unit. Your unit is ready to be connected to a mains voltage of 110V/60Hz or 220V/50Hz. AMPLIFIER CONNECTION Connect audio plugs to Alert input on your mixer or amplifier: Red plug into R/H channel input. White plug into L/H channel input. Note: This turntable has a built-in amplifier to avoid damage on the turntable or your audio-system.
MAINTENANCE TO REPLACE THE STYLUS (FIG.A) - Put the rest clip on the pick-up arm. Pull the stylus in the direction of arrow (A) and remove it. Put in the new stylus following the reverse procedure. TO DISASSEMBLE THE CARTRIDGE (FIG.B) - Put the rest clip into the pick-up arm. Remove the stylus (see section above). Release the pick-up head by pushing the cartridge in the direction of arrow. Disconnect the three cables link wires at the level of the pick-up head.
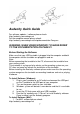
Audacity Quick Guide For software updates / software please check: http://audacity.sourceforge.net For the complete manual please check: http://audacity.sourceforge.net/help/documentation?lang=en WARNING: WHEN USING WINDOWS 7 PLEASE REFER TO THE DOCUMENTATION ON PAGE 21. Before Starting the Software Make sure that your USB turntable is plugged into the computer and both the computer and the turntable are plugged in and on.
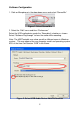
Software Configuration 1. Click on Microphone in the drop down menu and select “Stereo Mix” Figure 1: Select Stereo Mix 2. Select the “Edit” menu and then “Preferences” Select the USB audio device under the “Recording” selection as shown. Select “Software Playthrough” to hear the audio while recording. Note: The USBTurntable may show up with a different name in Windows system.. This may depend on your computer model and operating system. 99% of the time it will contain “USB” in the Name.
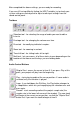
After completed the above settings, you are ready for recording. If you are still having difficulty finding the USB Turntable, try to check your system settings or control panel to adjust audio input settings from the sound control panel. . Toolbars Selection tool - for selecting the range of audio you want to edit or listen to. Envelope tool - for changing the volume over time. Draw tool - for modifying individual samples. Zoom tool - for zooming in and out.
Pause - temporarily stops playback or recording until you press pause again. Stop - stops recording or playing. You must do this before applying effects, saving or exporting. Skip to End - moves the cursor to the end of the last track. Edit Toolbar All of the buttons on this toolbar perform actions - and with a couple of exceptions, they're all just shortcuts of existing menu items to save you time. Holding the mouse over a tool will show a "tooltip" in case you forget which one is which.
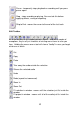
Mono - makes this track a mono track, meaning it is played out of just one speaker, or played out of the left and right speakers equally. Track Pop-Down Menu Left Channel - makes this track come out of only the left speaker. Right Channel - makes this track come out of only the right speaker. The Track Pop-Down Menu appears when you click in a track's title. This lets you access a few special commands that apply to individual tracks.
Set Rate - sets the number of samples per second of the track. 44100 Hz is used by audio CDs. Tracks can have different sample rates in Audacity; they are automatically resampled to the project sample rate (in the lower-left corner of the window). called Composition_data. Audacity project files are not meant to be shared with other programs - use one of the Export commands (below) when you are finished editing a file. Save Project As...
Export Selection As MP3... - same as above, but only exports the current selection. Print - Print out the main window view from audacity showing the tracks and waveforms. Export as Ogg Vorbis... - exports all of the audio as an Ogg Vorbis file. Ogg Vorbis files are compressed and therefore take up much less disk space, but they lose some audio quality.
Delete - Removes the audio data that is currently selected without copying it to the clipboard. left and right edge of the selection appear on a positive-slope zero crossing. This makes it easier to cut and paste audio without resulting in an audible clicking sound. Silence - Erases the audio data currently selected, replacing it with silence instead of removing it. Selection Save - Remembers the current selection (or cursor position), allowing you to restore it later.
Snap-To ... > Snap Off - Turns Snap-To mode off letting you select arbitrary ranges of time you turn on Snap-To mode in the Edit Menu, the selection will snap to the frames or other quantization you have selected in this menu. Preferences... - opens the Preferences dialog. History... - Brings up the history window. It shows all the actions you have performed during the current session, including importing. The right-hand column shows the amount of hard disk space your operations used.
Float Mixer Toolbar - moves the Mixer Toolbar out of the window and into its own floating window as above. options in the dialog to try some other possible encodings. At the beginning of your imported track(s), you may notice a little bit of noise. This is probably the file's header, which Audacity was not able to parse. Just zoom in and select the noise with the Selection Tool, and then choose Delete from the Edit Menu. Project Menu Import Audio...
Align and move cursor... - same as the functions above, except that the cursor or selection is moved along with the tracks. That allows you to shift the tracks without losing your relative place. that track was at a non-default rate then you may need to use Set Rate from the Track Pop-Down menu to set the correct sample rate. New Stereo Track - same as above, but creates a stereo track. You can also create a stereo track by joining two tracks using the track pop-down menu.
way to quickly apply the same effect to many different parts of a file. Silence - inserts silence Tone... - you can create a Sine wave, Square wave, or Sawtooth wave. Amplify - changes the volume of the selected audio. If you click the "Allow clipping" checkbox, it will let you amplify so much that the audio ends up beyond the range of the waveform, and is clipped (distorted).
Noise Removal - This effect lets you clean up noise from a recording. First, select a small piece of audio that is silent except for the noise, select "Noise Removal", and click on the "Get Noise Profile" button. Then select all of the audio you want filtered select "Noise Removal" again, and click the "Remove Noise" button. You can experiment with the slider to try to remove more or less noise. It is normal for Noise Removal to result in some distortion.
Repeat - repeats the selection a certain number of times. This operation is quite fast and spaceefficient, so it is practical to use it to create nearly-infinite loops. nearest peak frequency. This window can also display other common functions that are calculated using the Fast Fourier Transform, including three versions of the Autocorrelation function. The Enhanced Autocorrelation function is very good at identifying the pitch of a note.
Windows 7 installation instruction. When using Windows 7 as operating system, the hard and software need to be configured in a different way than discribed in the instruction manual. This quick guide discribes how you need to instal the hard and software. Note: Minimal system requirements are Windows 7 Home Premium. 1. Connect the trurntable with the AC power outlet. 2. Connect the turntable with a USB socket on your computer and wait for several seconds until below pop-up screen appears. 3.
9. Click on Apply, OK and OK again (now all programms are closed). 10. Insert the Audacity software CD into your disk drive or download free of charge new software via http://audacity.sourceforge.net/ . 11. Run the instalation as discribed instruction manual. 12. Run the audacity software. 13. Go to the taskbar and click on Edit and than on Preferences.
14. Select in the pull-down menu “Recording”, “Device” the option Microphone (USB-audiodevice). 15. Select in the pull-down menu “Channels” the option 2 (stereo) 16. Mark the selection box “Software Playthrough (play new track while recording it)”. 17. Click on OK. 18. Click on the microphone icon on the pull-down menu on start monitoring, as you can see in below picture. The sofware is now set and you can start digitalising your records. For information and support, www.lenco.