
Operation Manual

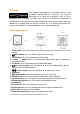
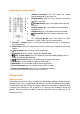


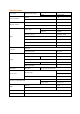

Exploring the remote control
1. Infrared transmitter, this LED sends the remote
control commands to the main unit
2. Display button, when the unit is on press this button
to display the clock
3. Standby button, press this button to turn the unit
on or off
4. Dimmer button, press this button to set the display
backlight level
5. AUX button, press this button to enter AUX mode
6. Next button, press this button to go to the next
song¹
7. 12 / 24 hour button, press this button to switch
between a 12 (AM / PM) or 24 hours clock format.
8. Volume + / - buttons, press + to increase the audio volume, press - to decrease
the audio volume
9. Mute button, press this button to turn off the volume, press it again to turn on the
volume
10. Sleep button, press here to set the sleep timer
11. BT Button, press this button to enter Bluetooth® mode
12. play / pause button, press this button to pause the audio playback, press it
again to resume audio playback¹
13. Previous button, press this button to go to the previous song¹
14. HR button, use this button to adjust the time (hours)
15. MIN button, use this button to adjust the time (minutes)
16. Set clock button, press this button to enter time set mode
17. Battery compartment, open to insert or replace the battery
¹ This feature does not function with devices connected via AUX.
Getting started
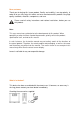
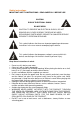
Where to install
Never place this device in direct sunlight. For comfortable viewing, we recommend a
soft light. Place it on a sturdy platform of which the surface should be flat and steady,
so the product can’t fall or hit by any objects. Make sure the product is placed in such
a manner that nothing can fall on top of it, as pressure will damage or break the
product. Prevent insertion of objects into the ventilation slots, or openings in the
cabinet at all time.