USER’S MANUAL CR-16 CLOCK RADIO WITH RADIO CONTROLLED For more information: www.lenco.
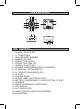
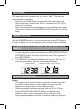
Outlook and Controls Item Description 1. ALARM 1 ON-OFF SET 2. << TUNE DOWN 3. SNOOZE/SLEEP/DIMMER 4. MEMORY/M+/NAP 5. PROJECTION ON/OFF 6. PROJECTION TIME 180° 7. ALARM 2 ON-OFF SET 8. VOLUME UP/BETWEEN DISPLAY CONTENTS 9. POWER ON – OFF/ALARM OFF 10. >> TUNE UP/YEAR-MONTH-DAY 11. CLK.ADJ. 12. VOLUME DOWN 13. RATING LABEL (BOTTOM OF UNIT) 14. BATTERY COMPARTMENT COVER (BOTTOM OF UNIT) 15. SPEAKER 16. ANGLE/SHARPNESS CONTROLLER 17. LED DISPLAY 18. AC POWER CORD 19. RADIO CONTROLLED CLOCK ANTENNA 20.
LED DISPLAY TIME Indicator PM Indicator ALARM 1 Indicator MHz Indicator RCC ANTENNA TOWER Indicator ALARM 2 Indicator POWER CONNECTION This product operates on AC230V~ 50Hz power supply. Plug the AC power cord into a household outlet AC source. INSTALLING/REPLACING THE BACK-UP BATTERY This unit is equipped with a battery back-up system, requiring one DC3V CR2032 lithium battery (not included) to maintain the time/ calendar settings and radio presets during AC power outage. 1.
WARNING DO NOT INGEST BATTERY, CHEMICAL BURN HAZARD This product contains a coin/button cell battery. If the coin/button cell battery is swallowed, it can cause severe internal burns in just 2 hours and can lead to death. Keep new and used batteries away from children. If the battery compartment does not close securely, stop using the product and keep it away from children. If you think batteries might have been swallowed or placed inside any part of the body, seek immediate medical attention.
on! If the reception cannot be automatically adjusted after 10 minutes in spite of the alignment of the integrated antenna, the reception in the respective location is too weak. In this case, set the time manually or change location. POWER ON/STANDBY 1. In standby mode, tap the POWER ON-OFF button once to turn on the unit. 2. Press the POWER ON-OFF button once to return the unit to standby mode.
- - - To check the year while current time is displayed, tap the YEAR-MONTH-DAY button once. The LED DISPLAY will change to year display for 5 seconds and then revert to current time automatically. To check the date while current time is displayed, tap the YEAR-MONTH-DAY button twice. The LED DISPLAY will change to date display for 5 seconds and then revert to current time automatically.
6-7 : Saturday & Sunday 1-1 : One day of week (you need to further select 1 for Monday, 2 for Tuesday and so on) 5. Tap the ALARM 1 (or ALARM 2) button again to advance to select the Alarm source between Beeper or Radio. Notes: - When the Beeper alarm begins, it will sound at a lower beeping rate and gradually increase to the normal rate within 30 seconds. - If you want to choose radio as the alarm source, you need to set the radio to your desired radio station in radio mode first.
OFF button. The alarm will ring again at the same alarm time on the following day, or when set to go off based on your Alarm settings. SNOOZE FUNCTION When the alarm source is sounding, press the SNOOZE button to suspend the alarm and activate the snooze function. The Alarm will temporarily stop and sound again 9 minutes later but the ALARM 1 (or ALARM 2) indicator will keep flashing. Notes: - This manual snooze operation can be repeated again and again.
- If the automatic tuning does not stop on the exact frequency of the station, for example, it stops on 88.9 MHz instead of 88.8 MHz, use the manual tuning method to “fine tune” to the exact frequency of the desired station. HINTS FOR BEST RECEPTION FM - To insure maximum FM tuner reception, unwrap and fully extend the EXTERNAL FM WIRE ANTENNA for best FM radio reception. TO SET/RECALL RADIO STATION PRESETS 1. Press the << or >> button to select the desired radio station. 2.
NAP ALARM The nap alarm can be used for e.g. a short “nap”. The function only operates in standby. - Press the unit NAP button to select the time after which the device will beep. Select from 90 to 10 minutes or OFF (off) in steps of 10 minutes. - After the selected time has elapsed, an increasingly fast beep will sound. Use the unit POWER ON-OFF button to turn off the beep.
- sharpness and angle. Press PROJECTION 180º FLIP button to flip the projected image. To deactivate projection function, simply press PROJECTION ON/OFF button. The projection lens goes off. RESETTING THE UNIT If the system does not respond or exhibits erratic or intermittent operation, you may have experienced an electrostatic discharge (ESD) or a power surge that triggered the internal microcontroller to shut down automatically.
Warning 1. No naked flame sources, such as lighted candles, should be placed on the apparatus. 2. Do not place the product in closed bookcases or racks without proper ventilation. 3. The mains plug is used as the disconnect device, the disconnect device shall remain readily operable. 4. The ventilation should not be impeded by covering the ventilation openings with items, such as newspapers, tablecloths, curtains, etc. 5.
Service and Support For information: www.lenco.com Lenco offers service and warranty in accordance to European law, which means that in case of repairs (both during and after the warranty period) you should contact your local dealer. Important note: It is not possible to send products that need repairs to Lenco directly. Important note: If this unit is opened or accessed by a nonofficial service center in any way, the warranty expires. This device is not suitable for professional use.
GEBRUIKERSHANDLEIDING CR-16 KLOKRADIO MET RADIOSTURING Voor meer informatie: www.lenco.
Uiterlijk en bediening Item Omschrijving 1. INSTELLEN WEKTIJD 1 AAN-UIT 2. << AFSTEMMEN NEER 3. SLUIMER/SLAAP/DIMMER 4. GEHEUGEN/M+/DUTJE 5. PROJECTIE AAN/UIT 6. PROJECTIETIJD 180° 7. INSTELLEN WEKTIJD 2 AAN-UIT 8. VOLUME OP/TUSSEN CONTENT VAN SCHERM 9. IN-/UITSCHAKELEN/WEKKER UIT 10. >> AFSTEMMEN OP/JAAR-MAAND-DAG 11. KLK.AANP. 12. VOLUME OMLAAG 13. TYPEPLAATJE (AAN DE ONDERKANT VAN HET TOESTEL) 14. DEKSEL BATTERIJVAK (AAN DE ONDERKANT VAN HET TOESTEL) 15. LUIDSPREKER 16. REGELAAR HOEK/SCHERPTE 17.
LED-SCHERM Aanduiding TIJD PM-aanduiding Aanduiding WEKKER 1 MHz-aanduiding Aanduiding TOREN RCC ANTENNE Aanduiding WEKKER 2 AANSLUITING STROOMVOORZIENING Dit toestel werkt op een stroomvoorziening van 230 V~ 50 Hz wisselspanning. Steek de stekker van het netsnoer in een stopcontact.
WAARSCHUWING BATTERIJ NIET INSLIKKEN, RISICO OP CHEMISCHE BRANDWONDEN Dit product bevat een knoopcelbatterij. Als deze knoopcelbatterij wordt ingeslikt, kan dit binnen slechts 2 uur tot ernstige interne brandwonden en fataal letsel leiden. Houd nieuwe en gebruikte batterijen buiten bereik van kinderen. Als de batterijhouder niet goed kan worden gesloten, dient u het product niet meer te gebruiken en buiten bereik van kinderen te houden.
OPMERKING: Het signaal kan zonder problemen worden ontvangen binnen een straal van ongeveer 2.000 km rondom Frankfurt am Main, maar er kan zich, afhankelijk van lokale omstandigheden, interferentie voordoen. Dit kan zich zowel voordoen in gebouwen die een hoog percentage metaal bevatten, als in de buurt van ingeschakelde TV-toestellen, PC’s, mobiele telefoon enz.
7. Herhaal de stappen #2 en #3 om de maand, de dag, het tijdsformaat, het huidige uur en de huidige minuten op dezelfde manier aan te passen.
de week) → AL1 Beeper (Wektijd 1 pieper) → AL1 Radio (Wektijd 1 radio) → AL1 final radio volume (Wektijd 1 uiteindelijk volume radio) → Normal Time (normale tijd) 1. Druk in de stand-bymodus op de toets ALARM 1 (of ALARM 2) om de ingestelde wektijd te tonen. 2. Houd de toets ALARM 1 (of ALARM 2) gedurende ongeveer 2 seconden ingedrukt totdat urenaanduiding op het LEDSCHERM knippert. Druk op de toets << of >> om het gewenste uur voor de wektijd in te stellen. 3.
radio het volume te verhogen. Als er een aanpassing van het volume nodig is, moet u de radio eerst d.m.v. de toets POWER ON-OFF uitschakelen en hem daarna weer inschakelen. De wekker wordt ook onmiddellijk gestopt. 6. Druk op de toets ALARM 1 (of ALARM 2) om het instellen te voltooien en terug te keren naar de normale tijdweergave. 7.
de toets POWER ON-OFF. Het knipperen van de INDICATOR WEKTIJD 1 (of WEKTIJD 2) stopt. LUISTEREN NAAR DE RADIO AFSTEMMEN VAN DE RADIO 1. Druk in de stand-bymodus op de knop POWER ON-OFF om het apparaat in te schakelen. 2. Het LED-SCHERM toont gedurende ongeveer 5 seconden de radiofrequentie en keert dan terug naar de normale tijdsweergave.
HET INSTELLEN/OPROEPEN VAN RADIO VOORKEUZESTATIONS 1. Druk op de toets << of >> om het gewenste radiostation te selecteren. 2. Houd de toets MEMORY ingedrukt; de volgende beschikbare nummer voor de geheugenvoorinstelling knippert op het LEDSCHERM. (Opmerking: Als u voor de eerste keer voorinstellingen programmeert, knippert er “P01” op het scherm.) 3. Druk de knop << of >> om het gewenste nummer van het voorkeuzestation te wijzigen van nummer P01 t/m P10. 4.
- Druk de toets NAP op het toestel om te kiezen na hoeveel tijd het toestel moet piepen. Selecteer van 90 tot 10 minutes (minuten) of OFF (uit) in stappen van 10 minuten. Nadat de gekozen tijd is verstreken klinkt er een steeds snellere pieptoon. Gebruik de toets POWER ON-OFF van het toestel om de pieptoon uit te schakelen. DIMMER Druk op de toets DIMMER om de helderheid van het LEDscherm, in overeenstemming met de omstandigheden van het omgevingslicht in te stellen op hoog, middelmatig of laag.
- scherpte en hoek voor de projectie te bereiken. Druk op de toets PROJECTION 180º FLIP om het geprojecteerde beeld om te draaien. Druk om de projectiefunctie uit te schakelen gewoon op de toets PROJECTION ON/OFF. De projector gaat uit.
voorwerpen, zoals vazen, op het toestel worden gezet. 6. Sluit de FM-antenne niet aan op een buitenantenne. 7. Het toestel mag niet aan direct zonlicht, zeer hoge of lage temperaturen, vocht, trillingen worden blootgesteld of in een stoffige omgeving worden geplaatst. 8. Gebruik nooit schurende schoonmaakmiddelen of benzeen, thinner of andere oplosmiddelen om het oppervlak van het toestel te reinigen.
Service en ondersteuning Voor informatie: www.lenco.com Lenco biedt service en garantie aan overeenkomstig met de Europese wetgeving. Dit houdt in dat u, in het geval van reparaties (zowel tijdens als na de garantieperiode), uw lokale handelaar moet contacteren. Belangrijke opmerking: Het is niet mogelijk om producten die gerepareerd moeten worden direct naar Lenco te sturen.
BEDIENUNGSANLEITUNG CR-16 UHRENRADIO MIT FUNKSTEUERUNG Für weitere Informationen: www.lenco.
Übersicht und Bedienelemente Element Beschreibung 1. EINRICHTUNG ALARM 1 EIN-AUS 2. << ABSTIMMUNG NACH UNTEN 3. SCHLUMMER/AUTOM. ABSCHALTUNG/DIMMER 4. SPEICHER/M+/KURZSCHLAF 5. PROJEKTION EIN/AUS 6. PROJEKTIONSZEIT 180° 7. EINRICHTUNG ALARM 2 EIN-AUS 8. LAUTSTÄRKE +/ZWISCHEN DISPLAY-INHALTEN 9. EIN-AUSSCHALTEN/ALARM AUS 10. >> ABSTIMMUNG NACH OBEN/JAHR-MONAT-TAG 11. UHRZEITANPASSUNG 12. LAUTSTÄRKE 13. TYPENSCHILD (UNTERSEITE DES GERÄTES) 14. ABDECKUNG DES BATTERIEFACHES (UNTERSEITE DES GERÄTES) 15.
LED ANZEIGE ZEIT-Anzeige PM-Anzeige ALARM 1-Anzeige MHz-Anzeige RCC-ANTENNE FUNKTURM-Anzeige ALARM 2-Anzeige STROMANSCHLUSS Dieses Gerät benötigt eine AC 230 V ~ 50 Hz Stromversorgung. Stecken Sie das AC Stromkabel in eine haushaltsübliche Steckdose. EINLEGEN/ERSETZEN DER RESERVEBATTERIE Dieses Gerät ist mit einem Reservebatterie-Sicherungssystem ausgestattet.
ACHTUNG BATTERIE NICHT VERSCHLUCKEN, GEFAHR VON VERÄTZUNG Dieses Produkt enthält eine Knopfzellenbatterie. Wenn die Knopfzellenbatterie verschluckt wird, kann dies innerhalb von 2 Stunden zu schweren inneren Verätzungen und Tod führen. Neue und gebrauchte Batterien von Kindern fernhalten. Wenn das Batteriefach nicht sicher schließt, dieses Produkt nicht weiter verwenden und von Kindern fernhalten.
km um Frankfurt/Main herum empfangen werden. Abhängig von den lokalen Bedingungen können jedoch Interferenzen auftreten. Dies kann insbesondere in Gebäuden mit Metallkonstruktionen auftreten, als auch in der Nähe von eingeschalteten TV-Geräten, PCs, Mobiltelefonen, usw.! Wenn der Empfang nach 10 Minuten trotz Ausrichtung der internen Antenne nicht automatisch angepasst wird, ist der Empfang an diesem bestimmten Ort zu schwach.
Hinweise: - Die Anzeigesequenz im Modus „Kalender/Uhrzeit einstellen“ ist wie folgt: Year (Jahr) → Month (Monat) → Date (Datum) → 12/24 Hour Time Format (12/24-Std. Zeitformat) → Real Time Hour (Echtzeit-Stunde) → Real Time Min (Echtzeit-Minute) → Normal Time (normale Zeit) - Um das Jahr während der Anzeige der aktuellen Uhrzeit zu prüfen, betätigen Sie die Taste YEAR-MONTH-DAY einmal.
2. Halten Sie die Taste ALARM 1 (oder ALARM 2) erneut für ca. 2 Sekunden gedrückt, bis die Stunde-Anzeige auf dem LED-DISPLAY blinkt. Betätigen Sie die Taste << oder >>, um die gewünschte Stunde der Weckzeit einzustellen. 3. Betätigen Sie die Taste ALARM 1 (oder ALARM 2) erneut, um zu der Minutenanzeige zu wechseln. Betätigen Sie die Taste << oder >>, um die gewünschten Minuten der Weckzeit einzustellen. 4. Betätigen Sie die Taste ALARM 1 (oder ALARM 2) erneut, um zu der Wochentaganzeige zu wechseln.
(oder ALARM 2), um zur normalen Zeitanzeige zurückzukehren. 7. Um ALARM 1 (oder ALARM 2) für die folgenden Tage zu deaktivieren, halten Sie die Taste ALARM 1 (oder ALARM 2) für ca. 2 Sekunden gedrückt und die entsprechende ANZEIGE für ALARM 1 (oder ALARM 2) erlischt. 8. Um ALARM 1 (oder ALARM 2) für das automatische Wecken für die folgenden Tage wieder zu aktivieren, halten Sie die Taste ALARM 1 (oder ALARM 2) für ca. 2 Sekunden gedrückt.
RADIO HÖREN EINSTELLEN DES RADIOS 1. Tippen Sie im Standby-Modus auf die Taste POWER ON-OFF, um das Gerät einzuschalten. 2. Das LED-DISPLAY zeigt die Radiofrequenz für ca. 5 Sekunden an und kehrt dann wieder zur normalen Uhrzeitanzeige zurück. AUTOMATISCHE SUCHEN NACH RADIOSENDERN Um automatisch nach Sendern mit starken Signalen zu suchen, halten Sie die Taste TUNE UP >> oder DOWN << gedrückt, bis die Frequenzanzeige auf dem Display mit dem Scannen beginnt. Lassen Sie die Taste los.
DISPLAY. (Hinweis: Wenn Sie die Schnellwahl zum ersten Mal programmieren, wird auf dem Display „P01“ blinken.) 3. Drücken Sie die Taste << oder >>, um zu der gewünschten Schnellwahlnummer P01 bis P10 zu wechseln. 4. Wiederholen Sie Schritte 1 bis 3 zur Schnellwahleinrichtung von bis zu 10 FM-Sendern. 5. Um eine der bereits programmierten Schnellwahlsender aufzurufen, betätigen Sie die Taste M+ wiederholt, bis Sie die gewünschte Schnellwahlnummer/den gewünschten Radiosender erreichen.
- Nachdem die ausgewählte Zeit abgelaufen ist, ertönt ein lauter werdender Ton. Zum Ausschalten des Alarms betätigen Sie die Taste POWER ON-OFF. DIMMERSTEUERUNG Betätigen Sie die Taste DIMMER zur Einstellung der Helligkeit des LED-Displays auf hoch, mittel oder niedrig, entsprechend der Bedingungen des Umgebungslichts. ALTERNATIVE ANZEIGE VON ZEIT UND MONAT-TAGANZEIGE 1. Drücken Sie bei ausgeschaltetem Radio die Taste BETWEEN DISPLAY CONTENTS für ca. 3 Sekunden, bis auf dem LEDDISPLAY „ON“ (AN) erscheint.
- Die Projektionsfunktion kann einfach durch drücken der Taste PROJECTION ON/OFF deaktiviert werden. Das Projektionsobjektiv schaltet sich aus. ZURÜCKSETZEN DES GERÄTES Wenn das System nicht reagiert oder ein unregelmäßiger oder unterbrochener Betrieb auftritt, trat eventuell eine elektrische Entladung (ESD) oder eine Überspannung auf, die dazu führte, dass der interne Mikrocontroller automatisch abgeschaltet wurde.
7. Das Gerät sollte nicht direktem Sonnenlicht, sehr hohen oder sehr niedrigen Temperaturen, Feuchtigkeit, Erschütterungen oder einer staubigen Umgebung ausgesetzt werden. 8. Verwenden Sie weder Benzol, Verdünner oder andere Lösungsmittel und keine scheuernden Reinigungsmittel für die Reinigung der Geräteoberflächen. Verwenden Sie zur Reinigung ein sauberes weiches Tuch mit einer milden, nicht scheuernden Reinigungsmittellösung. 9.
Wichtiger Hinweis: Falls dieses Gerät von einem nicht autorisierten Kundendienst geöffnet oder darauf zugegriffen wird, erlischt die Garantie. Dieses Gerät ist nicht für professionelle Zwecke geeignet. Falls das Gerät für professionelle Zwecke eingesetzt wird, erlöschen alle Garantieverpflichtungen seitens des Herstellers. Recycling Dieses Symbol zeigt an, dass das entsprechende Produkt oder dessen Batterie in Europa nicht mit dem normalen Hausmüll entsorgt werden darf.
MODE D’EMPLOI CR-16 HORLOGE RADIOCOMMANDÉE Pour plus d’informations : www.lenco.
Aperçu et commandes Élément Description 1. ACTIVATION-DÉSACTIVATION DU RÉVEIL 1 2. << SYNTONISATION BAS 3. RÉPÉTITION DU RÉVEIL/VEILLE/VARIATEUR 4. MÉMOIRE/M+/SIESTE 5. ACTIVER/DÉSACTIVER LA PROJECTION 6. PROJECTION DE L’HEURE/INVERSION 180° 7. ACTIVATION-DÉSACTIVATION DU RÉVEIL 2 8. AUGMENTER LE VOLUME/AFFICHAGE ALTERNÉ 9. ALIM. MARCHE-ARRÊT/ARRÊT DU RÉVEIL 10. >> SYNTONISATION HAUT/ANNÉE-MOIS-JOUR 11. RÉGLAGE DE L’HEURE 12. DIMINUER LE VOLUME 13. ÉTIQUETTE SIGNALÉTIQUE (AU BAS DE L’APPAREIL) 14.
ÉCRAN LED Indicateur de L’HEURE Indicateur PM Indicateur de RÉVEIL 1 Indicateur MHz Indicateur de LA TOUR DE L’ANTENNE RCC Indicateur de RÉVEIL 2 CONNEXION ÉLECTRIQUE Cet appareil doit être alimenté par une alimentation 230 V CA ~ 50 Hz. Branchez le cordon d’alimentation secteur dans une prise électrique secteur.
AVERTISSEMENT N’INGÉREZ PAS DE PILE, RISQUE DE BRÛLURE CHIMIQUE Ce produit contient une pile bouton. L’ingestion d’une pile bouton peut causer de graves brûlures internes en seulement 2 heures et causer la mort. Tenez les piles neuves et usagées hors de portée des enfants. Si le compartiment à pile ne se ferme pas correctement, cessez d’utiliser l’appareil et tenez-le hors de portée des enfants.
dans les bâtiments à structure hautement métallique, ainsi qu’à proximité d’appareils allumés tels que postes de télévision, ordinateurs, téléphones mobiles, etc. Si l’heure n’est pas réglée automatiquement après 10 minutes en dépit de l’orientation de l’antenne intégrée, la réception du signal à l’endroit concerné est trop faible. Dans ce cas, réglez manuellement l’heure ou déplacez l’appareil. MISE SOUS TENSION/VEILLE 1. En mode veille, appuyez une fois sur la touche POWER ONOFF pour allumer l’appareil.
Remarques : - La séquence d’affichage en mode de réglage de l’heure et la date est la suivante : Year (Année) → Month (Mois) → Date (Jour) → 12/24 Hour Time Format (Format 12/24 heures) → Real Time Hour (Heures actuelles) → Real Time Min (Minutes actuelles) → Normal Time (Heure normale) - - - Pour visualiser l’année alors que l’heure est affichée, appuyez brièvement sur la touche YEAR-MONTH-DAY. L’ÉCRAN LED affichera l’année pendant 5 secondes, puis reviendra automatique à l’affichage normal de l’heure.
1 (ou ALARM 2) pendant environ 2 secondes jusqu’à ce que l’indicateur des heures clignote sur L’ÉCRAN LED. Appuyez sur la touche << ou >> pour régler les heures du réveil souhaité. 3. Appuyez de nouveau sur ALARM 1 (ou ALARM 2) pour passer à l’indicateur des minutes. Appuyez sur la touche << ou >> pour régler les minutes du réveil souhaité. 4. Appuyez de nouveau sur ALARM 1 (ou ALARM 2) pour passer à l’indicateur des jours de la semaine.
ALARM 1 (ou ALARM 2) pendant environ 2 secondes. L’indicateur correspondant (ALARM 1 ou ALARM 2) s’éteindra. 8. Pour réactiver le réveil (ALARM 1 ou ALARM 2) pour les jours suivants, appuyez et maintenez enfoncée la touche ALARM 1 (ou ALARM 2) pendant environ 2 secondes. l’indicateur correspondant (ALARM 1 ou ALARM 2) s’allumera. Le réveil sonnera les jours suivants à l’heure réglée. ÉTEINDRE LE RÉVEIL Au moment du réveil, l’indicateur ALARM 1 (ou ALARM 2) clignotera sur L’ÉCRAN LED.
RECHERCHE AUTOMATIQUE DES STATIONS RADIO Pour rechercher automatiquement les stations avec une bonne réception, appuyez et maintenez enfoncée la touche TUNE UP >> ou DOWN << jusqu’à ce que les fréquences se mettent à défiler sur l’écran. Relâchez la touche. La radio s’arrêtera sur la première station trouvée avec une bonne réception. RECHERCHE MANUELLE DES STATIONS RADIO 1. Appuyez plusieurs fois sur la touche << ou >> pour choisir votre station radio souhaitée. 2.
plusieurs fois sur la touche M+ jusqu’à atteindre le numéro de la station préréglée souhaitée. FONCTION D’HORLOGE DE VEILLE L’horloge de veille permet d’éteindre l’appareil après une période de temps définie. 1. Alors que vous écoutez la radio, appuyez sur la touche SLEEP et la durée avant mise en veille « 90 » (minutes) apparaît sur L’ÉCRAN LED. 2. Appuyez plusieurs fois sur la touche SLEEP pour sélectionner la durée avant mise en veille parmi les valeurs 90, 60, 30 ou 15 minutes.
AFFICHAGE ALTERNÉ ENTRE L’HEURE ET LE JOUR/MOIS 1. La radio éteinte, appuyez et maintenez enfoncé sur la touche BETWEEN DISPLAY CONTENTS pendant environ 3 secondes jusqu’à ce que le symbole « ON » (MARCHE) s’affiche sur L’ÉCRAN LED. 2.
D’ALIMENTATION SECTEUR de la prise électrique murale et retirez la pile de secours de son compartiment. Attendez au moins 3 minutes et réinsérez la pile de secours, puis rebranchez le cordon d’alimentation secteur à la prise électrique murale. L’appareil est à présent réinitialisé et vous devez de nouveau régler l’heure et les réveils.
10. Les piles ne doivent pas être exposées à une chaleur excessive telle que la lumière du soleil, des flammes, etc. 11. Veuillez considérer les questions environnementales lors de la mise au rebut des piles. 12. Ne jetez pas l’appareil avec les déchets domestiques à la fin de sa vie utile ; emportez-le à un centre de collecte et de recyclage des appareils électriques et électroniques. Le recyclage permet de réutiliser les matériaux de fabrication. Vous contribuerez ainsi à la protection de l’environnement.
Entretien et assistance Pour obtenir des informations : www.lenco.com Lenco propose un service et une garantie conformément à la législation européenne, ce qui signifie qu’en cas de besoin de réparation (aussi bien pendant et après la période de garantie), vous pouvez contacter votre revendeur le plus proche. Remarque importante : Il n’est pas possible de renvoyer l’appareil pour réparation directement à Lenco.
MANUAL DE USUARIO CR-16 RADIO RELOJ RADIO-CONTROLADO Para más información: www.lenco.
Apariencia y controles Elemento Descripción 1. 2. 3. 4. 5. 6. 7. 8. ACTIVAR/DESACTIVAR ALARMA 1 << SINTONIZAR ABAJO POSPONER ALARMA/TEMPORIZADOR/ATENUADOR MEMORIA/M +/SIESTA ENCENDER/APAGAR PROYECCIÓN PROYECTAR LA HORA CON 180° ACTIVAR/DESACTIVAR ALARMA 2 SUBIR VOLUMEN/VISUALIZAR CONTENIDOS EN PANTALLA 9. ENCENDER-APAGAR/DESACTIVAR ALARMA 10. >> SINTONIZAR ARRIBA/AÑO-MES-DÍA 11. AJUSTAR RELOJ 12. BAJAR VOLUMEN 13. ETIQUETA DE CLASIFICACIÓN (PARTE INFERIOR DE LA UNIDAD) 14.
PANTALLA LED Indicador de HORA Indicador PM Indicador de ALARMA 1 Indicador MHz Indicador de TORRE DE ANTENA RCC Indicador de ALARMA 2 CONEXIÓN DE LA ALIMENTACIÓN Este producto funciona con una fuente de alimentación CA 230 V ~ 50 Hz. Enchufe el cable de alimentación de CA a una toma de corriente de CA.
ADVERTENCIA NO INGERIR LA BATERÍA, RIESGO DE QUEMADURAS POR AGENTES QUÍMICOS Este producto contiene una pila tipo botón. Si se traga la pila botón, en solo 2 horas podría sufrir quemaduras internas de importancia que pueden causarle la muerte. Mantenga las pilas nuevas o usadas fuera del alcance de los niños. Si el compartimiento de la pila no se cierra correctamente, deje de usar el producto y no lo deje al alcance los niños.
Esto puede ocurrir especialmente en edificios que contengan un alto porcentaje de metal, así como en las proximidades de aparatos de TV, PCs, teléfonos móviles, etc. encendidos. Si la recepción no se ajusta automáticamente transcurridos 10 minutos pese a extender la antena integrada, será debido a que la recepción en ese lugar es demasiado débil. En ese caso, ajuste la hora de forma manual o cambie de lugar. ENCENDIDO/EN ESPERA 1.
siguiente: Year (Año) → Month (Mes)→ Date (Día)→ 12/24 Hour Time Format (Formato de hora de 12/24)→ Real Time Hour (Hora actual)→ Real Time Min (Minutos actuales)→ Normal Time (Hora normal) - - - Para ver el año mientras se está visualizando la hora actual, toque una vez el botón YEAR-MONTH-DAY. La PANTALLA LED cambiará a la visualización del año durante 5 segundos y después volverá automáticamente a la hora actual.
la PANTALLA LED. Pulse el botón << o >> para obtener la hora de alarma deseada. 3. Pulse otra vez el botón ALARM 1 (o ALARM 2) para avanzar al indicador de minutos. Pulse el botón << o >> para obtener los minutos de alarma deseados. 4. Pulse otra vez el botón ALARM 1 (o ALARM 2) para avanzar al indicador de día de la semana. Pulse el botón << o >> para seleccionar el día de la semana deseado para la alarma.
(o ALARM 2) correspondiente desaparecerá. 8. Para reactivar la ALARM 1 (o ALARM 2) y que suene los días siguientes, mantenga pulsado el botón ALARM 1 (o ALARM 2) durante 2 segundos; el INDICADOR de ALARM 1 (o ALARM 2) correspondiente se iluminará y la alarma sonará el día siguiente a la hora establecida.
BÚSQUEDA AUTOMÁTICA DE EMISORAS DE RADIO Para buscar emisoras con señales fuertes de forma automática, mantenga pulsado el botón TUNE UP >> o DOWN << hasta que la lectura de frecuencia de la pantalla comience el escaneo. Suelte el botón. El sintonizador se detendrá en la primera emisora con señal fuente que encuentre. BÚSQUEDA MANUAL DE EMISORAS DE RADIO 1. Toque sucesivamente el botón << o >> para escoger la emisora de radio que desee. 2.
sucesivamente el botón M+ hasta que llegue al número de presintonía/emisora de radio que desee. FUNCIONAMIENTO DEL TEMPORIZADOR DE APAGADO El temporizador de apagado le permite apagar la unidad transcurrido un tiempo determinado. 1. Mientras escucha la radio, pulse el botón SLEEP y en la PANTALLA LED aparecerá la duración del temporizador “90” (minutos). 2. Toque sucesivamente el botón SLEEP para seleccionar una duración para el temporizador de 90, 60, 30 o 15 minutos.
ALTERNAR LA PANTALLA ENTRE LA HORA Y LA FECHA 1. En modo de radio apagada, mantenga pulsado el botón unit BETWEEN DISPLAY CONTENTS durante unos 3 segundos, hasta que en la pantalla aparezca “ON” (activado). 2.
introducir la pila de apoyo y vuelva a conectar el cable de CA a la toma de corriente. La unidad estará restablecida, de modo que deberá volver a establecer la hora y las alarmas. ESPECIFICACIONES Frecuencia: Batería de apoyo: Fuente de alimentación: Distancia de proyección: FM 87,5 – 108 MHz 1 pila de botón de litio de 3 V CR2032 (no incluida) CA 230 V ~ 50 Hz, 5 W ≤ 90 a 270 cm aprox. Advertencia 1. No deben colocarse fuentes de llama, como velas encendidas, sobre este aparato. 2.
12. No elimine este producto con la basura doméstica al final de su vida útil; llévelo a un centro de recogida para reciclaje de aparatos eléctricos y electrónicos. Reciclándolo, algunos materiales pueden ser reutilizados. Así usted realiza una importante contribución para proteger nuestro medioambiente. Por favor, consulte a su administración local acerca de los centros autorizados para su eliminación.
Servicio y asistencia Para más información: www.lenco.com Lenco ofrece servicio y garantía en cumplimiento con las leyes de la Unión Europea, lo cual implica que, en caso de que su producto precise ser reparado (tanto durante como después del periodo de garantía), deberá contactar directamente con su distribuidor. Nota importante: No es posible enviar sus reparaciones directamente a Lenco. Nota importante: Si la unidad es abierta por un centro de servicio no oficial, la garantía quedará anulada.