CS171 USB OWNER'S MANUAL Mobile Audio System 0 MP3 PLL Synthesizer Stereo Radio RDS (Radio Data System) operation Digital Compact Disc Player Automatically Memory Storing Slide Down Detachable Panel Preset Equalization Electronic Shockproof (ESP) Function Auxiliary Input Function Remote Control
CONTENTS Installation Take out screw before installation 3 DIN Front-Mount (Method A) 3 3 Installing the unit Removing the unit DIN Rear-Mount (Method B) Using The Front Panel Wiring Connection Operation Location of keys Switching on/off the unit and illuminating Faceplate Release 4 5 6 7 8 8 9 Loudness 9 9 10 Display 10 Equalization Vacuum fluorescent display Flashing LED Remote sensor 10 11 11 11 ESP function Reset function 11 11 Radio operation Switching to radio mode 11 11 Sound adjustme
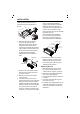
INSTALLATION Notes: TAKE OUT SCREW BEFORE INSTALLATION Choose the mounting location where the unit will not interfere with the normal driving function of the driver. Before finally installing the unit, connect the wiring temporarily and make sure it is all connected up properly and the unit and the system work properly. Use only the parts included with the unit to ensure proper installation. The use of unauthorized parts can cause malfunctions.
INSTALLATION middle left and right sides of the unit. Then slide the sleeve off the back of the unit. Then use the supplied hardware (Tapping Screw (5x25mm) and Plain Washer) to attach the other end of metal strap to a solid metal part of the vehicle under the dashboard. This strap also helps ensure proper electrical grounding of the unit. Note to install the short threading terminal of the mounting bolt to the back of the unit and the other long threading terminal to the dashboard.
INSTALLATION 2. Align the screw holes on the bracket with the screw holes on the unit, and then tighten the screws (5x5mm)on each side. Note: the outer trim ring, sleeve and the metal strap are not used for method B installation. DIN REAR-MOUNT (Method B) If your vehicle is a Nissan, Toyota, follow these mounting instructions. Use the screw holes marked T (Toyota), N (Nissan) located on both sides of the unit to fasten the unit to the factory radio mounting brackets supplied with your vehicle.
USING THE DETACHABLE FRONT PANEL To Detach the Front Panel 1. Press the OPEN button, then the front panel will slide down. The left side Front Panel POEN 2. To remove the front panel, lift it up at a little angle from horizontal position, then first pull out the right side and then pull out the left side. The right side 2. When the two sides fixed int palce, push the front panel into main unit. The left side Front Panel 3.
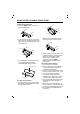
WIRING CONNECTION MAIN UNIT ANTENNA CONNECTOR IGNITION SWITCH (ACC+) RED MEMORY BACK-UP (B+) PINK FUSE FUSE BLACK GROUND (B-) (GREY) Rch RED REAR RCA CABLE POWER ANTENNA YELLOW Lch WHITE FRONT Lch SPEAKER + - REAR Lch SPEAKER + - GREEN GREY GREEN/BLACK GREY/BLACK BLUE WHITE BLUE/BLACK WHITE/BLACK 7 + - FRONT Rch SPEAKER + - REAR Rch SPEAKER
OPERATION LOCATION OF KEYS 8
OPERATION SWITCHING ON/OFF THE UNIT Switch on the unit by pressing any button (except OPEN button (7) and button (4) When system is on, press power button(9) to tur off the unit. SWITCHING ON/OFF THE UNIT AND ILLUMINATING Switch on the unit by pressing any button (except OPEN button (7) and button (4) When system is on, press power/DIM button (9) shortly to control the brightness of VFD. Press it for several seconds to turn off the unit.
OPERATION clockwise or counter-clockwise. - BEEP 2'nd mode: The beep is only generated when all allowed double key is pressed long (1 sec). e.g. When preset button (14) is pressed. When BND/LOU button (13) is pressed. When AMS button (18) is pressed. - BEEP ALL mode: The beep is generated when every key is pressed. - BEEP OFF mode: The beep is disabled. c) RETUNE L or RETUNE S mode The initial time of automatic TA search or PI search modes is selected.
OPERATION The reception band will change in the following order: LIQUID CRYSTAL DISPLAY Exhibit current frequency and activated functions on the display (8). FM1 FLASHING LED If the front panel does not install in the main unit, the LED (12) will be flashing. REMOTE SENSOR Point the remote control handset to the remote sensor IR (24). Press the function keys on the handset to control the system.
OPERATION PTY MUSIC group RDS (RADIO DATA SYSTEM) OPERATION - Setting RDS mode Press AF/REG button (3) and release immediately to switch on or off RDS mode. Whenever RDS is switch on, symbol “AF” appears on the display. Program name is displayed on receiving a RDS station. “AF” starts blinking if the broadcasting signal getting worse.
OPERATION information is being transmitted or not EON: Enhanced Other Networks Information Broadcasting information on PI, AF, TP, TA, etc, relating to networks other than the network used for current reception PTY: Program Type Code Contents of programs such as news, light music, sports etc. CD OPERATION SWITCHING TO CD MODE If there is no CD inserted in the driver: Gently insert the CD with the printed side uppermost into the CD compartment until you feel some resistance,.
OPERATION PLAYING ALL TRACKS IN RANDOM Press SHF button (23) to play all tracks on CD in random order. Press again to cancel the function. EJECTING A DISC PRESS button (4) to stop CD playing and eject the disc from the disc slot. MP3 OPERATION SWITCHING TO CD (MP3) MODE If there is no MP3 disc inserted in the driver: Gently insert the MP3 disc with the printed side uppermost into the disc slot (5) until you feel some resistance. The MP3 disc is drawn into the driver automatically. The MP3 playback begins.
OPERATION - Press SEL button to confirm entry of each characters. - Press BND /LOU (ENT) button to start the title search, In case the selected title is a directory name, display will show(' '), then - Use the TUNE/RACK UP/DOWN buttons to list all songs under this directory and select the title. - Press BND/LOU (ENTER) button to confirm and start the play. - Repeat the above steps if the newly selected title is again a directory. Searching From Root Directory Press AMS (MP3) button for three times.
OPERATION WMA OPERATION For the unit that can play the Wma disc, the operation is the same with Mp3 operation described above. USB PLAY OPERATION ln the front panel of the unit, there is an USB interface(26). You can connect an Mp3 player or other device with the USB interface through this interface(26). When you connect a player through the interface, the unit will search the Mp3 files of WMA files in the player and start to play Mp3 files or WMA files automatically.
OPERATION C. Notes on MP3 files (MP3 Version Only): 1. The disc must be in the ISO9660 level 1or level 2 format, or Joliet or Romeo in the expansion format. 2. When naming a MP3 file, be sure the file name extension is ".MP3". 3. For a non-MP3 file, even though the file name extension is ".MP3", the unit cannot recognize it. DISC NOTES A. Notes on discs: 1. Attempting to use non-standard shape discs (e.g. square, start, heart) may damage the unit. Be sure to use round shape CD discs only for this unit. 2.
SPECIFICATION GENERAL Power Supply Requirements Chassis Dimensions : DC 12 Volts, Negative Ground : 178 (W) x 165 (D) x 50 (H) Tone Controls - Bass (at 100 Hz) - Treble (at 10 kHz) : : Maximum Output Power Current Drain : 4x40 watts : 15 Ampere (max.) CD PLAYER Signal to Noise Ratio Channel Separation Frequency Response : More than 55 dB : More than 45 dB : 40Hz - 18 kHz 10 dB 10 dB RADIO Frequency Coverage I.F. Sensitivity (S/N=30dB) Stereo Separation FM : 87.5 to 108 Mhz : 10.
TROUBLE SHOOTING Before going through the checklist, check wiring connection. If any of the problems persist after checklist has been made, consult your nearest service dealer. Symptom No power. Disc cannot be loaded or ejected. No sound. Sound skips. Cause Solution The car ignition switch is not on. If the power supply is properly connected to the car accessory circuits, but the engine is not running, switch the ignition key to "ACC" The fuse is blown. Replace the fuse.