Model Model:: Lenco DIR-200 USER MANUAL (Internet Radio with FM) HANDLEIDING (Internet Radio met FM) BENUTZERHANDBUCH (Internetradio mit UKW) MODE D'EMPLOI (Radio internet avec FM) MANUAL DEL USUARIO (Radio por internet con FM)
INDEX ..................................................................................................................... 3 .....................................................................................................................3 ENGLISH ENGLISH..................................................................................................................... ........................................................................................................... 33 .......................
English (Internet Radio with FM) Before Started 1. Network Requirements • A broadband connection in a combination with a wireless access point, router or similar network device is required. Ensure the network device support WiFi (802.11a/b/g/n) wireless connection. Ensure the network which connected with your PC, tablet or smartphone, etc is the same as equipped with the device. • • 2.
• • • Risks associated with high volumes While listening the DIR-200 with headphones, always reduce the volume before put on the headphones. After the headphones are positioned properly, increase the volume to the desired level. Maintenance/cleaning Always power off the DIR-200 when cleaning it. Never use any harsh or strong solvents to clean the DIR-200 since these may damage the surface of the device.
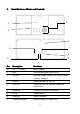
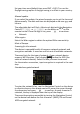
3. Identification of Parts and Controls 2 1 3 6 7 4 8 5 9 No. 1 2 3 Description 2.8” TFT Screen Reel Buttons Functions Color Display Volume/Navigate/Press to OK Standby/Mode, Menu/Info, Back, Preset, Tuning-, Tuning + 4 5 AUX In Line Out 3.5mm socket for AUX IN 3.5mm socket for External Amplifier connection 6 7 8 9 Antenna DC IN USB port Earphone socket Enhanced FM/DAB reception Power supply Music Playback 3.
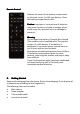
Remote Control Remove the cover of the battery compartment on the back. Insert 2 x AAA type battery. Close the battery compartment cover. Caution: Improper or incorrect use of batteries may cause corrosion or battery leakage, which could cause fire, personal injury or damage to property. Warning Do not ingest the battery, Chemical Burn Hazard (The remote control supplied with) This product contains 2 x AAA battery.
Connect the power adapter (included) to the DC IN socket at the rear of the device and the mains socket. Get the network environment ready • For wireless WiFi Make sure you have setup the wireless network and you have the WEP, WPA or WPA2 security password to activate the connection. You may also use the WPS (WiFi Protected Setup) function for an easy pairing between the network device and the device. Check if the light indicators on the network device are in an operational state.
Press / on the remote control or rotate the volume control on the device to adjust the volume. If you wish to switch the sound off, press , press again to resume audio listening. Music Sharing from PC • To share the music files from PC, follow the steps below: Connect the PC to the network. Ensure the device is powered on and connected to the same network. Open the UPnP platform Windows Media Player (version 11 or later). Alternatively, other platforms or server such as Windows Media Connection may be used.
5. Operations 5.1. Main Menu In the main menu, you can select the following modes: Internet Radio, Media Player, DAB, FM, AUX IN, Sleep and Alarm 5.2. System Settings 5.2.1. Setup Wizard • Time/date Display format Select 12 or 24 as your desired time format. Auto-update The time and date can be updated manually or automatically from DAB, FM or network. Auto-update is available in DAB, FM or Internet mode.
Set your time zone (default time zone GMT +1:00). Turn on the Daylight savings option if daylight saving is in effect in your country. Manual update If you select No update, the wizard prompts you to set the time and date manually. The date and time are displayed as dd-mm-yyyy and hh:mm. The adjustable digit will flash. Adjust each digit with the Navigation Control/ or on the device or ▲/▼ on the remote control. Once the digit is set, press to continue.
WPS encrypted networks are identified by WPS at the beginning of the network name when the device searches the available AP. Use one of the following methods for connection: o Push button The device prompts you to press the connect button on the router. It then scans for a ready Push Button Connect network and connects. o Pin The device generates an 8-digit code number, which you enter into the wireless router, access point, or an external registrar.
It will show Setup wizard completed on screen if the setup is connected successfully. If the connection is fail, the device returns to a previous screen for you to try again. Press to exit the setup wizard. 5.2.2. Equaliser Allows you to select different equalizers: Normal, Flat, Jazz, Rock, Movie, Classic, Pop, News, and My EQ. You may also create your own equalizers (under My EQ profile setup) with customized bass, treble and loudness. Press EQ on the remote control to quick enter equalizer menu. 5.2.
• Wlan region Select the Wlan region to obtain the optimal Wlan connectivity: Canada, Spain, France, Japan, Singapore, Australia, and Republic of Korea. • Manual settings Choose wireless network connection and enable or disable DHCP (Dynamic Host Configuration Protocol). • Network profile The device has memory function to memorise the last four wireless networks that it has been connected to. The device will automatically connect to one of them whichever could be found available.
5.2.6. Factory reset A factory reset resets all user settings back to default settings. All the presets, time, date and network configuration will be lost. However, the current software version of the device can be stored as it is registered with the internal radio portal. All favourites in the Internet radio is also stored. Unless you re-register your device with another account on the portal website. 5.2.7. Software update Software upgrade to fix bugs and/ or additional features will be available.
The portal also allow you to personalize multiple lists of favourite stations. While listening to an Internet radio station, you can press BACK or on the remote control to quickly return to the last visited branch of the menu tree. You may also press MENU/INFO on the device or MENU on the remote control to go to the first menu of Internet radio mode. 5.3.1. Last listened When Internet radio mode restarts, the last-listened station is selected.
5.3.3. Favourites Favourites are stored in the Internet radio portal, and are available through all Internet radios registered on the same account. Before the favourites can be used, the radio has to be registered with the Internet radio portal. To register your device, choose Station list > Help > Get access code to get your radio’s unique portal access code. (Do not confuse the portal access code with the Radio ID from System settings. Visit the portal website at www.wifiradio-frontier.
5.3.5. Presets Presets are stored in the radio and cannot be accessed by other radios. To store an Internet radio preset, press and hold PRESET on the device or on the remote control until the display shows the Save preset screen. Select one of the 10 presets to save the currently playing station. To select a preset, press PRESET on the device or on the remote control, then select one of the listed preset stations. When a preset station is playing, it shows n ( 1, 2 etc) at the bottom of the screen.
You can use or on the remote control to play the previous or next track, press and hold to rewind or fast forward (x1, x2, x4). Press on the remote control to play or pause. Press on the remote control to stop playback and return to the music list. Notice: The following table summarizes the maximum supported bit-rates for the various audio format supported in the device. Code WAV FLAC v1.2.1 AAC MP3 WMA Supported 1.536 mbit/s 24bit 48 KHz 320 kbit/s 320 kbit/s 320 kbit/s Min.
Press OK to play your desired track. A short press will play the track immediately. 5.4.2. USB playback From this point on, menus are generated from the folders on the USB device. Browse folders with the navigate reel and Back button, or direction keys on the remote control. The display shows folder and file names (not necessarily track names). Once you have found a track you want to play, press the navigate reel on the device or press OK on the remote control. Noted: The USB port is not support charging.
5.5. DMR (DLNA Streaming) Shared music in Section 5.4.1 is a way of music streaming which you look for the music list and control playback from the device. This topic will introduce another way to do the music streaming which is not necessary to control playback on the device. You can share the music files from PC, Android mobile or tablet, and directly use your PC, Android mobile, tablet or iPhone/iPad to control music playback on the device. It is simple called DLNA streaming. 5.5.1.
DIR-200 Select any music in the library and choose Play to “DIR-200 DIR-200”” A box of music playback pops up for the streaming. 5.5.2. Control on Smartphone/Tablet You may search (with keyword: DLNA) and install any free or commercial DLNA apps from Google Play or Apple Store if you are using Android mobile, tablet or iPhone/iPad. It is suggested to use BubbleUPnp or Twonky Beam on Android mobile, tablet; or use Twonky Beam on iPhone/iPad. Procedures for playing shared music on the app are as follows: 1.
Select player Select server (BubbleUPnp) (TwonkyBeam) NOTE: Some apps may not support streaming music from iPhone/iPod but iPhone/iPod could still be used to control streaming music from other servers. Some apps may allow to play the music to multi players at the same time. Some apps can create a playlist if you choose several music. If you want more details, please refer to your own instruction of the software or apps that you used for DLNA streaming.
5.6. DAB DAB mode receives DAB/DAB+ digital radio and displays information about the station, stream and track playing. 5.6.1. Scanning for stations The first time you select DAB radio mode, or if the station list is empty, the device will automatically performs a full station scan. You may also perform a scan manually to update the list of stations for the following possible reasons: o Available stations might change from time to time.
control briefly, then select one of the listed preset stations. The screen will show n ( 1, 2 etc) at the bottom right. You can store up to 10 of your favourite stations to the memory. This will enable you to access your favourite stations 1-0 quickly and easily by using the number buttons on the remote control. 5.6.3.
To search for a station, press OK OK. The frequency display starts to run up as the device scans the FM band. Alternatively, you can scan up or down by pressing and holding the buttons or . 5.7.1. Preset To store a FM preset, press and hold PRESET on the device or on the remote control until the display shows the Save preset screen. Select one of the 10 presets to save the current station.
• • Scan settings FM scans is default to stop at any available station. This may result in a poor signal-to-noise ratio (hiss) from weak stations. To change the scan settings to stop only at stations with good signal strength, select Yes after choosing Strong station only? Audio settings All stereo stations are reproduced in stations, this may result in a poor signal-to-noise ratio (hiss). To play weak stations in mono, select FM weak reception: Listen in mono only and then YES. 5.8.
alarm can be set in a particular mode. Select Alarms in the Main menu or press Alarm on the remote control to set or change an alarm. Select the alarm number (1 or 2) then configure the following parameters: o Enable: on/off, o Frequency: Daily, Once, Weekends or Weekdays, o Time, o Mode: Buzzer, Internet Radio, DAB or FM, o Preset: Last listened 1-10, o Volume: 0-20 To activate the new settings, scroll down and select Save. The screen shows active alarms with an icon at the bottom left.
6. Troubleshooting Error The device does not switch on. No sound. Remedy Check if the power adaptor is connected properly. No network connection can be established. 1. Check the WLAN function. 2. Try to set an IP address at the device. 3. Activate the DHCP function on the router and make the connection again at the device. 4. Check if the firewall is activated on the network - set the respective program in such a way that access is possible. 5. Reboot the router WiFi connection cannot be established.
No stations available/ burbling/intermitt ent in DAB mode. Alarm does not work. 1. 2. 3. Move the radio. Rescan local stations only (high-strength). Check the local DAB+ coverage. All other undetermined cases. The device may be processing a large amount of data after a period of operation, no matter in which mode, it will cause malfunction. Reboot the device if necessary. 1. Switch on the alarm. 2. This might cause by the volume setting, refer to the solutions of “No sound”. 3.
7. Specification Model number Description Display Network supported Encrypted key Streaming Supported playback formats DAB/DAB+ FM Power adaptor Standby mode power consumption Network stand-by power consumption DIR-200 Internet radio with DAB/DAB+/FM/USB 2.8", 320 x 240, TFT colour display IEEE 802.11a/b/g/n wireless (WiFi) WEP, WPA, WPA2 (PSK), WPS UPnP, DLNA MP3, WMA, WAV, AAC, FLAC Band III (170 - 240 MHz) 87.5 - 108.
8. Guarantee Lenco offers service and warranty in accordance with the European law, which means that in case of repairs (both during and after the warranty period) you should contact your local dealer. Important note: It is not possible to send products that need repairs to Lenco directly. Important note: If this unit is opened or accessed by a non-official service center in any way, the warranty expires. This device is not suitable for professional use.
11. Service For more information and helpdesk support, please visit www.lenco.com Lenco Benelux BV, Thermiekstraat 1a, 6361HB, The Netherlands.
Nederlands (Internet Radio met FM) Voordat u begint 1. Netwerkvereisten • Vereist is een breedbandverbinding in combinatie met een draadloos toegangspunt, router of een gelijkwaardig netwerkapparaat. Zorg ervoor dat het netwerkapparaat een draadloze wifi-verbinding ondersteunt (802.11a/b/g/n). Zorg ervoor dat het netwerk waarmee bijv. uw pc, tablet of smartphone is verbonden hetzelfde is als waarmee het apparaat is verbonden. • • 2.
• • • • Zorg ervoor dat de elektrische spanning die op de DIR-200 staat aangegeven en zijn stekker overeenkomen met de spanning van het stopcontact. Een verkeerde spanning zal het apparaat kapot maken. Risico Risico’’s m.b.t. hoge volumes Als u naar de DIR-200 wilt luisteren met een hoofdtelefoon, verlaag dan altijd het volume voordat u de hoofdtelefoon opzet. Verhoog nadat u de hoofdtelefoon goed hebt opgezet het volume tot het gewenste niveau.
3. Verklaring van onderdelen en bedieningselementen 1 2 3 6 4 7 8 5 9 Nr.
Afstandsbediening Verwijder het klepje van de batterijhouder aan de achterzijde. Installeer 2 type AAA batterijen. Sluit het klepje van het batterijcompartiment. Let op: Oneigenlijk of onjuist gebruik van batterijen kan corrosie of lekkage van de batterij veroorzaken, die brand, persoonlijk letsel of schade aan eigendommen kan veroorzaken. Waarschuwing Batterij niet inslikken, risico op chemische brandwonden (De afstandsbediening meegeleverd) met dit product bevat 2 x AAA batterijen.
Sluit de voedingsadapter (meegeleverd) aan op de DC IN-aansluiting aan de achterkant van het apparaat en in het stopcontact. Maak de netwerkomgeving klaar • Voor draadloos wifi Zorg ervoor dat het draadloze netwerk functioneert en dat u het WEP-, WPA- of WPA2-beveiligingswachtwoord hebt om de verbinding te activeren. U kunt daarnaast ook de WPS-functie WPS (WiFi Protected Setup) gebruiken om het netwerkapparaat en dit apparaat eenvoudig te paren.
Druk / op de afstandsbediening of draai aan de volumeknop op het apparaat om het volume aan te passen. Als u het geluid wilt uitschakelen, drukt u op . Druk opnieuw om het luisteren te hervatten. Muziek delen vanaf de pc • Ga als volgt te werk om muziekbestanden te delen vanaf uw pc: Sluit de pc aan op het netwerk. Zorg dat het apparaat is ingeschakeld en op hetzelfde netwerk is aangesloten. Open het UPnP-platform Windows Media Player (versie 11 of hoger).
5. Functionaliteiten 5.1. Hoofdmenu In het hoofdmenu kunt u de volgende functies selecteren: Internetradio, Mediaspeler, DAB, FM, AUX IN, Slaap en Alarm 5.2. Systeeminstellingen 5.2.1. Installatiewizard • Tijd/datum Weergaveformaat Kies 12 of 24 als uw gewenste tijdsformaat. Automatische update De tijd en datum kunnen handmatig of automatisch via DAB, FM of het netwerk worden bijgewerkt. Een automatische update is beschikbaar in DAB, FM of in de internetmodus.
Alleen voor instellen via het netwerk Tijdzone, zomertijd Stel uw tijdzone in (standaard tijdzone GMT +1:00). Schakel de optie Zomertijd in, indien de zomertijd van kracht is in uw land. Handmatige update Als u kiest voor update NEE, dan vraagt de wizard u om de tijd en datum handmatig in te stellen. De datum en tijd worden weergegeven als dd-mm-jjjj en uu:mm. Het aan te passen cijfer knippert. Pas elk cijfer aan met de navigatiebediening/ of op het apparaat of met ▲/▼ op de afstandsbediening.
Om de sleutel van het netwerk in te voeren, gebruikt u de navigatiebediening op het apparaat of de pijltjestoetsen op de afstandsbediening om de cursor over de tekens te bewegen en druk op om te bevestigen. Als een karakter wordt geselecteerd, wordt de sleutel in de bovenkant van het scherm weergegeven. Er zijn voor de navigatiebediening drie opties toegankelijk op het apparaat: Terug vóór het eerste karakter (BKSP), OK en Annuleren.
• Voltooiing Het apparaat probeert verbinding te maken met het geselecteerde netwerk. Het scherm zal aangeven wanneer de installatiewizard is voltooid als de verbinding is geslaagd. Als de verbinding mislukt, zal het apparaat terugkeren naar een vorig scherm zodat u het opnieuw kunt proberen. Druk op om de installatiewizard af te sluiten. 5.2.2. Equalizer Hiermee kunt u verschillende equalizers selecteren: Normaal, Vlak, Jazz, Rock, Film, Klassiek, Pop, Nieuws en My EQ (mijn equalizer).
5.2.3. Network (Netwerk) • Netwerk-wizard Druk enter om te zoeken naar AP SSID, voer vervolgens de WEP/WPA-sleutel in of kies Push Button/Pin/WPS overslaan om verbinding met het draadloze netwerk te maken. • PBC WLAN-instelling Push Button Configuration, dit is om de AP te verbinden die WPS (Wi-Fi Protected Setup) ondersteunt.
Anders zal alleen de verbinding beschikbaar zijn. Met deze optie is het apparaat gereed voor DLNA streaming in elke functionele modus. Voor details over DLNA streaming verwijzen wij u naar hoofdstuk 5.5. 5.2.4. Tijd/datum Stel de tijd handmatig in of werk automatisch de tijdsindeling, tijdzone en zomertijd bij. 5.2.5. Taal Engels is als de standaardtaal ingesteld. U kunt uw eigen gewenste taal selecteren. 5.2.6.
5.2.9. Achtergrondverlichting U kunt hiermee het niveau van de achtergrondverlichting instellen op Hoog, Gemiddeld of Laag (in ingeschakelde modus of op stand-by). De tijdsduur van de time-out kan worden aangepast, waardoor de radio op stand-by en het ingestelde lichtniveau schakelt wanneer niet in gebruik. 5.3. Internetradio Het apparaat kan kanalen ontvangen van radiostations en podcasts wereldwijd via een breedband internetverbinding.
druk hier op enter om het weergegeven station te selecteren. De meest recente stations verschijnen in de top van de lijst. 5.3.2. Stationslijst Blader door internetuitzendingen die in verschillende categorieën zijn onderverdeeld; Locatie, Genre, Populair en Nieuw. U kunt het station ook met zoekwoorden zoeken. 5.3.3. Favorieten Favorieten worden opgeslagen in het internetradioportaal en zijn beschikbaar via alle internetradio's die in hetzelfde account staan geregistreerd.
Als u al een account hebt en u wilt een extra radio toevoegen, log dan in op uw account en kies My preferences (Mijn voorkeuren) > Add another Wi-Fi radio (Voeg een andere wifi-radio toe). Nadat uw radio eenmaal is geregistreerd op het portaal, kunt u onmiddellijk de favorieten van de internetradio en de aanvullende stationeigenschappen gebruiken. U kunt een afspelend station als een favoriet opslaan door OK ingedrukt te houden totdat de display ‘Favourite added’ (favoriet toegevoegd) weergeeft.
het apparaat of op INFO op de afstandsbediening. Telkens als u op INFO drukt, wordt een ander soort informatie weergegeven, steeds herhalend naam/ beschrijving, genre/locatie, betrouwbaarheid, codec/ sampling rate, afspeelbuffer en de datum van vandaag. 5.4. Muziekspeler De muziekspeler-modus speelt audiobestanden af in MP3-, WMA-, WAV-, AAC- of FLAC-formaat vanaf een computer in het lokale netwerk. Terwijl u muziek afspeeelt, kunt u op BACK op het apparaat of op de afstandsbediening drukken.
5.4.1. Gedeelde media Als u de gedeelde media hebt ingesteld, zal een vermelding bestaande uit : worden weergegeven. Als u meerdere computers hebt die media delen, worden de alternatieven opgesomd. Selecteer de gedeelde media die u wilt afspelen. De menu's worden nu vanuit de gedeelde mediaserver gegenereerd. Het eerste menu toont een lijst van mediatypen, bijvoorbeeld Muziek, Video, Foto's en Afspeellijsten.
Zodra u een track hebt gevonden die u wilt afspelen, drukt u op het navigatiewiel op het apparaat of druk op OK op de afstandsbediening. Merk op: Opladen via de USB-poort wordt niet ondersteund. 5.4.3. Herhaal/willekeurig afspelen U kunt hiermee tracks herhalen of op willekeurige volgorde afspelen. Druk voor de snelkoppeling op REPEAT/SHUFFLE op de afstandsbediening. 5.4.4. Afspeelinformatie Terwijl een track wordt afgespeeld, toont het scherm de track en de artiest (UPnP).
5.5.1. Bediening op de PC De systeemvereisten voor de PC voor DLNA zijn Windows 7 en Windows Media Player 12. Stel het in, zoals hieronder beschreven: Deel allereerst de media op uw PC met het apparaat.
Een afspeelschermpje komt op voor het afspelen van de streaming. 5.5.2. Bediening op de smartphone/tablet U kunt zoeken (met trefwoord: DLNA) en installeer een van de gratis of betaalde DLNA-apps uit de Google Play of Apple Store als u een Android-mobiel, tablet of iPhone/ iPad gebuikt. Onze suggestie is om BubbleUPnp of Twonky Beam op uw Android-mobiel en tablet te gebruiken. Of gebruik Twonky Beam op de iPhone/iPad. Procedures voor het afspelen van gedeelde muziek op de app zijn: 1.
Selecteer speler Selecteer server (BubbleUPnp) (TwonkyBeam) OPMERKING: Sommige apps geven geen ondersteuning voor het streamen van muziek vanaf de iPhone/iPod, maar de iPhone/iPod kan nog wel worden gebruikt voor de bediening van het streamen van muziek vanaf andere servers. Sommige apps staan toe dat de muziek op meerdere spelers tegelijk wordt afgespeeld. Sommige apps kunnen een afspeellijst maken als u voor meerdere muziektracks kiest.
5.6. DAB In de DAB-modus ontvangt het apparaat DAB/DAB+ digitale radio en geeft het informatie over het station, de streaming en het afspelen van de track. 5.6.1. Scannen van stations De eerste keer dat u de DAB-radio-modus selecteert, of als de stationslijst leeg is, zal het apparaat automatisch een volledige scan naar stations uitvoeren. U kunt ook om de volgende mogelijke redenen een handmatige scan uitvoeren om de stationslijst te updaten. o Beschikbare stations kunnen van tijd tot tijd wijzigen.
de melding “Save preset” (station opslaan) verschijnt. Selecteer een van de 10 stationgeheugens om het huidige station op te slaan. U kunt een opgeslagen station selecteren door kort op PRESET op het apparaat of op de afstandsbediening te drukken en vervolgens een van de stations in de lijst te kiezen. Rechtsonder op het scherm zal n ( 1, 2, enz.) worden weergegeven. U kunt maximaal 10 van uw favoriete stations in het geheugen opslaan.
5.7. FM In FM-radiomodus ontvangt het apparaat analoge radiosignalen via de FM-band en toont het RDS (Radio Data System) informatie over het station en de locatie van de uitzending. Om een station te zoeken, druk op OK OK. De weergave van de frequentie start als het apparaat de FM-band scant. U kunt ook omhoog en omlaag scannen door de toets of ingedrukt te houden. 5.7.1.
volgende set informatie weergegeven: RDS-tekst, aanvullende RDS-tekst (station/programmatype), frequentie en de datum van vandaag. 5.7.3. Instellingen • Scaninstellingen De FM-scan stopt standaard bij elk beschikbare station. Dit kan leiden tot een slechte signaal-ruisverhouding (gesis) bij zwakke stations. Om de scan-instellingen zo te wijzigen dat het scannen alleen stopt bij stations met een goede signaalsterkte, selecteert u Yes (Ja) na het kiezen van Alleen sterke stations.
5.9. Slapen U kunt de slaaptimer instellen door “Sleep” (slaap) in het hoofdmenu op de afstandsbediening te drukken. Kies de te selecteren of op slaapperiode-optie uit: Sleep OFF (Slapen UIT), 15 MINS (15 minuten), 30 MINS (30 minuten), 45 MINS (45 minuten) of 60 MINS (60 minuten). Het systeem keert terug naar het hoofdmenu, nadat u de gewenste slaapperiode-optie hebt gekozen. Houd MENU/INFO op het apparaat of MENU op de afstandsbediening ingedrukt om terug te keren naar het huidige afspeelscherm. 5.10.
Scroll naar beneden en selecteer Opslaan om de nieuwe instellingen te activeren. Het scherm toont de actieve alarmen met een icoon in de linker benedenhoek. Wanneer het alarm klinkt, kunt u op een willekeurige toets (met uitzondering van of Alarm) op het apparaat of op de afstandsbediening drukken om het alarm tijdelijk uit te schakelen voor de ingestelde tijdsperiode. Het sluimer-icoon zal knipperen om aan te geven dat snooze is ingeschakeld. 5.11. Extra opties 5.11.1.
6. Probleemoplossing Fout Het apparaat gaat niet aan. Geen geluid. Er kan geen netwerkverbinding worden gemaakt. De wifi-verbinding kan niet worden gemaakt. Geen station gevonden. Geruis in de FM-modus Oplossing Controleer of de voedingsadapter goed is aangesloten. 1. Zet het geluid aan, omdat het gedempt kan zijn 2. Verhoog het volume. 3. Haal de aangesloten koptelefoon of luidspreker uit de aansluitingen. 1. Controleer de WLAN-functie. 2. Probeer een IP-adres op het apparaat in te stellen. 3.
In de DAB-modus zijn 1. Verplaats de radio. geen stations 2. Scan alleen de lokale stations opnieuw (sterk beschikbaar/borrelend signaal). geluid/fluctuerend. 3. Controleer de lokale DAB+-dekking. Het alarm werkt niet. Alle andere onduidelijke gevallen. 1. Schakel het alarm in. 2. Dit kan worden veroorzaakt door het ingestelde volume, raadpleeg a.u.b. de oplossingen voor “Geen geluid”. 3.
7. Specificaties Modelnummer Omschrijving Scherm Netwerk ondersteund Gecodeerde sleutel Streaming Ondersteunde afspeelformaten DAB/DAB+ FM Voedingsadapter Stroomverbruik in stand-by-modus Netwerk stand-by stroom verbruik Luidsprekervermogen Aansluitingen Afmetingen Gewicht DIR-200 Internetradio met DAB/DAB+/FM/USB 2,8", 320 x 240, TFT-kleurendisplay IEEE 802.
8. Garantie Lenco biedt service en garantie aan overeenkomstig met de Europese wetgeving. Dit houdt in dat u, in het geval van reparaties (zowel tijdens als na de garantieperiode), uw lokale handelaar moet contacteren. Belangrijke opmerking: Het is niet mogelijk om producten die gerepareerd moeten worden direct naar Lenco te sturen. Belangrijke opmerking: De garantie verloopt als een onofficieel servicecenter het apparaat op wat voor manier dan ook heeft geopend, of er toegang toe heeft gekregen.
11. Service Bezoek voor meer informatie en helpdeskondersteuning www.lenco.com Lenco Benelux BV, Thermiekstraat 1a, 6361 HB, Nederland.
Deutsch (Internetradio mit UKW) Vor der Inbetriebnahme 1. Netzwerkvoraussetzungen • Es ist ein Breitbandanschluss in Verbindung mit einem drahtlosen Zugriffspunkt, Router oder ähnlichen Netzwerkgeräten erforderlich. Das Netzwerkgerät muss WiFi-Verbindungen (802.11a/b/g/n) unterstützen. Das Netzwerk, mit dem Ihr PC, Tablet-PC oder Smartphone verbunden ist, muss identisch mit dem sein, mit dem das Gerät ausgestattet ist. • • 2.
• • • • Vergewissern Sie sich, dass die für das DIR-200 und sein Netzteil angegebene elektrische Spannung mit der Spannung der Steckdose übereinstimmt. Durch eine falsche Spannung wird das Gerät zerstört. Mit hohem Lautst Lautstäärkepegel verbundene Risiken Senken Sie immer zuerst die Lautstärke, bevor Sie Kopfhörer aufsetzen, um mit dem DIR-200 über Kopfhörer Musik zu hören. Nach ordnungsgemäßem Anschluss der Kopfhörer können Sie die Lautstärke entsprechend erhöhen.
3. Benennung der Teile und Bedienelemente 2 1 3 6 4 7 8 5 9 Nr.
Fernbedienung Entfernen Sie die Abdeckung des Batteriefachs auf der Rückseite der Fernbedienung. Legen Sie 2 Batterien des Typs AAA (Microzelle) ein. Schließen Sie das Batteriefach. ACHTUNG: Unsachgemäße oder falsche Verwendung von Batterien kann zu Korrosion oder Auslaufen der Batterien führen, das zu Brand bzw. Personen- oder Sachschäden führen kann. Warnung Nehmen Sie niemals die Batterie ein, Verätzungen wären die Folge.
Verbinden Sie das Netzteil (mitgeliefert) mit der DC IN-Buchse auf der Rückseite des Geräts und der Steckdose. Die Netzwerkumgebung vorbereiten • Für drahtloses WiFi Stellen Sie sicher, dass Sie das drahtlose Netzwerk eingerichtet haben und über das WEP-, WPA- oder WPA2Sicherheitspasswort verfügen, um die Verbindung zu aktivieren. Sie können ebenfalls die Funktion WPS (WiFi - geschütztes Einrichten) für ein unkompliziertes Verbinden des Geräts mit dem Netzwerkgerät verwenden.
aktivierten Wecker werden auf der Anzeige angezeigt. Drücken Sie / auf der Fernbedienung oder drehen Sie den Lautstärkeregler am Gerät, um die Lautstärke anzupassen. Drücken Sie , wenn Sie den Ton stummschalten möchten. Ein erneutes Drücken hebt die Stummschaltung wieder auf. PC-Musikfreigabe • Folgen Sie den nachfolgenden Schritten, um Musikdateien Ihres PCs freizugeben. Verbinden Sie Ihren PC mit dem Netzwerk. Vergewissern Sie sich, dass Ihr Gerät eingeschaltet und mit demselben Netzwerk verbunden ist.
5. Betrieb ü 5.1. Hauptmen Hauptmenü Im Hauptmenü können Sie die folgenden Modi auswählen: Internet Radio (Internetradio), Media Player (Mediaplayer), DAB, FM (UKW), AUX IN (AUX-IN), Sleep (Schlaf) und Alarm (Wecker) 5.2. Systemeinstellungen 5.2.1. Einrichtungs-Assistent • Uhrzeit/Datum Anzeigeformat Wählen Sie als gewünschtes Anzeigeformat entweder die 12-Stunden oder die 24-Stunden-Anzeige aus.
Zeitsignale, die von dem Internetradioportal gesendet werden, wenn das Gerät mit einem Netzwerk verbunden ist. Nur für Netzwerk-Einstellung Zeitzone, Sommerzeit Richten Sie Ihre Zeitzone ein (Standard-Zeitzone ist GMT +1:00). Aktivieren Sie die Option „Daylight savings“ (Sommerzeit), wenn in Ihrem Land die Sommer-/ Winterzeitumstellung durchgeführt wird.
Standardverschlüsseltes Netzwerk Um den Netzwerkschlüssel einzugeben, verwenden Sie die Navigationssteuerung des Geräts oder die Richtungstasten auf der Fernbedienung, um den Cursor durch die Zeichen zu bewegen. Drücken Sie zur Bestätigung . Durch die Auswahl der einzelnen Zeichen wird der Schlüssel am oberen Rand der Anzeige dargestellt.
o WPS überspringen Geben Sie den Schlüssel für ein standardverschlüsseltes Netzwerk ein. Weitere Informationen zur Einrichtung eines mit WPS verschlüsselten Netzwerks finden Sie in den Anweisungen zu Ihrem WPS-Router. • Fertigstellung Das Gerät versucht sich mit dem ausgewählten Netzwerk zu verbinden. Wenn das Setup erfolgreich verbunden wurde, wird auf dem Display „Setup wizard completed“ (Einrichtungsassistent erfolgreich beendet) angezeigt.
5.2.2. Equalizer Es stehen Ihnen verschiedene Equalizer für die Auswahl zur Verfügung: Normal, Flat (flach), Jazz, Rock, Movie (Film), Classic (Klassik), Pop, News (Nachrichten) und My EQ (mein EQ). Sie können auch Ihre eigenen Equalizer (unter der Profileinstellung My EQ (mein EQ)) mit benutzerdefinierten Bässen und Höhen sowie benutzerdefinierter Lautstärke einstellen. Drücken Sie auf der Fernbedienung EQ, um sofort ins Equalizermenü zu wechseln. 5.2.3.
deaktivieren Sie DHCP (dynamisches Host-Konfigurationsprotokoll). • Netzwerkprofil Das Gerät verfügt über eine Erinnerungsfunktion, um sich die letzten vier Drahtlosnetzwerke zu merken, mit denen es verbunden war. Das Gerät verbindet sich automatisch mit einem von diesen Netzwerken, je nachdem welches gefunden wird. Die Liste der registrierten Netzwerke wird angezeigt. Sie können unerwünschte Netzwerke löschen, indem Sie durch Drehen des Navigationsreglers das zu löschende Netzwerk auswählen.
Senderspeicher, die Zeit, das Datum und die Netzwerkkonfiguration gehen verloren. Die aktuelle Softwareversion des Gerätes kann gespeichert werden, wenn sie mit dem internen Radioportal registriert wurde. Dann werden auch alle Favoriten des Internetradios gespeichert. Das können Sie solange, bis Sie Ihr Radio mit einem anderen Konto auf der Internetseite des Portals neu registrieren. 5.2.7.
Wenn Sie Internetradio auswählen, greift das Gerät direkt auf das Internetradioportal „Frontier Silicon“ (das von V-Tuner unterstützt wird) zu und erhält eine Liste von Radiosendern. Über das Portal können Sie auch mehrere benutzerdefinierte Listen Ihrer favorisierten Radiosender erstellen. Wenn Sie Internetradio hören, können Sie durch Drücken von BACK (zurück) oder auf Ihrer Fernbedienung zum zuletzt besuchten Punkt des Menübaumes zurückkehren.
Durchsuchen Sie die Internetsendungen, die in verschiedene Kategorien (Standort, Genre, Popularität und Neu) unterteilt sind. Sie können Radiosender auch nach Stichworten suchen. 5.3.3. Favoriten Die Favoriten werden im Internetradioportal gespeichert und stehen für alle Internetradios zur Verfügung, die unter dem gleichen Konto registriert sind. Bevor die Favoriten verwendet werden können, muss das Radio beim Internetradioportal registriert werden.
preferences“ (Meine Einstellungen) > „Add another Wi-Fi radio“ (Weiteres WLAN-Radio hinzufügen) aus, wenn Sie bereits über ein Konto verfügen und ein zusätzliches Radio hinzufügen möchten. Sobald Sie Ihr Radio im Portal registriert haben, können Sie sofort die Internetradio-Favoriten und die Option, eigene Radiosender hinzuzufügen, nutzen.
Beschreibung des Streams angezeigt. Drücken Sie am Gerät MENU/INFO oder INFO auf der Fernbedienung, um weitere Informationen anzuzeigen. Nach jedem Drücken von INFO werden zyklisch andere Informationen angezeigt: Name/Beschreibung, Genre/ Standort, Zuverlässigkeit, Codec/Abtastrate, WiedergabePuffer und aktuelles Datum. 5.4. Musik-Player Im Musikwiedergabemodus können Audiodateien im Format MP3, WMA, WAV, AAC oder FLAC von einem Computer des lokalen Netzwerkes wiedergegeben werden.
Codierung WAV FLAC v1.2.1 AAC MP3 WMA Unterstützt 1,536 Mbit/s 24 bit/48 kHz 320 Mbit/s 320 Mbit/s 320 Mbit/s Min. 48 Mbit/s 24 bit/48 kHz 8 Mbit/s 8 Mbit/s 4 Mbit/s Max. 1,536 Mbit/s 24 bit/48 kHz 576 Mbit/s 320 Mbit/s 384 Mbit/s 5.4.1. Freigegebene Medien Wenn Sie freigegebene Medien eingerichtet haben, wird der Eintrag wie folgt angezeigt :
Navigationsregler und der Zurück-Taste oder den Richtungstasten auf der Fernbedienung durchsuchen. Auf der Anzeige erscheinen der Ordnername und die Dateinamen (nicht unbedingt die Titelnamen). Drücken Sie den Navigationsregler am Gerät oder OK auf der Fernbedienung, sobald Sie einen Titel für die Wiedergabe gefunden haben. Hinweis: Der USB-Anschluss unterstützt nicht das Aufladen von Geräten. 5.4.3.
das Gerät zu steuern. Dieser Abschnitt stellt eine andere Möglichkeit vor, um Musik zu streamen, bei der es nicht erforderlich ist, die Wiedergabe über das Gerät zu steuern. Sie können Musikdateien auf einem PC, Android-Handy oder Tablet-PC freigeben und Ihren PC, Ihr Android-Handy, Ihren Tablet-PC oder Ihr iPhone/iPad für die Steuerung der Musikwiedergabe auf dem Gerät verwenden. Dieses Verfahren wird DLNA-Streaming genannt. 5.5.1.
Wählen Sie die gewünschte Musik in der Bibliothek aus und danach DIR-200 "Play to" (Wiedergabe mit) sowie “DIR-200 DIR-200””. Ein Musikwiedergabefenster wird für das Streaming geöffnet. 5.5.2. Steuerung über Smartphone/Tablet-PC Sie können (mit dem Stichwort: DLNA) bei Google Play oder im Apple Store nach kostenlosen oder gewerblichen DLNA-Apps suchen und diese installieren, wenn Sie ein Android-Handy, ein Tablet-PC oder ein iPhone/iPad verwenden.
Wählen Sie den Player Wählen Sie den Server (BubbleUPnp) (TwonkyBeam) HINWEIS: Möglicherweise unterstützen nicht alle APPs das Musikstreaming vom iPhone/iPod, aber Sie können Ihr iPhone/iPod auch zur Kontrolle des Musikstreamings von anderen Servern verwenden Einige APPs erlauben die gleichzeitige Wiedergabe der Musik auf verschiedenen Musikwiedergabegeräten. Einige APPs unterstützen bei der Mehrfachauswahl von Musik das Anlegen einer playlist (Wiedergabeliste).
5.6. DAB Im DAB-Modus können Sie DAB/DAB+-Digitalradio empfangen und sich Informationen über den Sender, den Stream und den abgespielten Titel anzeigen lassen. 5.6.1. Scannen nach Radiosendern Wenn Sie den DAB-Radiomodus zum ersten Mal auswählen oder die Liste der Sender leer ist, führt das Gerät automatisch einen vollständigen Scan nach Radiosendern durch.
Radiosender zu sehen und drücken Sie zur Bestätigung OK. Auf dem Display werden Informationen über den gewählten Radiosender, den Titel oder als Broadcast angezeigt. 5.6.2. Senderspeicher Halten Sie PRESET des Geräts oder auf der Fernbedienung solange gedrückt, bis die Sender-speichernAnzeige erscheint, um einen DAB+-Radiosender abzuspeichern. Wählen Sie einen der 10 Speicherplätze für das Speichern des gegenwärtig ausgewählten Radiosenders aus.
• Senderreihenfolge Diese Funktion ermöglicht Ihnen, die Auflistung der DAB-Radiosenderliste alphanumerisch, nach Ensemble oder Gültigkeit geordnet anzeigen zu lassen. Die Ensembleliste gruppiert Sender, die auf dem gleichen Ensemble ausgestrahlt werden. Die Auflistung Gültigkeit erfolgt in der Reihenfolge gültige Radiosender, alphanumerisch und danach nichtsendende Radiosender. 5.7.
Sie können bis zu 10 Favoritensender im Senderspeicher speichern. Sie können schnell und unkompliziert auf die Favoritensender 1 - 0 zugreifen, indem Sie die Zifferntasten auf der Fernbedienung verwenden. 5.7.2. Informationen zur aktuellen Wiedergabe Während ein Stream abgespielt wird, werden auf dem Display die Frequenz des Streams und wenn vorhanden der Name des Radiosenders sowie weitere RDSInformationen wie Programmname, Titel und Kontaktinformationen angezeigt.
5.8. AUX-IN Im AUX-IN-Modus können Sie Audiodateien von einer externen Audioquelle wie beispielsweise einen MP3-Player wiedergeben lassen. Führen Sie bitte für die Wiedergabe von Audiodateien im AUX-In-Modus die nachfolgenden Schritte aus: o Minimieren Sie die Lautstärke sowohl an dem Gerät und, sofern einstellbar, an dem Audio-Quellgerät. o Schließen Sie die externe Audioquelle an der 3,5-mm-Audio-Eingangsbuchse auf der Rückseite des Geräts an.
bestimmten Modus eingerichtet werden. Wählen Sie für das Einstellen oder das Ändern des/der Wecker im Hauptmenü Alarms (Wecker) aus oder drücken Sie auf der Fernbedienung Alarm (Wecker).
5.11. Zus Zusäätzliche Funktionen 5.11.1. Audio-Ausgangsbuchse Über diese Buchse können Sie das Gerät für eine bessere Klangqualität über ein Audiokabel an Ihrem eigenen HiFi-Lautsprechersystem anschließen. 5.11.2. Kopfhörer-Buchse An diese Buchse können Sie das Audiokabel Ihres Kopfhörers anschließen.
6. Fehlerdiagnose Fehler Das Gerät schaltet nicht ein. Abhilfe Überprüfen Sie, ob das Netzteil ordnungsgemäß angeschlossen ist. Kein Ton. 1. Schalten Sie den Ton ein, wenn er stummgeschaltet wurde 2. Erhöhen Sie die Lautstärke. 3. Trennen Sie alle angeschlossenen Kopfhörer oder Lautsprecher von den Anschlussbuchsen. Es kann keine 1. Überprüfen Sie die Funktionalität Ihres WLANs. Netzwerkverbindung 2. Versuchen Sie, dem Gerät eine feste IP-Adresse aufgebaut werden. zuzuweisen. 3.
Rauschen im UKW-Modus 1. Prüfen/Bewegen Sie die Antenne. 2. Ändern Sie den Standort des Radios. Keine Radiosender verfügbar/Störunge n/Unterbrechungen im DAB-Modus. 1. Ändern Sie den Standort des Radios. 2. Scannen Sie nur nach lokalen Radiosendern (hohe Signalstärke). 3. Überprüfen Sie die lokale DAB+-Abdeckung. Wecker ertönt nicht. 1. Aktivieren Sie den Wecker. 2. Ursache kann ebenfalls die Lautstärkeeinstellung sein. Sehen Sie hierfür bei den Lösungen zu „Kein Ton“ nach. 3.
7. Technische Daten Modellnummer DIR-200 Beschreibung Anzeige Internetradio mit DAB/DAB+/UKW/USB 2,8", 320 x 240, TFT-Farbdisplay unterstützte Netzwerke Netzwerkverschlüsselung IEEE 802.
8. Garantie Lenco bietet Leistungen und Garantien im Einklang mit Europäischem Recht. Im Falle von Reparaturen (sowohl während als auch nach Ablauf der Garantiezeit) sollten Sie deshalb Ihren Einzelhändler kontaktieren. Wichtiger Hinweis: Es ist nicht möglich, Geräte für Reparaturen direkt an Lenco zu schicken. Wichtiger Hinweis: Falls dieses Gerät von einem nicht autorisierten Kundendienst geöffnet oder darauf zugegriffen wird, erlischt die Garantie.
11. Service Weitere Informationen und Unterstützung erhalten Sie unter www.lenco.com Lenco Benelux BV, Thermiekstraat 1a, 6361 HB, Die Niederlande.
Fran Franççais (Radio internet avec FM) Avant utilisation 1. Configuration réseau requise • Une connexion large bande en plus d’un point d’accès sans fil, d’un routeur ou d’un dispositif réseau équivalent sont nécessaires. Vérifiez que le dispositif réseau prend en charge une connexion réseau sans fil Wi-Fi (802.11a/b/g/n). Vérifiez que le réseau auquel est connecté votre ordinateur, tablette ou téléphone intelligent, etc. est identique à celui de l’appareil. • • 2.
• • • • Vérifiez que la tension du DIR-200 et de sa fiche d'alimentation correspond à celle du secteur. Une tension incorrecte détruirait l'appareil. é Risque d’une écoute à volume élev levé Si vous écoutez le son du DIR-200 avec des écouteurs, réduisez toujours le volume avant de mettre les écouteurs sur les oreilles. Une fois que les écouteurs sont bien positionnés, montez le volume à votre convenance. Entretien et nettoyage Éteignez toujours le DIR-200 avant de le nettoyer.
3.
Télécommande Enlevez le couvercle du compartiment à pile situé à l‘arrière. Installez 2 piles AA de type AAA. Fermez le compartiment de la pile. Attention : une utilisation inappropriée ou incorrecte des piles peut causer une corrosion o une fuite des piles, pouvant entraîner un incendie, des blessures ou des dommages matériels. Avertissement N’ingérez pas la pile, risque de brûlure chimique (La télécommande fournie avec) Ce produit contient 2 piles AAA.
Connectez l’adaptateur d’alimentation (fourni) au connecteur DC IN à l’arrière de l’appareil et à la prise secteur. Préparer l’environnement réseau • Pour un réseau Wi-Fi Vérifiez d’avoir configuré le réseau sans fil et que vous disposez du mot de passe de sécurité WEP, WPA ou WPA2 pour activer la connexion. Vous pouvez également utiliser la fonction WPS pour faciliter l'appariement entre le réseau et l'appareil. Contrôlez si les indicateurs lumineux du dispositif réseau sont opérationnels.
Appuyez sur / de la télécommande ou tournez la commande de volume de l’appareil pour régler le volume. Si vous souhaitez désactiver le son, appuyez sur , puis appuyez encore une fois pour reprendre l’écoute. Partage de musique depuis un ordinateur • Pour partager les fichiers audio du PC, suivez la procédure suivante : Connectez l’ordinateur au réseau. Vérifier que l’appareil est allumé et connecté au même réseau. Accédez à la plateforme UPnP du lecteur Windows Media Player (version 11 ou supérieure).
5. Op érations Opé 5.1. Menu principal Dans le menu principal, il est possible de sélectionner les modes suivants : Radio Internet, lecteur média, DAB, FM, entrée aux., veille et alarme ème 5.2. Réglages syst systè 5.2.1. Assistant de configuration • Heure/date Format d’affichage Sélectionnez le format sur 12 ou 24 heures que vous souhaitez. Mise à jour automatique L’heure et la date peuvent être réglées manuellement ou automatiquement à partie de la radio numérique (DAB), la radio FM ou le réseau.
Uniquement pour les réglages réseau Fuseau horaire, heure légale Réglez le fuseau horaire (le fuseau par défaut est GMT +1:00). Activez l’option de l’heure légale si elle est en vigueur dans votre pays. Mise à jour manuelle Si vous sélectionnez « No update » (Mise à jour désactivée), l’assistant vous invitera à régler l’heure et la date manuellement. La date et l’heure sont affichées au format jj-mm-aaaa et hh:mm. Le chiffre à régler clignotera.
Pour saisir la clé de chiffrement réseau, utilisez la commande de navigation de l’appareil ou les touches de direction de la télécommande pour faire défiler les caractères, puis appuyez sur pour confirmer. À chaque caractère sélectionné, la clé est complétée dans la partie supérieure de l’affichage. Il est possible de tourner la commande de navigation pour sélectionner les trois options suivantes : BKSP (Effacer), OK et Cancel (Annuler).
o Ignorer la fonction WPS Saisissez la clé comme pour la protection réseau standard. Pour plus d’informations sur la configuration de la protection réseau WPS, veuillez vous reporter aux instructions concernant la fonction WPS de votre routeur. • Résultat L’appareil tente de se connecter au réseau sélectionné. Il affichera Setup wizard completed (assistant d’installation terminé) sur l'écran si la configuration a établi une connexion.
5.2.2. Égaliseur Il est possible de sélectionner des réglages d’égaliseur différents : Normal, Bémol, Jazz, Rock, Film, Classique, Pop, Actualités et My EQ.Vous pouvez également créer vos propres égaliseurs (dans la configuration de profil My EQ) avec des réglages personnalisés de basses, aiguës et sonie. Appuyez sur la touche EQ de la télécommande pour accéder rapidement au menu d'égaliseur. 5.2.3.
la fonction DHCP (Protocole de configuration d’hôte dynamique). • Profil réseau L’appareil dispose d’une fonction de mémorisation des quatre derniers réseaux sans fil auxquels vous vous êtes connectés. L’appareil se connectera rapidement à celui qui est disponible. La liste des réseaux enregistrés s’affichera. Il est possible de supprimer les réseaux indésirables en tournant la commande de navigation et en appuyant sur OK, puis en confirmant par YES (OUI).
moins de réenregistrer votre appareil sous un autre compte sur le site Web du portail. 5.2.7. Mise à jour du logiciel Une mise à jour du logiciel peut être disponible pour corriger des problèmes ou ajouter des fonctions. L'appareil vérifie par défaut automatiquement la disponibilité des mises à jour périodiquement. Vous pouvez également vérifier manuellement la disponibilité de mises à jour. Si une nouvelle version du logiciel est disponible, vous en serez averti.
En écoutant une station de radio Internet, vous pouvez appuyer sur la touche BACK ou de la télécommande pour revenir rapidement à la dernière branche visitée de l'arborescence du menu. Vous pouvez aussi appuyer sur le bouton MENU/INFO de l’appareil ou la touche MENU de la télécommande pour accéder au premier menu du mode radio Internet. 5.3.1. Dernière station écoutée Au redémarrage du mode radio Internet, la dernière station écoutée est sélectionnée.
5.3.3. Favoris Les favoris sont stockés dans le portail de radio Internet et sont disponibles par le biais de toutes les radios Internet enregistrées sur le même compte. Avant d’utiliser les favoris, la radio doit être enregistrée avec le portail de radio Internet. Pour enregistrer votre appareil, choisissez Station list (Liste des stations) > Help (Aide) > Get access code (Obtenir un code d’accès) pour obtenir votre code d’accès unique au portail de radio.
5.3.4. Mes stations ajoutées Bien que le portail de radio Internet contienne des milliers de stations, vous souhaiteriez écouter une station non répertoriée. Il est possible d’ajouter votre propre station via le portail. 5.3.5. Stations préréglées Les stations préréglées sont mémorisées dans la radio et ne sont pas accessibles à d’autres radios.
En lisant de la musique, vous pouvez appuyer sur la touche BACK sur l'appareil ou la touche de la télécommande. Vous pouvez égalemen maintenir enfoncé la touche MENU/INFO sur l'appareil ou appuyer sur la touche MENU sur la télécommande pour revenir rapidement à la dernière branche visitée de l’arborescence du menu.Vous pouvez également appuyer sur ou de la télécommande pour reproduire la piste précédente ou suivante. Appuyez et maintenez enfoncé pour exécuter un retour ou une avance rapide (x1, x2, x4).
Une fonction de recherche est à votre disposition pour rechercher des pistes de la même façon que la recherche de stations radio Internet. Pour le type Music (Musique), il est possible de choisir des pistes en les sélectionnant par Genre, Artiste, Album, Compositeur ou Classement. Appuyez sur OK pour lire la piste souhaitée. Un bref appui lancera la lecture immédiate de la piste. 5.4.2. Lecteur USB À ce niveau, les menus sont créés à partir des dossiers du dispositif USB.
l’artiste (uPnP). Une barre de progression indique aussi la durée totale et la durée écoulée. Au bas de l’écran, une icône uPnP s’affiche en fonction de la source. Pour avoir plus d’informations, appuyez sur MENU/INFO de l’appareil ou sur INFO de la télécommande. Chaque fois que vous appuyez sur INFO INFO, un autre jeu d’informations s’affiche. L’ordre est le suivant : UPnP: piste/artiste/barre de progression/durées de la piste, album, codec/taux d’échantillonnage, tampon de lecture et date du jour. 5.5.
de diffusion multim multiméédia en continu) Ouvrez Windows Media Player pour activer Allow remote control of my ôle à distance de mon lecteur). Player (Autoriser le contr contrô Sélectionnez n'importe quelle musique dans la bibliothèque et choisissez de lire « DIR-200 DIR-200”” ». Une boîte de dialogue de lecture musicale apparaît pour la diffusion en continu.
5.5.2. Contrôle depuis un téléphone intelligent/une tablette Vous devez lancer une recherche (avec le mot-clé : DLNA) et installez l’une des applications gratuites ou payantes DLNA depuis les magasins en ligne Google Play ou Apple Store si vous utilisez un téléphone mobile Android, une tablette ou un iPhone/iPad. Il est conseillé d’utiliser BubbleUPnp ou Twonky Beam sur un téléphone mobile Android, une tablette ; ou d’utiliser Twonky Beam sur un iPhone/iPad.
Sélectionnez le lecteur Sélectionnez le serveur (BubbleUPnp) (TwonkyBeam) REMARQUE : Certaines applications ne prennent pas en charge la lecture de musique en flux continu à partir d'un iPhone/iPod mais l'iPhone/l'iPod peut encore être utilisé pour commander la musique en flux continu à partir d'autres serveurs. Certaines applications peuvent permettre la lecture de musique sur plusieurs lecteurs en même temps.
5.6. DAB Le mode DAB permet de recevoir la radio numérique DAB/DAB+ et d’afficher des informations sur la station, le flux et la piste diffusée. 5.6.1. Recherche des stations La première fois que vous sélectionnez le mode radio DAB ou si la liste des stations est vide, l’appareil exécutera automatiquement une recherche complète des stations.
l'appareil ou la touche de la télécommande jusqu’à ce que l'appareil affiche l'écran Save preset (sauvegarder le préréglage). Sélectionnez l'un des 10 préréglages pour enregistrer la station en cours. Pour sélectionner un préréglage, appuyez brièvement sur la touche PRESET sur l'appareil ou la touche de la télécommande, puis sélectionnez l’un des stations préréglées de la liste. L'écran affichera n ( 1, 2, etc) en bas à droite. Il est possible de mémoriser vos 10 stations préférées.
5.7. FM Le mode radio FM permet la réception des radios analogiques de la bande FM et d’afficher les informations RDS (Radio Data System) sur la station et le lieu d’émission. Pour rechercher une station, appuyez sur OK OK. L’appareil recherche les stations de la bande FM tout en actualisant la fréquence. Alternativement, vous pouvez lancer une recherche vers l’avant ou l’arrière en maintenant enfoncés les boutons ou . 5.7.1.
d’informations s’affiche parmi : texte RDS, autre texte RDS (station/type de programme), fréquence et date du jour. 5.7.3. Réglages • • Paramètres de recherche La recherche s’interrompt par défaut pour toute station détectée. Il peut en résulter un rapport signal-sur-bruit pauvre (sifflement) pour les stations faibles.
5.9. Veil. Pour régler le minuteur de sommeil, sélectionner Sleep (sommeil) dans le menu d'accueil ou appuyez sur la touche de la télécommande. Choisissez la durée de la minuterie de sommeil parmi Sleep OFF (Arrêt), 15 MINS, 30 MINS, 45 MINS ou 60 MINS. Le système revient au menu principal après avoir choisi la durée de la minuterie souhaitée. Maintenez enfoncé MENU/INFO sur l'appareil ou MENU sur la télécommande pour revenir à l'écran de lecture en cours. 5.10.
Quand l’alarm sonne, appuyez sur n’importe quelle touche (sauf ou Alarm) sue l’appareil ou la télécommande pour désactiver provisoirement l’alarme pendant une durée définie. L’icône de rappel de réveil se mettra à clignoter pour indiquer que le rappel est activé. 5.11. Fonctions suppl émentaires supplé 5.11.1. Connecteur de sortie audio Il vous permet de brancher un câble audio de l’appareil à votre chaîne hi-fi pour améliorer les performances sonores. 5.11.2.
La connexion Wi-Fi ne peut pas être établie. La radio ne trouve aucune station. Sifflements en mode FM Aucun station disponible/bruit sourd/intermittent en mode DAB. L’alarme ne fonctionne pas. Tous les autres cas indéterminés. 1. Contrôlez la disponibilité du réseau WLAN sur le routeur. 2. Rapprochez l’appareil du routeur. 3. Vérifiez que le mot de passe est correct. 1. Vérifiez le réseau, le point d’accès et le pare-feu. 2.
7. Caract éristiques Caracté Numéro du modèle Description DIR-200 Radio Internet avec DAB/DAB+/ FM/USB Affichage écran couleur TFT 2,8", 320 x 240 Réseau pris en charge IEEE 802.
8. Garantie Lenco propose un service et une garantie conformément à la législation européenne, ce qui signifie qu’en cas de besoin de réparation (aussi bien pendant et après la période de garantie), vous pouvez contacter votre revendeur le plus proche. Remarque importante : Il n’est pas possible de renvoyer l’appareil pour réparation directement à Lenco. Remarque importante : Si l’unité est ouverte ou modifiée de quelque manière que ce soit par un réparateur non agréé, la garantie serait caduque.
11. Service apr ès-vente aprè Pour en savoir plus et obtenir de l’assistance, visitez www.lenco.com Lenco Benelux BV, Thermiekstraat 1a, 6361 HB, Pays-Bas.
ñol Espa Españ (Radio por internet con FM) Antes de la puesta en marcha 1. Requisitos de red • Es necesaria una conexión de banda ancha con un punto de acceso inalámbrico, router o un dispositivo de red similar. Asegúrese de que el dispositivo de red es compatible con una conexión inalámbrica WiFi (802.11a/b/g/n). Asegúrese de que la red a la que está conectada su PC, tableta o smartphone, etc. es la misma con la que está equipado el dispositivo. • • 2.
• • • • Asegúrese de que la tensión eléctrica especificada en el DIR-200 y en su enchufe coincida con la tensión de su toma de corriente. Una tensión incorrecta podrá averiar el dispositivo. Riesgos asociados al volumen elevado Cuando escuche el DIR-200 con auriculares, baje el volumen siempre antes de ponerse los auriculares. Una vez que los auriculares estén colocados debidamente, aumente el volumen hasta el nivel que desee. Mantenimiento/limpieza Cuando limpie el DIR-200 apáguelo siempre.
3.
Mando a distancia Retire la tapa del compartimento de las pilas en la parte posterior. Inserte 2 pilas de tipo AAA. Cierre la tapa del compartimento de las pilas. ón: Un uso indebido o incorrecto de las pilas Precauci Precaució puede causar corrosión o fugas de líquido, lo que podría originar un incendio, lesiones personales o daños materiales. Advertencia No ingiera la batería; riesgo de quemaduras químicas (El mando a distancia las incluye) Este producto contiene 2 pilas AAA.
• Para WiFi inalámbrica Asegúrese de que ha configurado la red inalámbrica y de que dispone de la contraseña de WEP, WPA o WPA2 para activar la conexión. También puede utilizar la función WPS (Configuración de WiFi protegida) para un emparejamiento sencillo del dispositivo con el dispositivo de red. Compruebe si los indicadores luminosos del dispositivo de red están en estado operativo. Conecte el dispositivo a la fuente de alimentación.
Pulse / en el mando a distancia o gire el control del volumen del dispositivo para ajustar el volumen. Si desea apagar el sonido, pulse ; vuélvalo a pulsar para volver a la audición de audio. Compartir música desde el PC • Para compartir los archivos de música desde el PC, siga estos pasos: Conecte el PC a la red. Asegúrese de que el dispositivo está encendido y conectado a la misma red. Abra la plataforma UPnP platform Windows Media Player (versión 11 o superior).
ón del sistema 5.2. Configuraci Configuració 5.2.1. Asistente de configuración • Hora fecha Formato de pantalla Seleccione 12 o 24 como formato de hora que desee. Actualización automática La fecha y la hora se pueden actualizar manual o automáticamente desde DAB, FM o la red. La actualización automática está disponible en modo DAB, FM o Internet. La hora solo se actualizará cuando esté en un modo correspondiente, por lo que es mejor seleccionar un modo que use regularmente.
Actualización manual Si selecciona, no hay actualización, el asistente le indica que fije la hora y la fecha manualmente. La fecha y la hora se muestran como dd-mm-aaaa y hh:mm. Los dígitos ajustables parpadearán. Ajuste cada dígito con el control de navegación/ o en el dispositivo o ▲/▼ en el mando a distancia. Una vez establecido el dígito, pulse para continuar. • Network (Red) Región Wlan Selecciona la región Wlan para obtener la conectividad Wlan óptima: La mayoría de Europa.
confirmarlo. Cuando se selecciona cada carácter, se muestra la tecla cerca de la parte superior de la pantalla.Existen tres opciones accesibles para rechazar el control de navegación en el dispositivo antes del primer carácter – (BKSP), OK y Cancelar. Red encriptada WPS Las redes encriptadas WPS se identifican mediante WPS al principio del nombre de la red cuando el dispositivo busca la AP disponible.
• Finalización El dispositivo intenta conectarse a la red seleccionada. Mostrará ‘Setup wizard completed’ (Asistente de configuración completado) en la pantalla si la configuraciones ha realizado con éxito. Si la conexión falla, el dispositivo volverá a la pantalla anterior para que vuelva a intentarlo. Pulse para salir del asistente de configuración. 5.2.2. Ecualizador Le permite seleccionar diferentes ecualizadores: Normal, Plano, Jazz, Rock, Película, Clásica, Pop, Noticias, y my ecualizador.
5.2.3. Network (Red) • Asistente de red Entre para buscar AP SSID, posteriormente introduzca la clave WEP/WPA o elija el Botón/Pin/ Salir WPS para conectarse a la red inalámbrica. • Configuración PBC Wlan Configuración del botón; es para conectar la AP que es compatible con WPS (Configuración protegida Wi-Fi).
Si selecciona mantener la red conectada, la red WiFi no se desconectará ni cuando esté en el modo en espera. De lo contrario, la conexión estará sólo disponible. Esta opción permite que el dispositivo esté listo para la reproducción de DLNA en cualquier modo operativo. Para obtener más detalles de la reproducción DLNA, por favor, remítase a la Sección 5.5. 5.2.4. Hora/Fecha Fije la hora manualmente o actualice automáticamente el formato de hora, zona horaria y luz diurna. 5.2.5.
5.2.8. Info (Información) Ver la versión de firmware y la ID de la radio. 5.2.9. Backlight (Retroiluminación) Permite cambiar el nivel de la retroiluminación entre Alto, Medio y Bajo (en los modos encendido y en espera). El tiempo de apagado puede ajustarse, lo que permite que la radio apague su retroiluminación cuando no se utilice. 5.3. Radio por Internet El dispositivo puede reproducir emisoras de radio por Internet y podcasts de todo el mundo a través de una conexión a internet de banda ancha.
5.3.1. Última emisora escuchada Cuando se reinicia el modo radio de Internet, se selecciona la última emiosra escuchada. Para seleccionar otra emisora recientemente usada, entre aquí para seleccionar la emisora enumerada. Las emisoras más recientes aparecen en la parte superior de la lista. 5.3.2. Lista emisoras Busca en emisiones de Internet que se categorizan en diferentes categorías, Ubicación, Género, Popular y Noticias. Asimismo puede seleccionar la emisora con palabras clave. 5.3.3.
Si es la primera vez que visita el portal, registre una nueva cuenta , introduciendo la siguiente información: o Código de acceso, o Su dirección de correo electrónico, o contraseña, o Modelo de radio. Si ya dispone de una cuenta y desea añadir una radio adicional, inicie sesión en su cuenta y seleccione My preferences (mis preferencias) > Add another Wi-Fi radio (Añadir otra radio Wi-Fi).
5.3.6. Información sobre lo que se está reproduciendo ahora Cuando se está reproduciendo en Internet, la pantalla muestra su nombre y descripción. Para ver más información, pulse MENU/INFO en el dispositivo o INFO en el mando a distancia. Cada vez que pulsa INFO INFO, se muestra más información, que cambia entre nombre/descripción, género/ubicación, fiabilidad, códec/frecuencia de muestreo, buffer de reproducción y fecha actual. 5.4.
5.4.1. Archivos multimedia compartidos Si ha configurado los archivos multimedia compartidos, se mostrará una entrada que consiste en : . Si tiene más de un ordenador compartiendo contenidos, aparecerán todos en una lista. Seleccione el archivo multimedia compartido que desee reproducir. Los menús ahora se generan desde el servidor de archivos multimedia compartidos.
navegación y el botón Atrás o las teclas de dirección en el mando a distancia. La pantalla muestra los nombre de la carpeta y del archivo (no necesariamente los nombres de las pistas). Una vez que haya encontrado la pista que desee reproducir, pulse la bobina de navegación o pulse OK en el mando a distancia. Nota: El puerto USB no es compatible con la carga. 5.4.3. Repetir/cambiar Le permite repetir pistas o reproducirlas en orden aleatorio.
directamente usar el PC, móvil o tableta Android o iPhone/iPad para controlar la reproducción de música del dispositivo. Esto se conoce como transmisión DLNA. 5.5.1. Control sobre el PC Las exigencias del sistema del PC para DLNA son Windows 7 y Windows Media Player 12. Configúrelo como indicamos a continuación: Primero, comparta los archivos multimedia del PC al dispositivo.
Aparece una caja de reproducción de música para la reproducción. 5.5.2. Control sobre el Smartphone/Tableta Puede buscar (con palabra clave: DLNA) e instalar aplicaciones comerciales gratuitas de DLNA desde Google Play o Apple Store si usa un móvil, tableta Android o un iPhone/iPad. Sugerimos que use BubbleUPnp o Twonky Beam en un móvil, tableta Android; o use Twonky Beam en un iPhone/iPad. El procedimiento para reproducir música compartida en la aplicación es el siguiente: 1.
Seleccione el reproductor Seleccione servidor (BubbleUPnp) (TwonkyBeam) NOTA: Algunas aplicaciones no soportan la transmisión de música desde el iPhone/iPad aunque el iPhone/iPad sí será capaz de controlar la música transmitida desde otros servidores. Algunas aplicaciones permiten reproducir la música en varios reproductores al mismo tiempo. Algunas aplicaciones pueden crear una lista de reproducción si escoge varias canciones.
5.6. DAB El modo DAB recibe radio digital DAB/DAB+ y muestra información sobre la emisora, reproducción y reproducción de pistas. 5.6.1. Búsqueda de emisoras La primera vez que selecciona el modo radio DAB o si la lista de emisoras está vacía, el dispositivo realiza automáticamente una búsqueda completa de emisoras. Asimismo puede realizar una búsqueda manual para actualizar la lista de emisoras por los posible motivos siguientes: o La lista de emisoras disponibles puede cambiar cada cierto tiempo.
5.6.2. Presintonías Para guardar una presintonía DAB+, mantenga pulsado PRESET en el dispositivo o en el mando a distancia hasta que la pantalla muestre la pantalla de guardar presintonías. Seleccione una de las 10 presintonías en la que guardar la emisora actual. Para seleccionar una presintonía, pulse brevemente PRESET en el dispositivo o en el mando a distancia, y después seleccione una de las emisoras de la lista de presintonías. La pantalla mostrará n( 1, 2 etc.) en la parte inferior derecha.
5.7. FM El modo de radio FM recibe radio analógica de la banda FM y muestra la información RDS (Sistema de Datos de Radio) sobre la emisora y la ubicación de la emisión. Para buscar una emisora, pulse OK OK. La pantalla de frecuencia empieza a funcionar cuando el dispositivo busca la banda FM. De manera alternativa, puede buscar hacia arriba o hacia abajo, manteniendo pulsados los botones o . 5.7.1.
5.7.3. Configuración • Configuración de búsqueda La búsqueda FM es por defecto y se detiene en cualquier emisora disponible. Esto puede provocar una mala radio de señal a ruido (pitido) de emisoras débiles. Para cambiar la configuración de la búsqueda para que se detenga únicamente en las emisoras con una buena fuerza de señal, seleccione Yes (Sí) tras elegir emisores fuertes solamente.
5.9. Retad Para establecer el temporizador de apagado, seleccione Sleep en el menú principal o pulses en el mando a distancia. Elija la opción de periodo de sueño desde Sleep OFF, 15 MINS, 30 MINS, 45 MINS o 60 MINS (Sueño desconectado, 15 MINUTOS, 30 MINUTOS, 45 MINUTOS o 60 MINUTOS). El sistema vuelve al menú principal una vez que haya seleccionado la opción de periodo de sueño que desee.
o o Preset (Presintonizada): Última escuchada 1-10, Volume (Volumen): 0-20 Para activar la nueva configuración desplácese y seleccione Guardar. La pantalla muestra las alarmas activas con un icono en la parte inferior izquierda. Cuando suene la alarma, pulse cualquier tecla (excepto o Alarm)en el dispositivo o en el mando a distancia para desactivar temporalmente la alarma durante un período de tiempo establecido. El icono del retardo parpadeará para indicar que el retardo está conectado. 5.11.
6. ón de problemas Soluci Solució Error El dispositivo no se enciende. Remedio Compruebe si el adaptador de corriente está conectado correctamente. No hay sonido. 1. Active el sonido, ya que podría estar silenciado 2. Subir el volumen. 3. Extraiga cualquier auricular o altavoz conectado de las tomas de los conectores. No se puede establecer la conexión de red. 1. Compruebe el funcionamiento de la WLAN. 2. Intente configurar una dirección IP en el dispositivo. 3.
Aparece ruido de fondo en el modo FM 1. 2. Compruebe/mueva la antena FM. Mueva la radio. No hay emisoras disponibles/ entrecortadas/ intermitentes en el modo DAB. La alarma no funciona. 1. Mueva la radio. 2. Vuelva a buscar únicamente las emisoras locales (fuerza alta). 3. Compruebe la cobertura DAB+ local. Todos otros casos no determinados.
7. Especificaciones Número de modelo Descripción Pantalla Red soportada Clave encriptada Transmisión Formatos compatibles para reproducción DAB/DAB+ FM Adaptador de corriente Consumo de energía en espera Consumo de energía en espera de la red Potencia de salida de altavoz Conexiones Dimensiones Peso DIR-200 Radio de Internet con DAB/DAB+/ FM/USB Pantalla a color 2.8", 320 x 240, TFT IEEE 802.
8. Garant Garantíía Lenco ofrece servicio y garantía en cumplimiento con las leyes de la Unión Europea, lo cual implica que, en caso de que su producto precise ser reparado (tanto durante como después del periodo de garantía), deberá contactar directamente con su distribuidor. Nota importante: No es posible enviar sus reparaciones directamente a Lenco. Nota importante: Si la unidad es abierta por un centro de servicio no oficial, la garantía quedará anulada.
11. Servicio Para obtener más información y soporte del departamento técnico, por favor, visite la página web www.lenco.com Lenco Benelux BV, Thermiekstraat 1a, 6361 HB, Países Bajos.