24” (61cm) LED TV with DVD & DVBT Model No.: DVL-2453 WHITE For information and support, www.lenco.
Contents 1-3 SAFETY INFORMATION 4 5-6 7 8-11 12 13 14 15-22 Unit Remote Control Aerial connection Connecting external devices Common Interface slot Auto installation setup Source menu Menu settings 23-29 DVD Operation 30 31 TROUBLE SHOOTING GUIDE TECHNICAL SPECIFICATIONS options
SAFETY INFORMATION IMPORTANT SAFETY INSTRUCTIONS - READ CAREFULLY BEFORE USE. Take note of the following safety information which appears on the back of the TV. CAUTION TO PREVENT ELECTRICAL SHOCK, DO NOT REMOVE ANY COVER SCREWS, NO USER SERVICEABLE PARTS INSIDE, REFER SERVICING TO QUALIFIED SERVICE PERSONNEL. This symbol indicates that there are important operating maintenance instructions in the literature accompanying this unit.
IMPORTANT SAFETY INFORMATION (Continued) This unit has been produced according to all current safety regulations. The following safety tips should safeguard users against careless use and the dangers connected with such use. x Although this appliance has been carefully manufactured and rigorously checked prior leaving the factory, as with all electrical appliances it is possible for problems to develop.
IMPORTANT SAFETY INFORMATION (continued) Liquids spilt into the unit can cause serious damage. Switch the set OFF and disconnect the mains power supply, then consult a qualified service person before attempting to use the unit again. Do NOT remove the safety covers. There are no useable or serviceable parts inside. You may invalidate the warranty. Qualified personnel must only service this apperatus. Do NOT tap or shake the screen, you may damage the internal circuits.
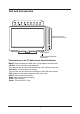
Unit and Accessories Please insert a 12cm disc according to the silk LED Indicator Remote Control Window (keep clear) The functions of the TV buttons are described below. MENU: Press to display the OSD menu, Press again to exit the menu. CH-/CH+: Press to scan through channels. They are also can be used to move down/up in the OSD menu screen. VOL-/VOL+: Press to adjust the volume. They are also can be used to move left/right in the OSD menu screen. VOL+ button can be used to skip forward to next menu.
Remote control 1 2 3 SYS-MENU 5 7 6 INPUT 4 8 DVD 9 10 SYS-EXIT DVB 11 12 TV/RADIO 13 FAV DISPLAY FAV+ LANGUAGE FAV- 1. POWER: Turn the TV on/standby. 2. buttons for DVD operation : Load/eject DVD disc : Play/pause DVD program : Stop DVD program : DVD fast reverse : DVD fast forward : DVD previous chapter : DVD next chapter 2.
Remote control (continued) 10. DVB: switch to DTV 1 2 11. SYS-EXIT: Exit the OSD menu. 12. 0-9,-/-Choose channel directly. Number buttons for DVD. Returns to the previous channel. 3 SYS-MENU 5 7 6 INPUT 4 8 DVD 9 10 SYS-EXIT DVB TV/RADIO 13 FAV DISPLAY FAV+ LANGUAGE FAV- 13. PICTURE: Select the picture mode. SOUND: Select the sound mode. NICAM/A2: Selects Nicam or Mono sound. MUTE: Mutes the Audio. SLEEP: Standby Timer TV/RADIO: Disc menu change between TV and Radio.
Aerial connection USER GUIDE WARNING! ENSURE THE TV AND ALL ANCILLARY EQUIPMENT IS UNPLUGGED FROM THE MAINS BEFORE MAKING ANY CONNECTIONS! Connecting the TV Antenna Connect the TV antenna to the aerial socket with a 75 ohm co-axial plug. For best results use a high gain TV aerial, preferably roof or loft mounted. • To improve picture quality in a poor signal area, purchase and install a signal amplifier. • If the antenna needs to be split for two TVs, use a 2-Way Signal Splitter (not supplied).
Connecting external devices (continued) USB SCART POWER: Connect to the mains adaptor. USB: For DVB-T software upgrade only. HDMI: Connect it to the HDMI of DVD or other equipment. VGA: For PC display.Connect it to the D-Sub 15 pins analog output connector of the PC. PC-IN: Connect it to the audio output terminal of PC. SCART: Connect them to the SCART video output terminal of DVD.(used in component source) Headphone: Connect it to your headphone or other audio equipment. Coax: DVD coaxial output.
Connecting external devices (continued) PC connection As PCs are sometimes still supplied with a ‘conventional’ CRT monitor, you may need to adjust the display settings of your PCs graphics card, otherwise the pictures may not appear correctly. Switch on your PC (still with your original monitor connected) no w select the screen resolution, and select 60Hz refresh rate. Switch off your PC, then connec t it to your TV while both appliances are still switched off.
Connecting external devices (continued) Connecting Video camera and Video recorder Video camera x x x x Connect the AV cable to the TV and to the video camera. Turn on both video camera and the TV. Select AV/CVBS source You can now see the playback picture from the video camera. Note: x To connect the video camera using other cables, refer to the video camera instruction manual. Video recorder x x x x Connect the Scart cable to the TV and video recorder.
Connecting external devices (continued) Connecting an audio system You can supply the TV sound to the stereo system (A) with the Scart socket. Use a special scart cable SCART to RCA. (Please consult your hi-fi instructions for details). If you have a surround sound amplifier/decoder (B) Use the Scart cable or the special scart cable Scart to RCA.
USER GUIDE Common Interface Slot USING YOUR COMMON INTERFACE SLOT Common Interface The Common Interface (CI) slot is designed to accept the Conditional Access Module (CAM) and Smart Card in order to view the pay TV programmes and additional services. Contact your Pay Per View TV service provider to get more information about the modules and subscriptions. NOTE: Conditional Access Module and Smart Cards are sold separately.
Auto installation setup Power On / Off the LCD TV 1. Connect to the power supply with a power code and an adaptor. 2. -To turn on the TV Press POWER button on the TV or remote control. -To turn off the TV Press POWER button on the TV or remote control. When you initially turn on the LCD TV you will see the first time installation menu as below: Ensure that the aerial is plugged in to the TV, Make sure your Remote is in TV mode (by pressing INPUT button), switch on the TV by pressing POWER.
BasLc Use Menu Settings 1. Turn the LCD TV on. 2. Press the MENU button on the Remote Control. 3. Use the and buttons to navigate through the menu. 4. Press the EXIT button to exit the Menu. CHANNEL MENU Allows you to search channels and set up a variety of channel options. (Select DTV source for example) (Select DTV source for example) SETTING MENU: Allows you to setup a variety of setup options. (Select DTV source for example) Allows you to customize the sound options and effects.
Application Menu Settings (continued) Use the and buttons to select the CHANNEL menu (as the picture above), press button to enter the menu. The CHANNEL menu includes the following options : Country Press and buttons to select the Country. (Can be selected in ATV mode) Auto Search Press button to start auto search. Auto Search menu for DTV Manual Program Press Auto Search menu for ATV button to enter the submenu. Manual Program menu for ATV Program Color Sys. Sound Sys.
Menu Settings (continued) Manual Program menu for DTV Program Start Search Channel Found SIG. Quality SIG. Strength Frequency Select the program you want to edit. Press button to start search. Display the channel it found. Display the singal quality of the channel it found. Display the singal strength of the channel it found. Display the frequency of the channel it found. Program Edit: Press button to enter the submenu as the following picture.
SEARCH: ·Use 【 OK】 button to enter the search menu. ·Use the number buttons to select the corresponding characters. ·Use the ▲▼ button to select channel, then use【Ok】 button to rename the program. There are two options: ·Use the 【1-9】 number buttons to select different character. ·Use the Green button to Switch between upper and lower case letters.Circularly press the number buttons 2 to select between a, b, c and 2 and use【OK】button to save.
Menu Settings (continued) Use the and buttons to select the PICTURE menu (as the picture above), press button to enter the menu. Picture Mode Choose from Standard, Movie, Vivid and Personal. Note: Contrast, Brightness, Color and Sharpness can only be adjusted in the Personal mode option in the Picture Mode Settings. Contrast Controls the difference between the brightest and darkest regions of the picture. Brightness Controls the overall brightness of the picture Color Control the color.
Application Menu Settings (continued) Use the and buttons to select the SOUND menu (as the picture above), press button to enter the menu. Sound Mode Allows you to select among: Standard, Music, Movie and Personal. Bass (Can be adjusted when the sound mode is set to User) Controls the relative intensity of lower pitched sounds. Treble (Can be adjusted when the sound mode is set to User) Controls the relative intensity of higher pitched sounds.
Menu Settings (continued) Use the and buttons to select the SETTING menu (as the picture above), press button to enter the menu. The SETTING menu includes the following options: Language Allows you to select menu language. OSD Timer Allows you to select the time for OSD menu displays on the screen. Transparence Allows you to select the transparence for OSD menu displays on the screen. Overscan Turn on/off the overscan funciton.
Menu Settings (continued) Use the and buttons to select the FUNCTION menu (as the picture above), press button to enter the menu. The FUNCTION menu includes the following options : Sleep Timer Allows you to setup the sleep timer to : 15min, 30min, 45min, 60min, 75min, 90min,105min, 120min and off. Aspect Allows you to select the screen display mode. (Can be selected in DTV mode) TT Language Allows you to select the Teletext language.
Menu Settings (continued) Use the and buttons to select the PC SETUP menu (as the picture above), press button to enter the menu. The PC SETUP menu includes the following options : H-Position Adjust the transverse position of the screen. V-Position Adjust the vertical position of the screen. Clock Adjust the pixel clock frequency, until the image size is maximized for the screen. Phase Adjust the phase of the ADC sampling clock relative to the sync signal, until a stable image is obtained.
INPUT 23
24
25
26
DVD-SETUP ► ▲/▼ ▲/▼ ▲/▼ ► ▼ ▲/▼ ► 27
▲/▼ OK ▲/▼ ▲/▼ 28
F 1234 512 567 89 345 98 3 2 9 ! " !" # ! $%$ # & # # ! & ! ' '( 6)7* 98 +, " ! !- ! " $%$ # , ! !" # !- ! ! "! , # , !- , " ". # -! , / . !" # " ! , & ! # / , ( 8740 1 /" !- ! " ! 2$ 3 , 4 ".
USER GUIDE TROUBLE SHOOTING GUIDE To assist in locating possible faults use the help guide below. SYMPTOM TROUBLESHOOTING No Picture, no sound Check that the TV is correctly plugged in. Check that the TV is connected to a suitable power source. Check the electrical supply is turned on. Ensure that the TV is powered on. Check that the cables are fitted securely. Ensure the aerial and/or external sources are connected. Press the INPUT button to change the source. Turn the TV on or off.
TECHNICAL SPECIFICATIONS Specifications of the TV that you have just purchased may vary from the information in this table due to technical innovations.