L-80 USB Turntable MP3 recorder USER MANUAL (ENGLISH)---------------------------------------------------------P1-P9 INDICE: ● SAFETY INSTRUCTIONS ● CONTROL AND FUNCTIONS ● SPECIFICATIONS ● OPERATIONS
USER MANUAL L-80 USB SAFETY INSTRUCTIONS 1. Read these Instructions. 2. Keep these Instructions. 3. Heed all Warnings. 4. Follow all Instructions. 5. Do not use this apparatus near water. 6. Clean only with a dry cloth. 7. Do not block any of the ventilation openings. Install in accordance with the manufacture’s instructions. 8. Do not install near nay heat sources such as radiators, heat registers, stoves, or other apparatus (including amplifiers) that produce heat. 9.
The exclamation point within the equilateral triangle is intended to alert the user to the presence of important operation and maintenance (servicing) instructions in the literature accompanying this appliance. CAUTION To prevent electric shock, do not use this polarized plug with an extension cord, receptacle or other outlet unless the blades can be fully inserted to prevent blade exposure.
CONTROL AND FUNCTIONS 1. USB SOCKET USB record only for MP3 format. 2. PLATTER 3. START/STOP BUTTONP Press this button to start or stop the platter. 4. PHONO/LINE SWITCH Switches the output to either Phono or Line level. 5. PLATTER SPEEDS Used to select the desired speed. * Press the “33” button to select the 33rpm speed. * Press the “45” button to select the 45rpm speed. 6. RECORD/STOP BUTTON Press the button to start recording and press again to stop recording. 7.
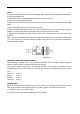
11. MOTOR OFF/Reverse BUTTON Tap the button to switch Reverse/Forward playback. Press the button more than 1sec. to enable motor off, and the led will be flash. Press the button more than 1sec again to disable motor off. 12. 45 RPM ADAPTOR Place on center spindle for playing 7” records with large center holes. 13. TONEARM LEVER Controls the up and down action of the tone arm lift. 14. ANTI-SKATE KNOB When a record is playing, a force is generated drawing the stylus towards the center of the record.
OPERATIONS 1. Push power button to on. 2. Insert target light for illumination the stylus. 3. Place a record on the turntable mat. When playing a 45rpm record with a large center hole; place the 45rpm adapter on the center spindle. 4. Set the rotation speed (33/45) to match the record. 5. Release the arm clamp 6. Set the cueing lever to the up position. 7. Press the Start/Stop button and the turntable platter will start to rotate. 8. Move the tone arm over the desired groove. 9.
SET-UP ASSEMBLY: Before you begin assembly please be sure all parts and accessories have arrived intact. Please use the check list below to identify and order parts and accessories. * Instruction manual * RCA cable * Slipmat * Platter * 45 rpm adaptor * Headshell * AC cord * Counterweight Note: * Do not connect the AC power plug before assembly has been completed. * Before turning the power on, make sure once again all the connections and power voltage settings are correct.
SET-UP a. Remove the stylus protective cover, if so equipped. Never touch the stylus tip during the adjustment. b. Lower the tonearm lever. c. Release the tonearm clamp and release the tonearm from the arm rest. d. Set the anti-skate adjustment to zero. e. Rotate the counterweight in either direction until the tonearm is perfectly balanced horizontally (floats freely) f. Return the tonearm to the arm rest and lock it in place. g.
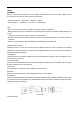
Output terminals Amplifier(Receiver) L (White) L CH R (Red) R CH You can also use a line input by setting the phono / line switch at the rear of the turntable to line. Set the PHONO/LINE switch to “PHONO” Set the PHONO/LINE switch to “LINE” If at any time in the future you should need to dispose of this product please note that: Waste electrical products should not be disposed of with household waste. Please recycle where facilities exist. Check with your Local Authority or retailer for recycling advice.
L-80 USB Plattenspieler mit MP3-Recorder BEDIENUNGSANLEITUNG (DEUTSCH)---------------------------------------------------------P10-P18 ENTHALTEN: ● SICHERHEITSHINWEISE ● KONTROLLE UND FUNKTIONEN ● EIGENSCHAFTEN ● BEDIENUNG
BEDIENUNGSANLEITUNG L-80 USB SICHERHEITSHINWEISE Lesen Sie bitte alle Warn- und Bedienungshinweise sorgfältig durch, bevor Sie dieses Gerät in Betrieb nehmen. • Bewahren Sie diese Bedienungsanleitung für evtl. später auftauchende Fragen sorgfältig auf. • Entfernen Sie bitte nicht die Warnhinweise am Gerät. • Befolgen Sie bitte alle Hinweise in dieser Bedienungsanleitung genau. • Nutzen Sie dieses Gerät niemals in der Nähe von feuchten Stellen wie z.B. Waschbecken, Badewannen oder Teichen und Seen.
• Das Gerät sollte von einem autorisiertem Servicetechniker gewartet werden wenn: - Das Stromanschlusskabel oder der Stecker beschädigt wurde oder - Das Gerät heruntergefallen ist oder Flüssigkeit eingedrungen ist oder - Das Gerät Regen ausgesetzt war oder - Das Gerät nicht fehlerfrei arbeitet bzw.
TONARM Typ Effektive Armlänge Phono Ausgangs-Level Line Ausgangs-Level Frequenzbereich Kanal Trennung Kanal Gleichgewicht Statisch ausgewogener S-förmiger Arm mit abnehmbarem System 230.5mm 1.5~3.6mV at 1KHz 5cm/sec (HP-4005) 90~216mV aan 1KHz 5cm/sec (HP-4005) 20Hz-20KHz Mehr als 15 dB Von 2.5dB bis 1KHz ALLGEMEIN Stromkabel Stromverbrauch Abmessungen Gewicht AC115/230V, 60/50Hz 9 Watt 449 (B) x 370 (T) x 145 (H) mm 3.
3. START/STOP KNOPF Diesen Knopf drücken um den Plattenteller zu starten oder zu stoppen 4. PHONO/LINE SCHALTER Schaltet die Ausgabe entweder auf Phono - oder Line-Ebene. 5. PLATTENTELLERGESCHWINDIGKEIT * Den “33” Knopf drücken um die Geschwindigkeit 33 rpm auszuwählen. * Den “45” Knopf drücken um die Geschwindigkeit 45 rpm auszuwählen. 6. AUFNAHME/STOP KNOPF Drücken Sie die Taste um die Aufnahme zu starten, drücken Sie die Taste erneut um die Aufnahme zu stoppen. 7.
BEDIENUNG 1. Schalten Sie das Gerät mit dem Hauptschalter ein. 2. Montieren Sie die Nadelbeleuchtung, um die Nadel bei Dunkelheit besser erkennen zu können. 3. Legen Sie eine Platte auf den Plattenteller. Wenn Sie eine 7“ Platte mit großer Öffnung in der Mitte spielen möchten, nutzen Sie den 45 RPM Adapter und legen Sie ihn in die Mitte des Plattentellers. 4. Stellen Sie die Plattenteller Geschwindigkeit auf die entsprechende Platte ein 5. Lösen Sie die Halteklammer des Tonarmes 6.
SET-UP AUFBAU: Bevor Sie beginnen, stellen Sie schicher, dass alle Teile und Zubehör intakt sind. Bitte verwenden Sie hierfür die aufgeführte Checkliste * Bedienungsanleitung * Anschlusskabel * Splimat * Plattenteller * 45 rpm Adapter * System * Stromkabel * Kontergewicht Hinweis: * Verbinden Sie den Netzstecker erst nach Abschluss der Montage. * Bevor das Gerät einschalten, stellen Sie nochmals sicher, dass alle Anschlüsse korrekt eingestellt sind.
SET-UP a. Entfernen Sie die Schutzhülle falls vorhanden und berühren Sie die Nadel nicht. b. Stellen Sie die Tonarm Stütze mit Hilfe des Hebels auf minimale Höhe ein. c. Lösen Sie den Tonarm Halter und nehmen Sie den Tonarm vom Halter herunter. d. Setzen Sie anti-skating auf 0 e. Drehen Sie das Kontergewicht und balancieren Sie den Tonarm so ein, das er nicht nach vorn oder hinten fällt. f. Legen Sie den Tonarm danach wieder auf den Halter und befestigen Sie ihn. g.
Ausgangsanschlüsse L (weiss) R (rot) Verstärker (Receiver) L Kanal R Kanal Sie können auch ein Phono/Line Signal zum Verstärker senden. Nutzen Sie dazu den Ausgangswahlschalter hinten am Gerät. Set the PHONO/LINE switch to “PHONO” Set the PHONO/LINE switch to “LINE” Sollten Sie irgendwann zu späterer Zeit dieses Produkt entsorgen wollen, beachten Sie bitte Folgendes: Elektroschrott sollte nicht mit dem Haushaltsmüll entsorgt werden.
L-80 USB Draaitafel MP3 recorder GEBRUIKSAANWIJZING (NEDERLANDS)---------------------------------------------------------P19-P27 INHOUDSTAFEL: ● VEILIGHEIDSVOORSCHRIFTEN ● KNOPPEN EN FUNCTIES ● SPECIFICATIES ● BEDIENING
GEBRUIKSAANWIJZING L-80 USB VEILIGHEIDSVOORSCHRIFTEN 1. Lees deze voorschriften. 2. Bewaar deze voorschriften. 3. Neem alle waarschuwingen in acht. 4. Volg alle voorschriften. 5. Houd dit toestel uit de buurt van water. 6. Maak het enkel schoon met een vochtige doek. 7. Blokkeer de ventilatieopeningen niet. Installeer dit toestel volgens de voorschriften van de producent. 8.
Het symbool van de bliksemschicht met pijl in de gelijkzijdige driehoek wijst de gebruiker op de aanwezigheid van niet-geïsoleerde “gevaarlijke spanning” binnenin het toestel, dewelke voldoende groot kan zijn om een risico tot elektrische schok in te houden. Het uitroepteken in de gelijkzijdige driehoek wijst de gebruiker op de aanwezigheid van belangrijke bedienings- en onderhoudsinstructies in de literatuur meegeleverd bij dit toestel.
ALGEMEEN Stroomvoorziening Stroomverbruik Afmetingen Gewicht AC115/230V, 60/50Hz 9 Watt 449 (W) x 370 (D) x 145 (H) mm 3.8 Kg NOOT: Ten gevolge van verbeteringen zijn er zonder voorafgaande kennisgeving revisies mogelijk aan de specificaties en ontwerp van dit toestel. KNOPPEN EN FUNCTIES 1. USB UITGANG USB opname enkel in MP3-formaat 2. DRAAISCHIJF 3. START/STOP KNOP Druk op deze knop om de draaischijf te starten of te stoppen. 4. PHONO/LINE SCHAKELAAR Schakelt de output naar Phono of Line. 5.
7. BLOKKEERSCHROEF VAN DE SYSTEEMDRAGER Bevestig de systeemdrager door deze in het voorste uiteinde van de pick-up arm te schuiven, draai daarna de blokkeerschroef in wijzerzin. 8. SCHUIFKNOP VOOR TOONHOOGTE Gebruik deze om de snelheid van de draaischijf aan te passen. Wanneer u de SCHUIFKNOP VOOR TOONHOOGTE beweegt, zal de indicator voor toonhoogte niet oplichten. Enkel wanneer de SCHUIFKNOP VOOR TOONHOOGTE op 0% staat, zal de indicator voor toonhoogte oplichten. 9. S-VORMIGE PICK-UP ARM 10.
BEDIENING 1. Druk op de stroomschakelaar om het toestel aan te zetten. 2. Breng het verlichtingslampje voor de naald in. 3. Plaats een plaat op de draaischijf. Plaats de 45 TPM ADAPTER op de hoofdas indien u een 45tpm plaat met groot gat in het midden afspeelt. 4. Stel de draaisnelheid (33/45) in overeenkomstig met de plaat. 5. Laat de armklem los. 6. Zet de hefboom van de pick-up arm lift in de hoogste stand. 7. Druk op de START/STOP KNOP, waarop de draaischijf zal beginnen draaien. 8.
SET-UP MONTEREN: Verifieer of alle onderdelen en accessories intact werden geleverd voor u begint met monteren. Gelieve de onderstaande checklist te gebruiken om de onderdelen en accessories te identificeren en ordenen. * Gebruiksaanwijzing * RCA kabel * Slipmat * Draaischijf * 45 tpm adapter * Systeemdrager * AC snoer * Tegengewicht Noot: * Steek de wisselstroomstekker niet in alvorens de montage voltooid is.
SET-UP 7 Tegengewicht: a. Haal de naald uit haar beschermende verpakking, indien aanwezig. Raak de naald nooit aan tijdens het afstellen. b. Laat de hefboom van de pick-up arm zakken. c. Geef de pick-up arm klem vrij en laat de pick-up arm uit de armsteun gaan. d. Stel de anti-schuif regelaar in op nul. e. Draai het tegengewicht in willekeurige richting totdat de pick-up arm perfect horizontaal in balans is (vrij zwevend) f. Breng de pick-up arm terug naar de steun en klem deze hierin vast. g.
Output terminals L (Wit) R (Rood) Versterker(Ontvanger) L CH R CH U kan eveneens met line input werken, door de phone/line schakelaar aan de achterzijde van de draaitafel op line te zetten. Set the PHONO/LINE switch to “PHONO” Set the PHONO/LINE switch to “LINE” Indien u zich in de toekomst van dit toestel wenst te ontdoen, let er dan op dat elektrisch afvalmateriaal niet met het huishoudelijk afval mag worden verwijderd. Breng het toestel naar een kringloopwinkel of anderevoorziening voor recycling.
L-80 USB Platine enregistreur MP3 MANUAL D’UTILISATION (FRANÇAIS)---------------------------------------------------------P28-P36 SOMMAIRE: ● INSTRUCTIONS DE SÉCURITÉ ● COMMANDE ET FONCTIONS ● CARACTERISTIQUES ● OPERATIONS
MANUEL D’UTILISATION L-80 USB INSTRUCTIONS DE SECURITE 1. Lisez les instructions 2. Gardez précieusement le manuel d’utilisation 3. Respecter tous les avertissements 4. Suivez toutes les instructions 5. N’utilisez pas l’appareil près de l’eau 6. Nettoyez l’appareil avec un chiffon doux 7. N’obstruez pas les ouvertures de ventilation. Installez en respectant les recommendation du fabricant 8.
ATTENTION Pour empêcher les décharges électriques, ne pas utiliser cette prise polarisée avec une rallonge. Empêcher tout introduction d’objet dans le réceptable pour éviter tout risque d’incident. CARACTERISTIQUES TOURNE DISQUE Type Moteur Mode d’entrainement Plateau Vitesse Fonctione USB Wow et Flutter S/N ratio Pitch Temps de démarrage Temps de freinage Temps de changement de vitesse 2-vitesse manuelle Moteur DC Entrainement courroie 330mm dia.
CONTROLE ET FONCTION 1. PRISE USB USB record uniquement en format MP3. 2. PLATEAU 3. BOUTON START/STOP Appuyez sur ce bouton pour démarrer ou stopper le plateau. 4. INTERRUPTEUR PHONO/LINE Interrupteur de sortie soit au niveau line, soit au niveau phono. 5. VITESSE DU PLATEAU Utilisez pour sélectionner la vitesse désirée. * Appuyez sur le bouton “33” pour sélectionner la vitesse 33rpm. * Appuyez sur le bouton “45” pour sélectionner la vitesse 45rpm. 6.
11. BOUTON MOTEUR OFF/REVERSE Appuyez sur le bouton pour basculer lecture précédente/suivante. Appuyez sur le bouton plus d’1sec. pour arrêter le moteur et le LED clignotera. Appuyez sur le bouton plus d’1 sec. à nouveau pour réactiver le moteur. 12. ADAPTATEUR 45 RPM Cet adaptateur permet de jouer la norme 7” des disques vynils avec de grands trous centraux. 13. TONEARM LEVER Ce levier est employé pour élever sans risqué le bras de tonalité au-dessus de la surface du disque sans mettre en danger celle-ci.
OPERATIONS 1. Appuyez le commutateur sur ON 2. Insérez la cible lumière pour éclairer le stylet 3. Placez un disque sur la feutrine. En jouant un disque de 45t/mn avec un grand trou central, placer d’adaptateur de 45t/mn sur l’axe central. 4. Réglez la vitesse du disque 5. Enlevez la protection de l’aiguille de la tête et puis libérer la bride du bras 6. Placez le levier en le positionnant à la position haute 7. Appuyez sur le bouton start/stop, le plateau du tourne-disque commencera à tourner 8.
ASSEMBLAGE Avant de commencer l’assemblage, soyez sûr que tous appareils et tous les accessories sont arrives intacts. Veuillez contrôler en suivant la liste ci-dessous pour identifier les pieces et les accessories. * Manuel d’utilisateur * câble RCA * Slipmat * Plateau * adaptateur 45 rpm * Tête * AC cord * Contrepoids Remarque : * Ne pas connecter le câble d’alimentation avant l’assemblage complet.
SET-UP a. Retirez le couvercle de protection s’il est équipé. Ne jamais toucher au stylet durant l’ajustement. b. Abaisser le bras de levier c. Relâchez le bras de serrage et relâchez le bras de l'accoudoir. d. Réglez l'anti-skate ajustement à zéro. e. Faites pivoter le contrepoids dans les deux sens jusqu'à ce que le bras est parfaitement équilibré horizontalement (flotteurs librement) f. Retournez le bras de l'accoudoir et de le fixer en place. g.
Fiches de sortie L (Blanc) R (Rouge) Amplificateur (Récepteur) Canal gauche Canal droit Vous pouvez aussi utiliser une entrée ligne en définissant le commutateur phono / line à l'arrière de la platine vinyle. Set the PHONO/LINE switch to “PHONO” Set the PHONO/LINE switch to “LINE” Si vous souhaitez vous débarrasser ultérieurement du produit, veuillez noter que : les déchets électriques ne doivent pas être jetés avec les déchets domestiques.
L-80 USB Plato giradiscos grabador de MP3 MANUAL DEL USUARIO (ESPAÑOL)---------------------------------------------------------P37-P45 CONTENNIDOS: ● INSTRUCCIONES DE SEGURIDAD ● CONTROLES Y FUNCIONES ● ESPECIFICACIONES ● OPERACIONES
MANUAL DEL USUARIO L-80 USB INSTRUCCIONES DE SEGURIDAD 1. Lea estas instrucciones. 2. Conserve estas instrucciones. 3. Haga caso de las advertencias. 4. Siga todas las instrucciones. 5. No haga uso de este aparato cerca del agua. 6. Límpielo sólo con un trapo húmedo. 7. No bloquee ninguna de las aberturas de ventilación. Realice la instalación de acuerdo a las instrucciones del fabricante. 8.
El símbolo del rayo circunscrito en un triángulo equilátero pretende alertar al usuario de la presencia de “voltaje peligroso” no aislado en el interior del producto, que podría ser de la suficiente magnitud como para constituir un riesgo de descarga eléctrica. El signo de exclamación circunscrito en un triángulo equilátero pretende alertar al usuario de la presencia de importantes instrucciones de funcionamiento y mantenimiento (reparación) en los impresos que acompaña a este aparato.
GENERAL Suministro de corriente Consumo eléctrico Dimensiones Peso AC115/230V, 60/50Hz 9 Vatios 449 (W) x 370 (D) x 145 (H) mm 3,8 Kgs NOTA: Las especificaciones y el diseño están sujetos a posibles modificaciones sin previo aviso debido a mejoras. CONTROLES y FUNCIONES 1. TOMA USB Grabación USB sólo para el formato MP3 2. PLATO 3. BOTÓN START/STOP Pulse este botón para encender o parar el plato. 4. INTERRUPTOR PHONO/LINE Cambia la salida al nivel PHONO o al nivel LINE. 5.
7. ROSCA DE BLOQUEO DEL CABEZAL DE AGUJA Fije el cabezal de aguja acoplándolo en el extremo frontal del brazo del tocadiscos, después gire la rosca de bloqueo en el sentido de las agujas del reloj. 8. CONTROL DESLIZANTE DEL TONO Úselo para cambiar la velocidad del plato. Cuando mueva el control deslizante de la velocidad, el indicador no se iluminará. Sólo cuando dicho control se encuentre al 0%, el indicador se iluminará. 9. BRAZO TOCADISCOS CON FORMA DE “S” 10.
FUNCIONAMIENTO 1. Pulse el botón Power, dejándolo en la posición “on”. 2. Introduzca la luz focal para la iluminación de la aguja. 3. Coloque un disco en la goma del giradiscos. Cuando reproduzca un disco a 45rpm con un agujero grande en el centro, coloque el adaptador de 45rpm en el eje central. 4. Seleccione la velocidad de rotación (33/45) que coincida con el disco que quiere reproducir. 5. Deje suelto el brazo tocadiscos. 6. Coloque la palanca de entrada en la posición alzada. 7.
PREPARACIÓN MONTAJE: Antes de empezar con el montaje, por favor, asegúrese de que todas las partes y accesorios están intactos. Por favor, use la lista de comprobación de debajo para identificar y pedir partes y accesorios. * Manual de instrucciones * Cable RCA * Goma de deslizamiento * Plato * Adaptador de 45 rpm * Cabezal de la aguja * Cable AC * Contrapeso Nota: * No conecte el enchufe AC sin antes haber finalizado el montaje.
PREPARACIÓN 7 Contrapeso: a. Retire la protección de la aguja, si así viniera presentado. No toque nunca la punta de la aguja durante el ajuste. b. Baje la palanca del brazo tocadiscos. c. Libere la abrazadera del brazo tocadiscos y levante a este de su apoyo. d. Seleccione el ajuste antideslizamiento en cero. e. Gire el contrapeso en cualquier dirección hasta que el brazo tocadiscos quede horizontalmente equilibrado (flota libremente). f.
Terminales de salida L (Blanco) R (Rojo) Amplificador(Receptor) L CH (Izquierda) R CH (Derecha) También puede usar una entrada LINE seleccionando la opción LINE del interruptor Phono/Line que se encuentra en la parte posterior del plato giradiscos. Set the PHONO/LINE switch to “PHONO” Set the PHONO/LINE switch to “LINE” Si en el futuro necesita deshacerse de este producto, tenga en cuenta lo siguiente: no debe deshacerse de los residuos de productos eléctricos como si fueran residuos domésticos.