Operator’s manual Gebruiksaanwijzing Bedienungsanleitung Manuel de l’utilisateur Manual de Instrucciones (EN) (NL) (DE) (FR) (SP) P01~11 P12~22 P23~33 P34~44 P45~55
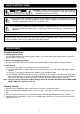
IMPORTANT SAFETY PRECAUTIONS 14. Non-use Periods – The power cord of the appliance should be unplugged from the outlet when left unused for a long period of time. 15. Object and Liquid Entry – Care should be taken so that objects do not fall and liquids are not spilled into the enclosure through openings. 16. Damage Requiring Service – The appliance should be serviced by qualified service personnel when: A. The power-supply cord or the plug has been damaged; or B.
SAFETY INSTRUCTIONS DO NOT OPEN RISK OF ELECTRIC SHOCK CAUTION: To reduce the risk of electric shock, do not remove any cover. No user-serviceable parts inside. Refer servicing to qualified service personnel only. The lightning flash with arrowhead symbol within the equilateral triangle is intended to alert the use to the presence of un-insulated “dangerous voltage” within the product’s enclosure that may be of sufficient magnitude to constitute a risk of electric shock.
SET-UP Some assembly required before you can begin to use your new unit. Please follow the assembly instruction below before attempting to use you new turntable. ASSEMBLY: Before you begin assembly please be sure all parts and accessories have arrived intact. NOTES: y Do not connect the AC power plug before assembly has been completed. y Before turning the power on, make sure once again all the connections and power voltage settings are correct. Always turn off the power when connecting or disconnecting.
SET-UP 6. COUNTERWEIGHT: Locate and remove the tonearm COUNTERWEIGHT from the packaging. Slide COUNTERWEIGHT onto the rear of the TONEARM ASSEMBLY. Turn it lightly and it will screw onto the rear shaft of the tonearm. TONEARM ASSEMBLY COUNTERWEIGHT Turntable Connections: Before connecting the unit it is advised that you also consult your current equipment instruction manual. IMPORTANT: Be sure to turn off the equipment before you make changes to the different connections. 1.
SET-UP Turntable Installation: 1. Do not place the unit in a location where it will be exposed to direct sunlight or near any type of heating appliance. 2. Do not place the unit in a location where there is high humidity or a lot of dust. 3. Cartridge may pick up slight sound pressure or vibrations of near by speakers. For best results, do not install this unit too close to speakers. 4. Install this unit on a horizontal surface that is stable and vibration free. 5.
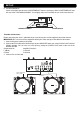
CONTROLS AND FUNCTIONS 19 22 20 21 18 17 1 16 15 2 14 3 13 4 12 5 6 7 8 9 10 11 1. EP ADAPTER This adapter allows you to play standard 7” EP vinyl records with large center holes. Place the adapter on the CENTER SPINDLE 7" records. 2. STROBE INDICATORS The PLATTER has four rows of indicators. These indicators are used to visually detail various stages of pitch. The indicators are illuminated by the STROBE INDICATOR PILOT LAMP. Each row may appear to stand still at different pitch levels.
CONTROLS AND FUNCTIONS 9. S-SHAPED TONE ARM The tonearm is the mechanism that holds the HEAD- SHELL and stylus allowing it to glide across a record. 10. 33-RPM SPEED SELECTOR BUTTON Engaging this button will rotate the platter at 33 revolutions per a minute (RPMs). A function LED will glow when this function is activated. 11. 45-RPM SPEED SELECTOR BUTTONS Engaging this button will rotate the platter at 45 RPMs A function LED will glow when this function is activated. 12.
AUDACITY SOFTWARE OVERVIEW Audacity is free software, licensed under the GNU General Public License (GPL). More information as well as open source code can be found on the CD included or on the web at http://audacity.sourceforge.net/ * Please ensure you have installed the software before starting. Setting up your PC to work with Audacity 1. 2. 3. 4. 5. Connect an input source to the unit. Connect the USB lead to your computer. Install the Audacity recording software. Open the Audacity program.
AUDACITY SOFTWARE OVERVIEW Recording Albums with Audacity 1. Saving a project y Audacity writes all the changed and recorded audio to a directory called Projectname_data, which is located right where you saved the project file itself. y Thus, select Save Project as from your Audacity File tab and choose a location and filename for your project. y Please note that when you startup Audacity fresh, only the “Save As...” menu option is available. 2.
SPECIFICATIONS GENERAL Model: Dimensions: Weight: Power supply: Power consumption: Standard test condition: Digital USB Turntable 450(W) x 350(D) x 139(H)mm 5.36Kg AC 230V~50Hz 11W Ambient Temperature: 20 +/- 2 deg.C Relative Humidity: 65% +/- 5% NOTE: Measurements can be carried out between 5 deg.C to 35 deg.C and 45% to 85% relative humidity.
SERVICE AND SUPPORT For information: www.lenco.com Lenco offers service and warranty in accordance to European law, which means that in case of repairs (both during and after the warranty period) you should contact your local dealer. Important note: It is not possible to send products that need repairs to Lenco directly. Important note: If this unit is opened or accessed by a non-official service center in any way, the warranty expires. This device is not suitable for professional use.
BELANGRIJKE VEILIGHEIDSVOORSCHRIFTEN 14. Periodes zonder gebruik – Haal de voedingskabel van het apparaat uit het stopcontact wanneer voor langere tijd niet gebruikt. 1. Lees de instructies – Alle veiligheid- en 2. 3. 4. 5. 6. gebruiksinstructies dienen te worden gelezen voordat dit product in gebruik wordt genomen. Bewaar de instructies – De veiligheid- en gebruiksinstructies dienen te worden bewaard als eventueel naslagwerk.
VEILIGHEIDSINSTRUCTIES LET OP RISICO ELEKTRISCHE DOOP NOT OPEN SCHOKKEN; NIET OPENEN RISK OF ELECTRIC SHOCK LET OP! Verwijder de afdekking niet om het risico op elektrische schokken te verminderen. Geen interne onderdelen die de gebruiker zelf kan repareren. Laat reparaties over aan uitsluitend gekwalificeerd onderhoudspersoneel.
INSTELLING Voordat u uw nieuwe apparaat kunt gebruiken, is er wat assemblage vereist. Volg a.u.b. de montage-instructies hieronder voordat u probeert uw nieuwe platenspeler te gebruiken. MONTAGE: Voordat u met de assemblage begint, controleer a.u.b. of alle onderdelen en accessoires intact zijn geleverd. OPMERKING: Sluit de netstekker niet aan voordat de assemblage is voltooid. Voordat u het apparaat inschakelt, dient u nogmaals te controleren dat alle aansluitingen en stroominstellingen correct zijn.
INSTELLING 6. TEGENGEWICHT: Haal het TEGENGEWICHT voor de toonarm uit de verpakking. Schuif het TEGENGEWICHT op de achterzijde van de TOONARMASSEMBLAGE. Draai het lichtjes om het op de achteras van de toonarm te schroeven. TOONARMASSEMBLAGE TEGENGEWICHT Aansluitingen platenspeler: Voordat u het apparaat aansluit, is her raadzaam ook de gebruikshandleiding te raadplegen van uw huidige apparatuur.
INSTELLING De platenspeler installeren: 1. Plaats het apparaat niet op een plek blootgesteld aan direct zonlicht of in de buurt van enigerlei type 2. 3. 4. 5. verwarmingsapparatuur. Plaats het apparaat niet op een plek met een hoge luchtvochtigheid of teveel stof. De patroon kan lichte geluidsdruk of trillingen oppikken van luidsprekers in de buurt van het apparaat. Installeer dit apparaat voor de beste resultaten dus niet te dicht in de buurt van luidsprekers.
BEDIENINGEN EN FUNCTIES 19 22 20 21 18 17 1 16 15 2 14 3 13 4 12 5 6 7 8 9 10 11 1. EP-ADAPTER U kunt deze adapter gebruiken om standaard 7” langspeelplaten met grote middengaten af te spelen. Plaats de adapter op de MIDDENAS 7” platen. 2. STROBE-INDICATOREN Het PLATEAU is voorzien van 4 rijen indicatoren. Deze indicatoren worden gebruikt voor een visuele vertegenwoordiging van de verschillende fases van de pitch. De indicatoren worden opgelicht door het STROBE-INDICATIELAMPJE.
BEDIENINGEN EN FUNCTIES 9. S-VORMIGE TOONARM De toonarm is een houdermechanisme voor de KOPBEHUIZING en naald, waardoor de naald over de plaat kan glijden. 10. 33-TPM SNELHEIDSSCHAKELAAR Druk op deze knop om het plateau op 33 toeren per minuut (TPM) te laten draaien. Er zal een functie-LED branden wanneer deze functie is geactiveerd. 11. 45-TPM SNELHEIDSSCHAKELAAR Druk op deze knop om het plateau op 45 toeren per minuut (TPM) te laten draaien.
OVERZICHT AUDACITY SOFTWARE Audacity is gratis software, onder licentie van de GNU Algemene Publieke Licentie (GPL). Meer informatie en tevens open broncodes zijn te vinden op de meegeleverde CD of op de website http://audacity.sourceforge.net/ * Zorg er a.u.b. voor dat de software is geïnstalleerd voordat u van start gaat. Uw PC instellen om met Audacity te werken 1. Sluit een ingangsbron aan op het apparaat. 2. Sluit de USB-kabel aan op uw computer. 3. Installeer de Audacity opnamesoftware. 4.
OVERZICHT AUDACITY SOFTWARE Albums opnemen met Audacity 1. Een project opslaan Audacity schrijft alle veranderde en opgenomen audio naar een folder met de naam Projectname_data, te vinden rechts van waar u het projectbestand zelf hebt opgeslagen. Selecteer dus Save Project as (project opslaan als) op het tabblad Audacity Bestand en kies een locatie en bestandsnaam voor uw project. Vergeet a.u.b. niet dat als u Audacity opnieuw start, alleen de menuoptie “Save As...” (opslaan als) beschikbaar is. 2.
SPECIFICATIES ALGEMEEN Model: Afmetingen: Gewicht: Stroomvoorziening: Opgenomen vermogen: Standaard testconditie: Digitale USB-platenspeler 450 (B) x 350 (D) x 139 (H) mm 5,36 Kg AC 230 V~50 Hz 11 W Omgevingstemperatuur: 20 +/- 2 graden C Relatieve vochtigheid: 65% +/- 5% OPMERKING: Metingen kunnen worden uitgevoerd tussen 5 graden C tot 35 graden C en met een relatieve vochtigheid van 45% tot 85%.
SERVICE EN ONDERSTEUNING Voor informatie: www.lenco.com Lenco biedt service en garantie aan overeenkomstig met de Europese wetgeving. Dit houdt in dat u, in het geval van reparaties (zowel tijdens als na de garantieperiode), uw lokale handelaar moet contacteren. Belangrijke opmerking: Het is niet mogelijk om producten die gerepareerd moeten worden direct naar Lenco te sturen.
WICHTIGE SICHERHEITSVORKEHRUNGEN 14. Nichtgebrauch – Trennen Sie das Netzkabel während längerer Zeiten des Nichtgebrauchs vom Netzstrom. 1. Anleitungen lesen – Lesen Sie vor der Nutzung des Produkts alle Sicherheits- und Gebrauchsanleitungen durch. 2. Anleitungen aufbewahren – Bewahren Sie diese Sicherheits- und Gebrauchsanleitungen für ein zukünftiges Nachschlagen gut auf. 3. Warnungen beachten – Beachten Sie alle Warnungen auf dem Gerät und in der Bedienungsanleitung. 4.
SICHERHEITSANWEISUNGEN ACHTUNG RISIKO VON ELEKTROSCHOCK DO NOT OPEN NICHT ÖFFNENSHOCK RISK OF ELECTRIC ACHTUNG! Um die Gefahr eines Stromschlags zu vermeiden, die Abdeckungen nicht öffnen. Es befinden sich keine vom Nutzer zu wartenden Teile im Inneren. Wartungsarbeiten nur von qualifizierten Fachkräften durchführen lassen.
SETUP Vor dem Gebrauch Ihres neuen Geräts sind einige Installationsschritte durchzuführen. Bitte befolgen Sie die nachfolgenden Installationsanleitungen, bevor Sie Ihren neuen Plattenspieler in Betrieb nehmen. INSTALLATION: Vergewissern Sie sich vor der Installation, dass alle Komponenten und Zubehörteile vollständig und unversehrt sind. HINWEIS: Schließen Sie den AC-Netzstecker erst nach vollständiger Montage an.
SETUP 6. GEGENGEWICHT: Nehmen Sie das GEGENGEWICHT des Tonarms aus der Verpackung. Schieben Sie das GEGENGEWICHT hinten auf den TONARM. Drehen Sie es leicht, um es auf den rückseitigen Schaft des Tonarms anzuschrauben. TONARM GEGENGEWICHT Anschlüsse des Plattenspielers: Lesen Sie die Bedienungsanleitungen aller zu verbindenden Geräte sorgfältig durch. WICHTIG: Schalten Sie alle Geräte aus, bevor Sie Änderungen an den Anschlüssen vornehmen. 1. Schließen Sie das Netzkabel an eine AC-Steckdose an. 2.
SETUP Installation des Plattenspielers: 1. Stellen Sie das Gerät nicht an Orten mit direkter Sonneneinstrahlung oder in der Nähe von Heizgeräten auf. 2. Stellen Sie das Gerät nicht an sehr feuchten oder schmutzigen Orten auf. 3. Der Tonabnehmer nimmt möglicherweise den Druck oder leichte Vibrationen umliegender Lautsprecher auf. Installieren Sie das Gerät im Hinblick auf eine optimale Wiedergabe daher nicht in unmittelbarer Nähe von Lautsprechern. 4.
TASTEN UND FUNKTIONEN 19 22 20 21 18 17 1 16 15 2 14 3 13 4 12 5 6 7 8 9 10 11 1. EP-ADAPTER Dieser Adapter ermöglicht Ihnen, herkömmliche 7" EP-Vinylschallplatten mit größeren Mittellöchern abzuspielen. Setzen Sie den Adapter für 7" Schallplatten auf die MITTLERE SPINDEL. 2. STROBOSKOP-ANZEIGEN Der Plattenteller verfügt über vier Reihen mit Anzeigen. Diese Anzeigen weisen visuell auf die unterschiedlichen Tonhöheneinstellungen hin.
TASTEN UND FUNKTIONEN 9. S-FÖRMIGER TONARM Der Tonarm ist der Mechanismus, der die TONABNEHMERFASSUNG und die Tonabnehmernadel festhält und diesen ermöglicht, über die Schallplatte zu gleiten. 10. REGLER FÜR 33 U/MIN Wenn Sie diese Taste aktivieren, dreht sich der Plattenteller mit einer Geschwindigkeit von 33 Umdrehungen pro Minute (U/min). Bei aktivierter Funktion leuchtet eine LED-Anzeige. 11.
ÜBERSICHT DER AUDACITY SOFTWARE Audacity ist eine kostenlose Software unter Lizenz von GNU General Public License (GPL). Nähere Informationen sowie den offenen Quellcode finden Sie auf der mitgelieferten CD bzw. im Internet unter http://audacity.sourceforge.net/ * Vergewissern Sie sich, dass Sie die Software vor der Inbetriebnahme installiert haben. Vorbereitung des PCs für die Verwendung von Audacity 1. Verbinden Sie eine Eingangsquelle mit dem Gerät. 2. Schließen Sie das USB-Kabel an Ihren Computer an.
ÜBERSICHT DER AUDACITY SOFTWARE Alben mit Audacity aufnehmen 1. Projekte speichern Audacity speichert alle geänderten und aufgenommen Audioinhalte in einem Verzeichnis mit dem Namen Projectname_data. Dieses Verzeichnis befindet sich genau dort, wo das Projekt selbst gespeichert ist. Wählen Sie also unter Audacity-Datei die Option Save Project as (Projekt speichern unter) und wählen Sie dann einen Speicherort und einen Dateinamen für Ihr Projekt aus.
TECHNISCHE DATEN ALLGEMEIN Modell: Abmessung: Gewicht: Stromversorgung: Leistungsaufnahme: Standardtestbedingungen: Digitaler USB-Plattenspieler 450 (Breite) x 350 (Tiefe) x 139 (Höhe) mm 5,36 kg AC 230 V~ 50 Hz 11 W Umgebungstemperatur: 20 +/- 2 Grad Celsius Relative Feuchtigkeit: 65% +/- 5% HINWEIS: Messungen können bei Temperaturen zwischen 5 und 35 Grad Celsius und bei einer relativen Feuchtigkeit von 45% bis 85% durchgeführt werden.
SERVICE UND UNTERSTÜTZUNG Weitere Informationen: www.lenco.com Lenco bietet Leistungen und Garantien im Einklang mit Europäischem Recht. Im Falle von Reparaturen (sowohl während als auch nach Ablauf der Garantiezeit) sollten Sie deshalb Ihren Einzelhändler kontaktieren. Wichtiger Hinweis: Es ist nicht möglich, Geräte für Reparaturen direkt an Lenco zu schicken. Wichtiger Falls dieses Gerät von einem nicht autorisierten Kundendienst geöffnet oder darauf zugegriffen wird, Hinweis: erlischt die Garantie.
PRECAUTIONS DE SECURITE IMPORTANTES 14. Périodes d’inutilisation - Le fil d’alimentation doit être débranché de la prise quand l’appareil n’est pas utilisé sur une longue période. 15. Entrée d’objet ou de liquide - Il faut attention à ce qu’aucun objet ne tombe et que des liquides ne soient répandus dans le boitier par les ouvertures. 16. Dégâts demandant une révision - L’appareil doit être révisé par du personnel qualifié quand : A. Le fil d’alimentation ou la fiche ont été endommagés ; ou B.
PRÉCAUTIONS D'EMPLOI ATTENTION RISQUEDO DE NOT CHOCOPEN ÉLECTRIQUE, NEELECTRIC PAS OUVRIRSHOCK RISK OF ATTENTION ! Pour éviter une électrocution, ne retirer aucun capot. Pas de pièce réparable à l’intérieur. Ne faire effectuer une révision que par du personnel qualifié.
MISE EN ŒUVRE Un assemblage est requis avant d’utiliser votre nouvelle unité. Veuillez suivre les instructions de montage avant d’essayer d’utiliser votre nouveau tourne-disque. MONTAGE : Avant de commencer le montage, veuillez vous assurer que toutes les pièces et accessoires sont intacts. REMARQUES : Ne pas brancher avant que le montage ne soit complet. Avant de mettre en marche, s’assurer une nouvelle fois que toutes les connexions et la tension sont correctes.
MISE EN ŒUVRE 6. CONTREPOIDS : Situer et retirer le CONTREPOIDS de bras de son emballage. Glisser le CONTREPOIDS à l’arrière du BRAS. Le tourner légèrement et il se visse sur l’arbre arrière du bras. BRAS CONTREPOIDS Connexions du tourne-disque : Avant de connecter l’unité, il est conseillé de consulter le manuel d’instruction. IMPORTANT : S’assurer d’éteindre l’équipement avant d’effectuer des changements de connexion. 1. Connecter le fil d’alimentation sur une prise AC. 2.
MISE EN ŒUVRE Installation de tourne-disque : 1. Ne pas placer l’unité sous les rayons directs du soleil ou près d’un appareil de chauffage. 2. Ne pas placer l’unité dans un endroit très humide ou plein de poussière. 3. La pointe de lecture peut subir une pression sonore ou des vibrations des haut-parleurs s’ils sont près. Pour de meilleurs résultats, ne pas installer cette unité trop près des haut-parleurs. 4. Installer cette unité sur une surface horizontale et stable et ne subissant pas de vibration. 5.
CONTRÔLES ET FONCTIONS 19 22 20 21 18 17 1 16 15 2 14 3 13 4 12 5 6 7 8 9 10 11 1. ADAPTATEUR EP Cet adaptateur vous permet de lire des disques vinyle de 7” (17 cm) avec des grands trous centraux. Placer l’adaptateur sur la TIGE CENTRALE pour les disques 7”. 2. INDICATEURS STROBOSCOPIQUES Le PLATEAU est muni de quatre rangées d’indicateurs. Ces indicateurs servent à détailler visuellement les divers stades de vitesse. Les indicateurs sont éclairés par la LAMPE STROBOSCOPIQUE.
CONTRÔLES ET FONCTIONS 9. BRAS EN FORME DE S Le bras est le mécanisme qui maintient la TÊTE DE LECTURE et la pointe pour qu’elles glissent sur le disque. 10. SÉLECTEUR 33 TOURS Appuyer sur cette touche fait tourner le plateau à 33 tours par minute (trs/m). Une LED est allumée quand cette fonction est activée. 11. SÉLECTEUR 45 TOURS Appuyer sur cette touche fait tourner le plateau à 45 trs/m. Une LED est allumée quand cette fonction est activée. 12.
VUE D’ENSEMBLE DU LOGICIEL AUDACITY Audacity est un logiciel gratuit, licencié sous GNU Licence Publique Générale (GPL). Plus d’informations, de même que le code de source ouverte peuvent être trouvés sur le CD inclus ou sur le Web à http://audacity.sourceforge.net/ * Veuillez vous assurer que vous avez installé le logiciel avant de commencer. Paramétrer votre PC avant de travailler avec Audacity 1. Connecter une source d’entrée à l’unité. 2. Connecter la fiche USB sur votre ordinateur. 3.
VUE D’ENSEMBLE DU LOGICIEL AUDACITY Enregistrement d’album avec Audacity 1. Sauvegarde d’un projet Audacity inscrit tous les audios changés et enregistrés sur un répertoire appelé Projectname_data, situé à droite d’où vous avez sauvegardé le fichier de projet lui-même. Puis, sélectionner Save Project as (Sauvegarder le projet sous) sur le Fichier Audacity, et choisir un endroit et un nom de fichier pour votre projet.
CARACTÉRISTIQUES TECHNIQUES CARACTÉRISTIQUES GÉNÉRALES Modèle : Dimensions : Poids : Alimentation électrique : Puissance consommée : Conditions de test standard : Tourne-disque USB numérique 450 (L) x 350 (P) x 139 (H) mm 5,36 Kg AC 230 V ~ 50 Hz 11 W Température ambiante : 20 +/- 2 °C Humidité relative : 65% +/- 5% REMARQUE : Les mesures peuvent être effectuées entre 5 et 35°C, et avec 45 à 85% d’humidité relative.
SERVICE ET ASSISTANCE Pour obtenir des informations : www.lenco.com Lenco propose un service et une garantie conformément à la législation européenne, ce qui signifie qu’en cas de besoin de réparation (aussi bien pendant et après la période de garantie), vous pouvez contacter votre revendeur le plus proche. Remarque importante : Il n’est pas possible de renvoyer l’appareil pour réparation directement à Lenco.
PRECAUCIONES DE SEGURIDAD IMPORTANTES 14. Periodos de no uso: se debe desenchufar el cable eléctrico del aparato de la toma cuando no se use durante un periodo de tiempo prolongado. 15. Entrada de líquidos y objetos: se deben tomar precauciones para que no caigan objetos ni se derramen líquidos dentro de la carcasa a través de las aberturas. 16. Daños que requieren reparación: un técnico cualificado deberá reparar el aparato si: A. El cable eléctrico o el enchufe han quedado dañados; o B.
INSTRUCCIONES DE SEGURIDAD PRECAUCIÓN RIESGO DE DESCARGA DO NOT OPEN NO ABRIR RISKELÉCTRICA OF ELECTRIC SHOCK ¡PRECAUCIÓN! No quite ninguna cubierta para reducir el riesgo de descargas eléctricas. No contiene piezas reparables por el usuario. Las reparaciones solo deben realizarlas técnicos cualificados.
INSTALACIÓN Es necesario montar la nueva unidad antes de empezar a usarla. Lea las siguientes instrucciones de montaje antes de intentar usar su nuevo tocadiscos. MONTAJE: Antes de empezar con el montaje, asegúrese de que todas las piezas y accesorios hayan llegado intactos. NOTA: No conecte el enchufe eléctrico antes de terminar el montaje. Antes de encender la corriente, vuelva a asegurarse de que todas las conexiones y los ajustes de tensión eléctrica sean correctos.
INSTALACIÓN 6. CONTRAPESO: Encuentre y saque el CONTRAPESO del brazo del embalaje. Deslice el CONTRAPESO hacia la parte trasera del CONJUNTO DEL BRAZO. Gírelo un poco y atorníllelo al eje trasero del brazo. CONJUNTO DEL BRAZO CONTRAPESO Conexiones del tocadiscos: Se recomienda consultar el manual de instrucciones de su equipo actual antes de conectar la unidad. IMPORTANTE: Asegúrese de apagar el equipo antes de hacer cambios en las conexiones. 1. Conecte el cable eléctrico a una toma de CA. 2.
INSTALACIÓN Instalación del tocadiscos: 1. No coloque la unidad en un lugar expuesto a la luz directa del sol ni cerca de un aparato de calefacción de cualquier tipo. 2. No coloque la unidad en un lugar con un nivel de humedad elevado o con mucho polvo. 3. El cartucho puede percibir vibraciones o presiones acústicas ligeras de altavoces cercanos. No instale esta unidad muy cerca de altavoces para conseguir los mejores resultados. 4. Instale esta unidad en una superficie horizontal estable y sin vibraciones.
CONTROLES Y FUNCIONES 19 22 20 21 18 17 1 16 15 2 14 3 13 4 12 5 6 7 8 9 10 11 1. ADAPTADOR DE EP Este adaptador permite reproducir discos de vinilo de 7” estándar con agujeros centrales grandes. Coloque el adaptador sobre el PERNO CENTRAL de un disco de 7”. 2. INDICADORES ESTROBOSCÓPICOS El PLATO tiene cuatro filas de indicadores. Estos indicadores se usan para informar visualmente de las diferentes fases de la modulación. La LUZ PILOTO INDICADORA ESTROBOSCÓPICA ilumina los indicadores.
CONTROLES Y FUNCIONES 9. BRAZO EN FORMA DE S El brazo es el mecanismo que sostiene la CARCASA y la aguja permitiendo que ésta se deslice por el disco. 10. BOTÓN SELECTOR DE VELOCIDAD DE 33 RPM Al activar este botón, el plato girará a 33 revoluciones por minute (rpm). Cuando esta función esté activada, se encenderá un LED. 11. BOTÓN SELECTOR DE VELOCIDAD DE 45 RPM Al activar este botón, el plato girará a 45 rpm. Cuando esta función esté activada, se encenderá un LED. 12.
RESUMEN DEL SOFTWARE AUDACITY Audacity es un software gratuito con la Licencia Pública General (GPL, por sus siglas en inglés) de GNU. Puede encontrar más información y el código fuente abierto en el CD incluido o en la página web http://audacity.sourceforge.net/ * Asegúrese de instalar el software antes de empezar. Configurar el PC para trabajar con Audacity 1. Conecte una fuente de entrada a la unidad. 2. Conecte el cable USB al ordenador. 3. Instale el software de grabación Audacity. 4.
RESUMEN DEL SOFTWARE AUDACITY Grabar álbumes con Audacity 1. Guardar un proyecto Audacity escribe todo el audio grabado y modificado en un directorio llamado Projectname_data, ubicado donde se guardó el archivo de proyecto. Por tanto, seleccione Save Project as (Guardar proyecto como) en la pestaña Archivo (File) de Audacity y elija una ubicación y nombre de archivo para el proyecto. Tenga en cuenta que cuando inicie Audacity por primera vez sólo estará disponible la opción “Save As...
ESPECIFICACIONES GENERAL Modelo: Dimensiones: Peso: Alimentación eléctrica: Consumo de energía: Condiciones de prueba estándar: Tocadiscos USB digital 450 (An) x 350 (P) x 139 (Al) mm 5,36 kg 230 V CA-50 Hz 11 W Temperatura ambiente: 20 +/- 2 °C Humedad relativa: 65% +/- 5% NOTA: Se pueden realizar mediciones entre 5 °C y 35 °C y una humedad relativa de 45% a 85%.
SERVICIO Y ASISTENCIA Para más información: www.lenco.com Lenco ofrece servicio y garantía en cumplimiento con las leyes de la Unión Europea, lo cual implica que, en caso de que su producto precise ser reparado (tanto durante como después del periodo de garantía), deberá contactar directamente con su distribuidor. Nota importante: No es posible enviar sus reparaciones directamente a Lenco. Nota importante: Si la unidad es abierta por un centro de servicio no oficial, la garantía quedará anulada.