USER’S MANUAL Xemio-645 , 654 , 655 , 664 Media Player For information and support, www.lenco.
Warnings Don’ts • Do not place naked flames, such as lighted candles on or near the product. • Do not place objects filled with liquids, such as vases on or near the product. • Do not use or store this product in a place where it is subject to direct sunlight, heat, excessive dust or vibration. • Do not use this product with wet hands. • Do not clean this product with water or other liquids. • Do not block or cover the slots and holes in the product.
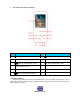
1. Get to know the controls on Player Item Description Item 1 TFT Display 7 2 Micro SD Memory Card Slot 8 USB Mini Connector 9 Main Power Switch (ON - OFF) Mic 3 (Previous / Fast-Rewind / VOL-) 4 VOL (Volume Control) 10 5 M (Menu / Enter / Select) 11 6 Description (Play / Pause / Standby ON - OFF) Earphone Output Jack (Next / Fast-Forward / VOL+) About Player Battery Player has an internal, non–user-replaceable battery.
Note: Player continues to use battery power after it’s been turned off, if unit isn’t used for a while, the battery might need to be charged. a. Charging the Battery: You can charge the player battery in two ways: Connect player to your computer. Or, Use the USB power charger. (available separately) b.
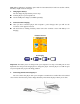
a. To Connecting Player To connect player to your computer, plug the connector of USB Cable into a USB port on your computer, and connect the other end to player, then the “Connect” screen appear for view. Now the player is ready for media files transfer with your computer and the battery is charging. You can transfer the media files by using the computer mouse use drag and place, or copy and paste, in between the player and your computer. Disconnect it when you’re done. b.
(If Picture chooses) (If Text chooses) (If Game chooses) (If Setting chooses) 4. Use Setup Menu You might need to set date & time or change some default setting as you desired in setup sub menu before you start to use the player. / button and then To go into setup menu, from main menu, choose “Setup” by use press M button, a “Setting” menu appears to use. You can go back to previous menu by press the button during in setup menu. Or, press and hold the M button to return to main menu.
b. To change “LCD set” You can set the backlight to illuminate the screen for a certain amount of time as you desired or make the backlight to always ON when every time you turn ON the player. To change LCD backlight, choose “LCD set” > choose “Dark mode”, a level bar with number appear then chose “0 (always On) / 5 / 10 / 15 / 20 / 25 / 30 / 35 / 40 / 45 / 50 seconds” as you desired by using M and / buttons. Choose “0” to prevent the LCD backlight from turning to off.
will be losses. Choose “Format Device” then choose “Format Disk / Format Card” by using M and / buttons, and then choose OK to process or choose Cancel to exit and back to setup menu. h. To View “Firmware Version” You might need to view the details about firmware information inside the Player. Choose “Firmware version” by using M and appear for view. To return to setup menu or main menu, press / buttons, an information screen button or press and hold M button. i.
c. Use Fast-Forward or Fast-Backward Press and hold button to use fast-forward Press and hold d. Adjust volume level In music playing , press “VOL” button, a change volume control screen appears, then press / buttons to adjust volume levels to down / up ( 0 – 40). Wait for 6 – 8 seconds or press button to return to music now playing screen. e. button to use fast-backward. Use Lyric Display This player supports “*.
d. Exit Select Exit to back to music now playing screen. 7. Use Music Submenu in Music Playing Mode You might need to do some changes for music playing, such as repeat, EQ settings for music files… etc. To change setting: a. To Set Repeat In music playing mode, press M button, a Music Submenu appear, then choose “Repeat”, then choose “Normal / Repeat one / Folder / Repeat folder / Repeat all / Random / Intro” as you desired by using b. / and M buttons.
d. Exit Select Exit to back to music now playing screen. 8. Use Movie Menu a. To Play Movie From Main Menu, choose “Movie” by using / and M button, a “Movie Now Playing” screen appears to use. key to start the play. In Movie Now Playing” screen, press Press button to pause and to back to Movie Now Playing screen. Press it again, the video will play continue. b. To Play Previous or Next Video Press button to play next movie file. Press c.
Once file is selected, press M button and choose “Yes” to confirm or “No” to cancel. c. Delete All In movie submenu screen, choose “Delete all” then selects “Yes / No” by using button. One “YES” or “NO” appear then press M button to confirm. All music files will be deleted once YES is selected and confirmed, a “Deleting” screen appear / for a while and deleting process is in progress, then “Empty disk!” message will shown on screen for few seconds. d.
Run “AMV Convert Tools”, click to choose the folder where to save the AMV files, and then click to select the folder where the original files are. The original file will show in the file window once selected. Select with highlight the unprocessed AMV files in the file window, the highlighted into . And then click icon will be icon and a dialog box will be shown. Choosing pixels of AMV to “128x128” and Frames per second to “middle”, then click OK to confirm.
Note: Only pixels in 160x128 can be supported. 11. Use Record Menu You can use the player as a Voice Recorder and recording voice memos using the built-in microphone. 1. To Start Recording Voice Memo From main menu, choose “Record” by using screen appear to use. / and M buttons, a “Now Recording” “Now Recording” Screen 2. To Start / Pause Recording Press button to start the recording and the recording time is running. Press button to pause the recording and recording time will stop and flashing.
In record submenu, choose “Record type”, then choose “32K BPS / 64K BPS / 128K BPS / 256K BPS” values as you desired by using / and M buttons. 13. Use Voice Menu For playback and manage the recorded voice memos file. From main menu, choose “Voice” menu by using Playing” screen appear to use. / and M buttons, a “Voice Now “Voice Now Playing” Screen a. To Play and Pause Recorded Voice Memos button to start to play the recorded file.
mode, then press M button to call up the voice submenu. In Voice submenu screen, choose “Local folder” a list menu appear, and then select folder and / and M button. / or choose a voice file by using It will go back to music now playing screen once a music file is selected. Then press button to play. b. Delete File In voice submenu screen, choose “Delete file” a list menu appear, and then choose which voice file that you want to delete by using / and M buttons.
To create another A – B distance of track to repeat, press new created A – B distance of track is repeating. To cancel the repeat A – B function, press the M button. Or press button again and then again. a button to pause. Set Replay Times: In voice playing mode, press M button, a Music Sub-menu appear, the choose “Replay times”, then choose “1 / 2 / 3 / 4 / 5 / 6 / 7 / 8 / 9 / 10” as you desired by using / and M buttons.
to use / Play is selected. button to browse next / previous photo in photo playing mode when Manual Choose “Auto play”, a setting menu appear, then choose “2 / 3 / 4 / 5 / 5 / 6 / 7 / 8 / 9 / 10 second(s)” as you desired by using / and M buttons. The slide show function is activated as your selected time gap to playing the photo files one by one automatically. c.
In eBook Submenu, choose “Local folder” a list menu appear, and then choose folder and file by using / button. Once file is selected, press M button then b. Playback Set In eBook Submenu, choose “Playback set” and then choose “Manual play”. You need to use / button to change next / previous page for reading when Manual Play is selected. Or, Choose “Auto play”, a setting menu appears, then choose “1 / 2 / 3 / 4 / 5 / 5 / 6 / 7 / 8 / 9 / 10 button to read. / and M buttons.
up eBook submenu. Choose “Bookmark Add” by using / button and then press M button, the pages is saved into bookmark and go back to current reading page automatically. d. Exit Select Exit for back to eBook list menu screen. 21. Use Memory Card Slot This player allows you to play those support media files from your memory card (T-Flash). Also it will increase the mobile hard disk memory capacity of the player if you use this option. a. To Play From Memory Card: Turn Off the player.
Download of music files fails. * Check whether USB cable is damaged and is connected properly. * Check whether driver is installed correctly. * Check whether the player’s memory is in full. 24. Specification Dimension 82.5 mm (H) x 40 mm (W) x 8.5mm (D) Weight 28g LCD 1.8 Inches, Resolution (RGB)128 x 160 PC connection USB 1.0 / 1.1 / 2.0 Earphone Impedance 32 Ohm Internal Memory See carton Li-ion 3.7V, 150mAh Battery Max. Play Time: > 8 - 10 Hours (MP3 music with power saving mode) Max.